
Top 50 Useful and Simple IPtables Rules for Linux Administrator
One of the main reasons behind the immense popularity enjoyed by Linux is its sheer prowess in networking. Linux powers the majority of business servers in the world due to its robust networking capabilities. It allows system administrators the ability to control their network any way they want. Linux iptables is one such utility which provides sysadmins all they need to manage modern-day networks effectively. It’s a user-space program that allows users to configure their kernel firewall table and manage the chains and rules contained by it using simple iptables rules.
50 Productive IPtables Firewall Rules
People often think hard of iptables firewall rules, but in practice, they’re pretty straightforward once you get going. Fundamental knowledge of the iptables utility and its purpose will make it easier to master the firewall. We have curated this guide carefully and outlined the contents according to that. Start honing your networking skills by practicing these iptables rules for a better view of the subject.
Foundation & Structure of Linux IPtables Rules
The Linux kernel contains a framework called Netfilter for networking purposes. It is simply a stack of kernel routines that provide the barebone networking abilities to our system. The framework is quite low-level and, hence, not feasible for everyday users. Bang, here comes iptables
It is a user-space program, with a neat command-line interface that allows users to utilize Netfilter’s raw power in a concise, well-organized manner. It can inspect, modify, redirect, or drop packets, units of network communications used by our systems.
Iptables act as a firewall by blocking incoming network packets from hostile systems. However, it can do all sorts of networking magic you want it to do. Now, what do iptables consist of? Below the hood, it just contains some tables, chains, and rules.
Deeper Look into IPtables Components
Iptables consists of five tables, each for specialized networking jobs. They contain chains and rules. The default table is filter; others are raw, nat, mangle, and security. The chains are simple lists of rules. Filter has three built-in chains; INPUT, OUTPUT, and FORWARD. The nat table has two additional chains called PREROUTING and POSTROUTING.
The filtering of network traffic is done via the rules. They can be specified to have multiple matches and on specific targets. Targets are activated using the j option, short for –jump. They can be a user-defined chain, in-built target, or an extension. Iptables’ built-in targets are ACCEPT, DROP, QUEUE, and RETURN.
The policy chain dictates the default chain’s behavior. They determine what to do with packets that don’t match any iptables rules in your tables. You’ll learn their workings via trying out some commands we teach you. So get ready and fire up your terminal for some networking menace.
Basic IPtables Rules for Linux
Understanding the basic iptables commands will help you master the tool in the long term. Below, we discuss some very fundamental yet crucial commands that will enhance your productivity as a Linux sysadmin to a whole new level.
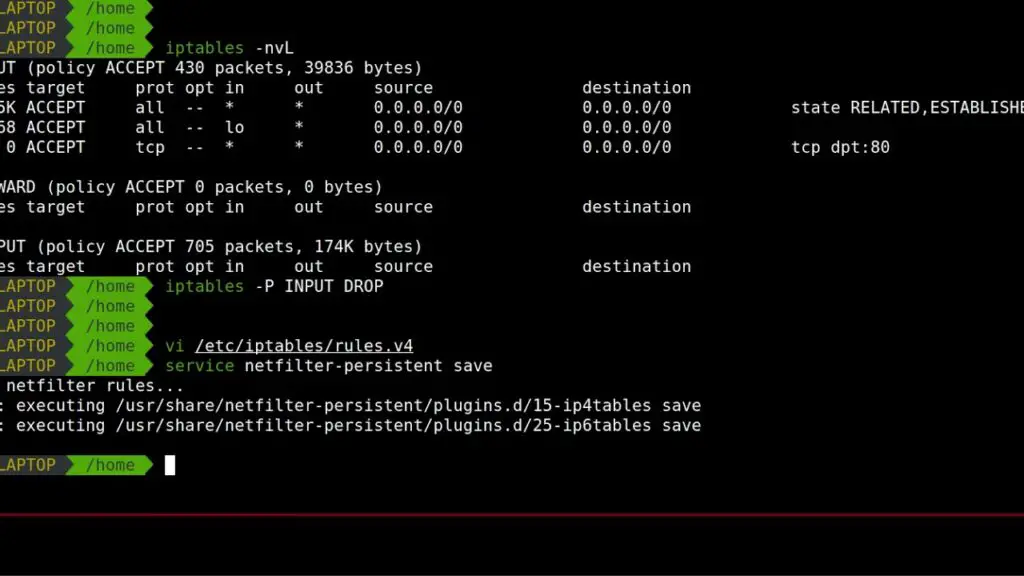
1. Check the Default Policy Chain Behavior
$ sudo iptables -L | grep policy
The above command will print out the default policy chain behavior of your system. In my Ubuntu 19.08 system, the default policy is to accept packets for all three built-in chain of the filter table. It should be the same for your system given you had not modified them earlier.
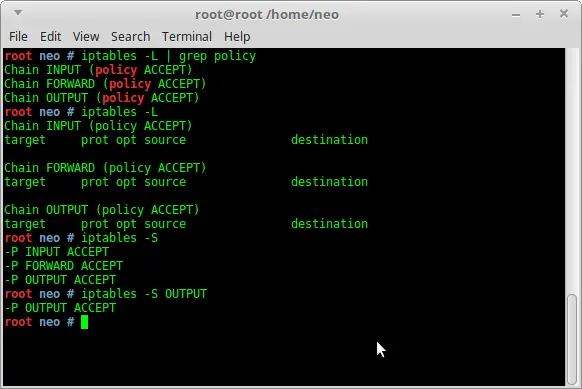
2. Check the Current Rules
$ sudo iptables -L
You can check the current iptables configuration of your system via calling iptables with the -L option. It should display a nicely formatted list of your rules alongside information on their policy, target, source, and destination.
3. List Rules by Specification
$ sudo iptables -S
The -S option added with the iptables command will display a list of all your rules based on their specification. My shell is showing me that it accepts all packets for the chains INPUT, OUTPUT, and FORWARD.
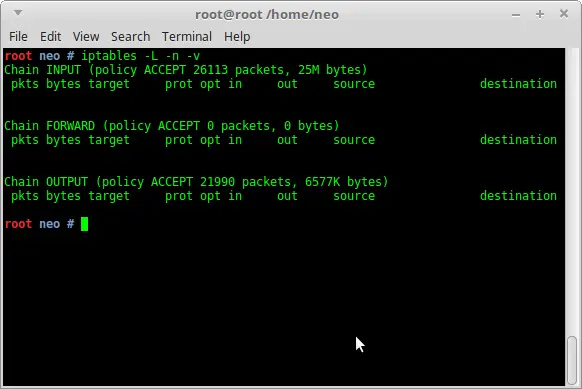
4. Check Your Iptables Status
$ sudo iptables -L -v
The above command will show you the current status of your iptables. It will list out how many packets your system have accepted and sent till now. You should take notice of the FORWARD chain. It should be all zeros unless you’ve changed your firewall settings previously.
5. Reset Your Iptables Rules
$ sudo iptables -F
There might come a time when you’ve garbled up your iptables configuration and messed up your system’s networking entirely. This can happen when you’re trying out new rules and fail to revert some changes. However, you can relax as this command will come to your rescue in such situations.
6. Saving Modified Iptables
$ sudo service iptables save
The changes to iptables are transitory, meaning it gets automatically reset whenever the daemon is restarted. You may wish to save your iptables after changing some rules for future usage. The above command does this and makes sure iptables is loaded with the new configuration next time you boot up.
7. Flush Iptables and Persist Changes
$ sudo iptables -F && sudo /sbin/iptables-save
You need to use the above command for flushing your iptables and make the changes permanent. The latter part of the command (after &&) does the same job as command number six. So, they can be used interchangeably.
Administration of Linux IPtables
Iptables provide robust administration commands which make it pretty easy to manage this networking utility. However, these commands tend to vary from system to system. Luckily the changes are subtle and easy to understand for even new Linux users.
8. Starting the Iptables Firewall
$ sudo systemctl start iptables
You can use the above command to start the iptables service in systems that use systemd, including Fedora, OpenSUSE, and Ubuntu.
$ sudo /etc/init.d/iptables start
Systems that use sysvinit instead will require the above variation for this job. People using MX Linux, Slackware, or Puppy Linux will need to use this version to start iptables on their system.
9. Stopping the Iptables Firewall
$ sudo systemctl stop iptables
This command will stop the iptables daemon running in systems that use systemd.
$ sudo /etc/init.d/iptables stop
It will do the same for systems running sysvinit.
10. Restarting the Iptables Firewall
$ sudo systemctl restart iptables
You can use the above command to restart the iptables service in your Ubuntu machine.
$ sudo /etc/init.d/iptables restart
For systems that use sysvinit, try the above command instead. Notice the similarity in patterns between the above three commands.
11. Check All Existing Rules
$ sudo iptables -L -n -v
This iptables command will print out every existing iptables firewall rules you have set up till that moment. Since this command will display a lot of information, using grep to find specific rules would be a smart idea.
12. Check Existing Rules for Specific Tables
The above command will display information about the default table, which is filter. If you want to find information about some other table, say the NAT table, use the below command instead.
$ sudo iptables -t nat -L -v -n
Notice how the -t option is being used here for specifying the table name to iptables.
13. List Rules for TCP Chains Only
$ sudo iptables -S TCP
This command will show information only about the TCP chain. This is handy when you want outputs only for incoming TCP requests.
14. List Rules for UDP Chains Only
$ sudo iptables -S UDP
UDP requests also account for a substantial amount of traffic in a lot of systems. If you want to block unwanted UDP traffics, then this command can be used to inspect these requests.
Linux IPtables Firewall Rules
One of the primary use of iptables in Linux is to set up network firewalls. It can be used to block unwanted incoming requests based on many different criteria, including specific IP addresses, IP ranges, MAC addresses, and so on. Below, we’re listing some appropriate examples of such commands.
15. Block all Incoming Requests
The next command will block every incoming request for your system. This command will take precedence over other rules in your tables as it will be the first rule checked for each request.
$ sudo iptables INPUT -j DROP
16. Block a Specific IP Address
Often you’ll notice obtrusive traffic behaviors from some specific IP addresses. The given command will come in handy in such situations and enable sysadmins to block those IPs altogether.
$ sudo iptables -A INPUT -s xxx.xxx.xxx.xxx -j DROP
This command will block all incoming requests from the IP address variable. In iptables terms, this is known as ‘dropping’ requests. The -A option is used for appending this rule at the end of your INPUT chain, rather than at first.
17. Block all TCP requests from an IP
The below command can be used for blocking all incoming TCP requests from a given IP address. Don’t forget to replace the IP address variable with an existing one.
$ sudo iptables -A INPUT -p tcp -s xxx.xxx.xxx.xxx -j DROP
The -p flag is used here for selecting only TCP requests. The -j option is used for ‘jumping’ to a specific action.
18. Unblock an IP Address
Sometimes you may want to unblock an IP address you blocked earlier. The below command allows you to do exactly this.
$ sudo iptables -D INPUT -s xxx.xxx.xxx.xxx -j DROP
This command simply deletes the rule that blocked the given IP. You may also use –delete instead of -D if you want.
19. Block IP Address Ranges
Sysadmins often block specific IP ranges due to their continuous suspicious behavior. The below command lets you block all incoming requests from the IP range xxx.xxx.xxx.0/24.
$ sudo iptables -A INPUT -s xxx.xxx.xxx.0/24 -j DROP
20. Unblock IP Address Ranges
Sometimes you may want to block an IP range for some inspection. When p legitimate, you need to re-enable their access to your system. Use the below command for unblocking a given IP address range from your iptables firewall.
$ sudo iptables -D INPUT -s xxx.xxx.xxx.0/24 -j DROP
21. Block all TCP requests for Given IP Range
Malicious users often use their vast network of bots for flooding legitimate servers with TCP requests. You can use the below command to block all TCP requests from a given IP range, say xxx.xxx.xxx.0/24.
$ sudo iptables -A INPUT -p tcp -s xxx.xxx.xxx.0/24 -j DROP
22. Unblock all TCP requests for Given IP Range
You can use the below command when unblocking all TCP traffics from a given IP range, say xxx.xxx.xxx.0/24. This will come in handy when you blocked all incoming TCP requests from some IP address range.
$ sudo iptables -D INPUT -p tcp -s xxx.xxx.xxx.0/24 -j DROP
23. Block TCP Connections on Specific Ports
The iptables rules can be used for blocking all outgoing TCP connections on a specific port, say 111 in this case.
$ sudo iptables -A OUTPUT -p tcp --dport 111 -j DROP
You can replace the chain name to INPUT for blocking TCP connections on the same port, but for incoming requests.
$ sudo iptables -A INPUT -p tcp --dport xxx -j DROP
24. Allow TCP Connections on Port 80
The next command will allow incoming TCP requests on port 80 of your system. Sysadmins often designate specific port numbers to different connections for the sake of management.
$ sudo iptables -A INPUT -p tcp -s xxx.xxx.xxx.0/24 --dport 80 -j ACCEPT
25. Reject TCP Connections on Port 80
The below iptables command will reject any TCP connection attempted at port 80. All you need to do is pass DROP as the argument to -j.
$ sudo iptables -A INPUT -p tcp -s xxx.xxx.xxx.0/24 --dport 80 -j DROP
The same also applies for UDP connections.
$ sudo iptables -A INPUT -p udp -s xxx.xxx.xxx.0/24 --dport 80 -j DROP
26. Allow Incoming SSH Connections on Port 22
The below command is useful when you want to allow all incoming SSH connections on the default port. You need to pass ssh as an argument to the –dport flag in your iptables rules.
$ sudo iptables -A INPUT -p tcp -s xxx.xxx.xxx.0/24 --dport ssh -j ACCEPT
27. Block Incoming SSH Connections
To block any incoming ssh attempt, use the below command. This will block every incoming SSH attempt made from the IP range xxx.xxx.xxx.0/24.
$ sudo iptables -A INPUT -p tcp -s xxx.xxx.xxx.0/24 --dport ssh -j DROP
28. Allow Outgoing SSH Connections
You need to have outgoing SSH enabled if you want to establish secure remote communication for your Linux machine. The next command allows you to do precisely this.
$ sudo iptables -A OUTPUT -p tcp --dport ssh -j ACCEPT
It allows all outgoing SSH connections from your system across the web.
29. Block All Outgoing SSH Connections
The next command will block all outgoing SSH attempts from your system to any network. Be cautious when using this command remotely as it may leave you locked from the system also.
$ sudo iptables -A INPUT -p tcp --dport ssh -j DROP
30. Establish States when Allowing Incoming SSH
Sysadmins often use SSH states to determine whether the remote connections belong to the right entity or not. First, assign states to incoming SSH requests using the below command. The -i flag is used to refer to the interface, which is eth0 in this case.
$ sudo iptables -A INPUT -i eth0 -p tcp --dport 22 -m state --state NEW,ESTABLISHED -j ACCEPT
31. Establish States when Allowing Incoming SSH
Assign states to outgoing SSH requests the same way you did with incoming requests. The -o flag is used here to refer to the interface, which is also eth0 in this case.
$ sudo iptables -A OUTPUT -o eth0 -p tcp --dport 22 -m state --state NEW,ESTABLISHED -j ACCEPT
32. Allow Multiple Ports for Incoming Requests
Linux firewall iptables allow admins to enable more than one port at once using the multiport option of iptables. The below command sets up a rule for accepting all incoming requests on port number 22, 80, and 110.
$ sudo iptables -A INPUT -p tcp -m multiport --dports 22,80,110 -j ACCEPT
33. Allow Multiple Ports for Outgoing Requests
Setting up multiple ports for outgoing connections are almost identical with the above command. Here, all you need to do is use the OUTPUT option.
$ sudo iptables -A OUTPUT -p tcp -m multiport --sports 22,80,110 -j ACCEPT
34. Allow IP Ranges on Specific Port
Sometimes you may receive network requests only from a specific IP range, i.e., Private Enterprise Networks. The below command allows all outgoing SSH requests of the range xxx.xxx.xxx.0/24 on the default SSH port.
$ sudo iptables -A OUTPUT -p tcp -d xxx.xxx.xxx.0/24 --dport 22 -j ACCEPT
35. Block IP Ranges on Specific Ports
Often you will encounter continuous network requests from malicious bot users. They usually comprise of a specific IP range. It’s easy to block these traffics using the below command.
$ sudo iptables -A INPUT -p tcp -s xxx.xxx.0.0/24 --dport 22 -j DROP
36. Block Facebook in Iptables Rules
Often many companies block social media sites such as Facebook during office hours. The below commands can be used for this purpose. First, find out the network range used by Facebook in your geo-location.
$ sudo host facebook.come
This should return a result consisting of the specific IP used by Facebook, say 157.240.7.35 in this case. Now run the next command.
$ sudo whois 66.220.156.68 | grep CIDR
It will provide the IP range Facebook uses for your location, say 157.240.0.0/16 in this case. Now we can simply block all outgoing connections to this network.
$ sudo iptables -A OUTPUT -p tcp -d 157.240.0.0/16 -j DROP
37. Block Network Flood
Malicious users often resort to network flooding for compromising company servers. You can limit the incoming requests per unit time to save your system from such attacks.
$ sudo iptables -A INPUT -p tcp --dport 80 -m limit --limit 50/minute --limit-burst 100 -j ACCEPT
This command limits the incoming traffic to port 80 to a maximum of 50 connections per minute and sets a limit burst of 100.
38. Block Incoming Ping Requests
Ping requests are used to determine whether a server is up or not. It can also provide valuable insights for potential hackers. You can block these requests by adding the next command to your Linux firewall iptables.
$ sudo iptables -A INPUT -pr icmp -i eth0 -j DROP
39. Log Dropped Network Packets
You might want to store the network packets dropped by your iptables firewall rules for later inspection. This can be achieved with the below command.
$ sudo iptables -A INPUT -i eth0 -j LOG --log-prefix "IPtables dropped packets:"
You can substitute the string after –log-prefix to something of your choice. Use grep to find out the dropped packages.
$ sudo grep "IPtables dropped packets:" /var/log/*.log
40. Block Connection Requests on Network Interface
If you have more than one network interface, you might want to block connections on one of them. Use the below command to block all requests from the IP range xxx.xxx.xxx.0/24 on the first ethernet interface, eth0.
$ sudo iptables -A INPUT -i eth0 -s xxx.xxx.xxx.0/24 -j DROP
Miscellaneous IPtables Firewall Rules
Since Linux iptables rules can be quite diverse, we’re going to list out some essential commands that have a considerable impact on system administration. They can often lead to the solution of specific problems and can also be used for troubleshooting iptables firewall.
41. Allow Port Forwarding in Iptables
Sometimes you may want to forward the traffics of one service to some different port. The below command demonstrates one such simple example.
$ sudo iptables -t nat -A PREROUTING -i eth0 -p tcp --dport 25 -j REDIRECT --to-port 3535
The above command forwards all incoming traffic on the network interface eth0 from port 25 to 3535.
42. Allow loopback Access
Loopback access is important for troubleshooting your network and various testing purposes. You can allow this using the below commands.
For incoming connections,
$ sudo iptables -A INPUT -i lo -j ACCEPT
For outgoing connections,
$ sudo iptables -A OUTPUT -o lo -j ACCEPT
43. Block Access to Specific MAC Addresses
If you want to prevent other people from accessing your system from some particular MAC address, you can use the below command for doing this. Change the below MAC with the address you want to block.
$ sudo iptables -A INPUT -m mac --mac-source 00:00:00:00:00:00 -j DROP
44. Limit Concurrent Connections for per IP
Sysadmins sometime want to limit the number of concurrent connections established from a single IP address on a given port. The next command shows us how to do this with iptables.
$ sudo iptables -A INPUT -p tcp --syn --dport 22 -m connlimit --connlimit-above 3 -j REJECT
You can change the port number and the connection limit as you want.
45. Search Iptables Rules
Once your iptables firewall is set up and running, you may need to inspect some rules later. This can be done using the below command syntax.
$ sudo iptables -L $table -v -n | grep $string
Don’t forget to replace $table with your table name and $string with your search term.
46. Save Iptables Rules to a File
You can save your new iptables firewall easily to a file. The next command shows how to save a newly configured iptables to a file named iptables.rules. You can change the filename to anything you want.
$ sudo iptables-save > ~/iptables.rules
47. Restore Iptables from a File
The below command demonstrates how to restore iptables firewall rules from files. In this example, we’re assuming the rules are saved to the file created in the above example.
$ sudo iptables-restore < ~/iptables.rules
48. Disable Outgoing Mails
If you are sure that your system does not need to send outgoing e-mails, you can disable them completely using iptables. The below command block all outgoing connections on SMTP ports. Use DROP instead of REJECT if you do not want to send an acknowledgment.
$ sudo iptables -A OUTPUT -p tcp --dports 25,465,587 -j REJECT
49. Reset Packet Counts and Size
You can use the below command to reset your iptables packet counts and aggregate size. This is helpful when you want to determine how much new traffic your server is handling during an already established connection.
$ sudo iptables -Z
50. Allows Internal to External Connection
Suppose your internal network interface in eth1 and external interface is eth0. The below command will allow the eth1 adapter to access the external adapter’s traffic.
$ sudo iptables -A FORWARD l-i eth1 -o eth0 -j ACCEPT
Linux iptables rules offer a flexible mean for controlling network traffic and allows admins to manage their system conveniently. People often think iptables is out of their scope due to an abundance of iptables firewall rules. However, they are quite simple once you understand them.
