
Lab-DFIR-SOC
DFIR & SOC Focused VM Automated Deployment Lab
This project is still in alpha version and much remains to be done for this Lab to be really usable.
the objective is to have for our projects a lab with all the necessary tools and technology to be able to carry out tests, forensic analysis, detection etc…
This project will be maintained over the months to move towards a project that can be used in production by cybersecurity analysts.
Group
- CEBERIO Pierre @PierreYnov
- DIAS Steven @StevenDias33
- FEUGERE Thibault @thibaultfeugere
- LABORDE Simon @Genisys
Many thanks to Kidrek for his DFIR project which helped us a lot. @Kidrek

packer
You will need to create the packer images on your ESXI with the build.shwhich is located at the root of each vm in the packer folder. don’t forget to provide him with the ISOs if there are none.
Terraform
Once the .tf files are edited, you can:
terraform initterraform planterraform apply
Network Diagram
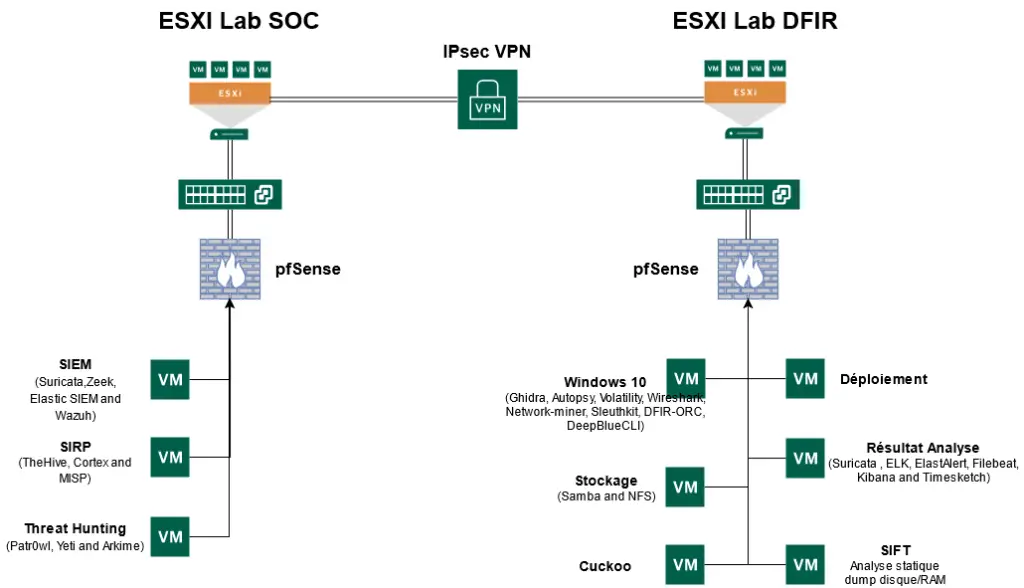
IPSEC Setup
So that the two sites can communicate we have made an inter-site Ipsec vpn. The configuration of this one is very simple, you just have to enter the same values in phases 1 and 2 on the two Pfsense.
For Phase 1 and 2 on the Dfir hypervisor:

You have to be careful that the Pre-Shared Keyis the same on the two Phase 1 between the two pfsense.
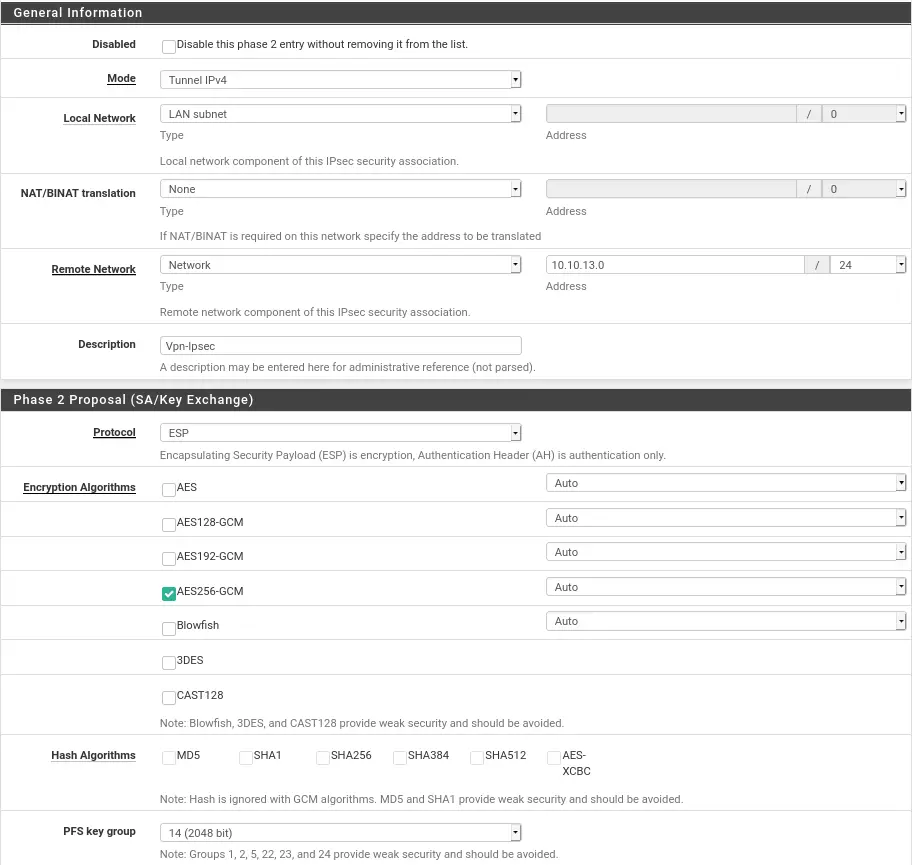
It will be at phase two that we will specify the internal network for the pfsense in front.
For Phase 1 and 2 on the Soc hypervisor:

Once parameters are checked we can save and specify at the end of the phase 2 configuration that it ip to ping to ensure the connection. We advise you to put the ip of the gateway for us 10.10.12.254and 10.10.13.254.

vpn
For the Vpn Server we used the deployment vm. Thus we save resources for the vm of the lab. The script is available here
Description of available VMs
I. Windows 10
The tools on it are:
Note: If the first time you launch Ghidra, a cli asks you for a path, give it the following:
C:\Program Files\OpenJDK\openjdk-11.0.10_9
II. Threat Hunting
The purpose of the Threat Hunting VM is to hunt on network captures and any other artifacts so as not to be surprised by attackers.
The tools on it are:
- Patr0wl : http://10.XXX:8083/
- Arkime (Manual installation required to finalize see here )
- Yeti : http://10.XXX:5000
III. Security Incident Response Platform
The VM SIRP is a VM which aims to facilitate incident processing and collaboration between analysts for digital investigation. To do this, this VM is currently composed of 3 tools:
MISP is a platform that allows you to retrieve other MISPs or public lists of information on IOCs, threats, payloads and everything a SOC analyst would need to correlate events, for example he can retrieve information on TOR Exit nodes to correlate with IPs that have attempted to scan the SI being monitored.
The Hive is a collaborative platform that allows you to process security events in the form of Cases and assign tasks to analysts. With the use of Cortex we can launch from the hive analyzers such as total virus, cuckoo which will retrieve information on payloads, ips, urls, any type of information that the SIEM will have retrieved to be able to do the incident response on this alert.
IV. Vm SIFT Forensic Analyst
For our forensic VM on Linux we started with a SIFT Workstation base which is the VM provided by SANS which is well supplied with tools and which allows us to have everything you need to carry out a digital investigation on samples. RAM and disk. For automatic deployment, you will have to download the VM from the SANS site and place it in the DFIR/deployment directory for automatic deployment to take place.
V.Sandbox Cuckoo
The Cuckoo machine will allow us to launch, or check if the file sent contains a virus via generic PIDs or YARA rules. Cuckoo is mostly made in python2.7, which is its biggest problem. The python2.7 being deprecated recently, it happens that libraries come out of the errors. To counter dependency conflict concerns, everything will be installed in a Virtual environment.
Preparing the host
For the deployment of the Vm cuckoo it will be necessary to know on which Os we want to start. On our side we have chosen a Windows 10 vm. The creation of the vm was done with the packer tool which will follow the instructions specified in the file.xml
.
├── Autounattend.xml
├── build.log
├── build.sh
├── drivers
│   └── virtio-win.iso
├── files
│   ├── cuckoo_agent.py
│   ├── secubian-vmware-share-automount
│   └── winlogbeat-sandbox.yml
├── scripts
│   ├── chocolatey.ps1
│   ├── disable-screensaver.ps1
│   ├── disable-windowsDefender.bat
│   ├── disable-windows-update.ps1
│   ├── disable-winrm.ps1
│   ├── enable-winrm.ps1
│   ├── fixnetwork.ps1
│   ├── install-FTKImager.ps1
│   ├── install-zimmermantools.ps1
│   ├── microsoft-updates.bat
│   ├── Readme.md
│   ├── rearm-windows.ps1
│   ├── Set-SysmonSettings.ps1
│   ├── Set-WindowsTelemetrySettings.ps1
│   ├── vmware-tools.ps1
│   └── win-updates.ps1
├── win10.json
└── windows10-enterprise.iso
The creation of the vm can take some time, depending on the machine we are working on and the internet connection. It takes about 20~30 for one installation.
export PACKER_LOG=1; packer build win10.json | tee build.log
All the files present in the directory scriptswill be added to the vm and executed to be implemented in the vm.
For deployment it is preferable to have the image on a machine in the same network, so sending it to the vm will be faster. If you want to provision it with terrform you have to be careful to have space in the /tmp/. In our case we generated an RSA key, to go through scp.
Deployment
For deployment just make a terraform apply -auto-approve. Normally everything will happen automatically.
./
├── CONF
│   ├── Cuckoo
│   │   ├── auxiliary.conf
│   │   ├── kvm.conf
│   │   └── reporting.conf
│   ├── id_rsa
│   ├── id_rsa.pub
│   └── systemd
│       ├── cuckoo.service
│       └── cuckooweb.service
├── main.tf
├── output.tf
├── README.md
├── SCRIPTS
│   ├── cuckoo_install_kvm.sh
│   ├── cuckoo.sh
│   ├── cuckooweb.sh
│   └── cuckoo-win10.sh
├── variables.tf
└── versions.tf
VI. VM Storage
The purpose of this VM is to store the Evidences of all the analysts, this makes it possible not to corrupt the evidence and to gather everything in the same place. In addition, we will note the presence of some SANS Ebooks which are of very good quality.
To do this, there is a SAMBA to install with an Evidences folder where RAM and disk DUMPs will be stored for all analysts on the network.
Installation to be completed manually
I. Arkime on the VM Threat Hunting
Stand in the direction of arkim:cd arkime
Then :sudo make config
Select the eth0 interface Enter yes for the Elasticsearch installation and no for the password-encrypt question. Finally enter yes . ES is now installed.
Start the service:sudo systemctl start elasticsearch.service
We then initialize Arkime:/opt/arkime/db/db.pl http://localhost:9200 init
Define username and password:/opt/arkime/bin/arkime_add_user.sh admin "Admin User" mdptropsecure --admin
We start the services:
sudo systemctl start arkimecapture.service
sudo systemctl start arkimeviewer.service
You can now access Arkime from http://10.XXX:8005/ with the username admin and the password you have chosen (here mdptropsecure ).
II. Nested Virtu on Cuckoo
Once the automatic deployment is complete, the vm should turn off on its own once finished, you have to go to the vm options through the provider (ESXI for us):
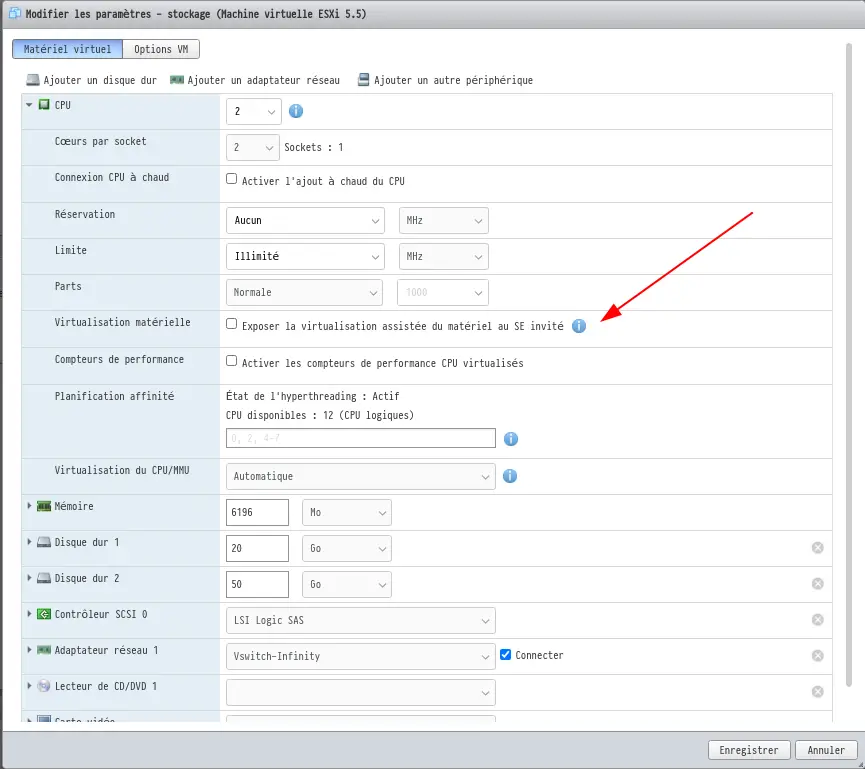
Thus we will activate the nested virtu through this vm. All we have to do is restart the vm and run this command line:
sudo bash ./cuckoo-win10.sh
Thus we will add the Windows 10 vm to the machine’s internal libvirt. Thanks to the previous manipulation we will be able to launch it without worries.
The Lab-DFIR-SOC is a github repository by StevenDias33