

purpleteam CLI
CLI component of purpleteam – Currently in alpha
If you are planning on running the local environment, once you have installed, configured and are ready to run the purpleteam CLI, head back to the local setup documentation and make sure all of the otther purpleteam components are also set-up and ready to run. After that work through the local workflow documentation.
If you are planning on targeting the cloud environment, the purpleteam CLI is all you need to have set-up.
If you have any issues with the set-up, be sure to check the trouble shooting page.
Install
There are several options.
Clone the git repository
If you are planning on running/debugging purpleteam standalone, cloning is a good option.
From a directory that you would like the CLI cloned to run the following command:
git clone https://github.com/purpleteam-labs/purpleteam.git
Install the dependencies with the following command:
npm install
Another option with cloning if you want the purpleteam CLI to be available as a system wide command is to use the following command from the repositories root directory:
npm link
NPM install locally
If you are planning on running/debugging purpleteam from another NodeJS process, for example a CI/nightly build/build pipeline project of your own, installing via NPM is a good option.
For the locally installed via NPM option the purpleteam-labs Team uses the purpleteam-build-test-cli project as an example to test that this option works as expected. The following example package.json and index.js files are from the purpleteam-build-test-cli example project. Feel free to clone it, or use your own project to follow along.
This example exports two environment variables:
NODE_ENV=local: Means that purpleteam will be using thelocalconfiguration. If instead you have signed up for a cloud license, you will want to be targeting thecloudenvironment insteadPURPLETEAM_UI=noUi: As detailed in the Configure sub-section
Using the above mentioned example build project files, and for the sake of this example, let’s assume your NodeJS build project has the same following files:
{
  "name": "purpleteam-build-test-cli",
  "description": "Used to test that the purpleteam CLI runs within a build pipeline successfully",
  "main": "index.js",
  "scripts": {
    "// Don't forget to export any required env vars before running the purpleteam CLI. For example": "NODE_ENV=local and PURPLETEAM_UI=noUi",
    "// Invoke purpleteam binary from NPM script": "npm run purpleteam",
    "purpleteam": "NODE_ENV=local purpleteam",
    "// Start your node app": "npm start",
    "start": "NODE_ENV=local PURPLETEAM_UI=noUi node index.js",
    "// Debug your node app": "npm run debugApp",
    "debugApp": "NODE_ENV=local PURPLETEAM_UI=noUi node --inspect-brk=localhost:9230 index.js",
    "// Debug your node app and the purpleteam CLI": "npm run debugAppAndCli",
    "debugAppAndCli": "NODE_ENV=local PURPLETEAM_UI=noUi DEBUG_PURPLETEAM=true node --inspect-brk=localhost:9230 index.js"
  },
  "dependencies": {
    "purpleteam": "*"
  }
}
const { spawn } = require('child_process');

// You will need to define two debuggers in what ever tool you're using.
// localhost:9230 and localhost:9231
const execArgvDebugString = '--inspect-brk=localhost';
const childProcessInspectPort = 9231;
// You can run any of the purpleteam commands [about|status|test|testplan], `test` is just one example.
const purpleteamArgs = ['purpleteam', 'test'];

startPurpleteam = () => {
  const purpleteam = spawn('node', [
    ...(process.env.DEBUG_PURPLETEAM
    ? [`${execArgvDebugString}:${childProcessInspectPort}`]
    : []),
    ...purpleteamArgs],
    { cwd: `${process.cwd()}/node_modules/.bin/`, env: process.env, argv0: process.argv[0] }
  );

  purpleteam.stdout.on('data', (data) => {
    process.stdout.write(data);
  });
  purpleteam.stderr.on('data', (data) => {
    process.stdout.write(data);
  });
  purpleteam.on('exit', (code, signal) => {
    console.debug(`Child process "purpleteam" exited with code: "${code}", and signal: "${signal}".`);
  });
  purpleteam.on('close', (code) => {
    console.debug(`"close" event was emitted with code: "${code}" for "purpleteam".`);
  });
  purpleteam.on('error', (err) => {
    process.stdout.write(`Failed to start "purpleteam" sub-process. The error was: ${err}.`);
  });
};

startPurpleteam();
From within your NodeJS build project run the following command to install the purpleteam CLI locally into your NodeJS project:
npm install
NPM install globally
For example, you may have a build project/pipeline that is written in some language besides JavaScript. In this case the most suitable install technique may be to install the purpleteam CLI globally.
To do so, run the following command:
npm install -g purpleteam
Now the purpleteam CLI is installed and on your path to invoke from anywhere on your system.
which purpleteam
# Will print where purpleteam is located.
# You will need this to configure it if you choose to install globally.
As mentioned under the Clone section, another option for a system wide install is to use npm link.
Configure
Job File
The Job file (also referred to as the buildUserConfig) is what purpleteam uses to do the following. Most properties should be self documenting. If you are unsure of any, start a Github discussion or reach out in the #project-purpleteam channel of OWASP Slack. Examples of Job files that the purpleteam-labs team uses can be found here:
- Authenticate to your System Under Test (SUT)
- Locate your SUT
- Which browser to use to test your application in
- Define your Test Session
- Alert Threshold
- Routes to test
- Fields of each specific route, other fields “may” also be tested
CLI
No matter which install option you decide on the purpleteam CLI will require configuration.
If you are planning on using the cloud environment copy the config/config.example.cloud.json to config/config.cloud.json and make the necessary changes. If you are planning on using the local environment copy the config/config.example.local.json to config/config.local.json and make the necessary changes.
Use the config/config.js for documentation and further examples.
loggers.testerProgress.dirname: Configure this property.
loggers.testPlan.dirname: Configure this property. Using the same value as used for loggers.testerProgress.dirname is an option.
purpleteamApi: If you are planning on using the local environment you can stick with the default property values. If you are planning on using the cloud environment you will be given this information when you sign-up for a purpleteam account.
testerFeedbackComms.medium: Long Polling (lp) is supported in both local and cloud environments. Server Sent Events (sse) is only supported in the local environment due to AWS limitations. Both lp and sse are real-time. Both implementations have their pros and cons.
Which ever option you choose, the same option must be applied to both the orchestrator and the purpleteam CLI.
Using sse is one way communications after the initial subscription from the CLI to the orchestrator. Redis pub/sub is used between the Testers and the orchestrator to publish Tester feedback. If the CLI is stopped (not subscribed) at any point while the back-end is in a test run, events will be lost.
Using lp is request-response communications. A request is made and only answered when there are Tester feedback messages available, or the application specific (rather than AWS Api Gateway) time-out is exceeded. As soon as the CLI receives a set (one to many) of Tester feedback messages, it makes another request to the orchestrator (if running in local env), or API (if running in cloud env). Redis pub/sub is used between the Testers and the orchestrator to publish Tester feedback.
So long as the initial CLI request for Tester feedback is made immediately after testing has begun, Tester feedback messages will be persisted in memory to Redis lists. This means that if the CLI is stopped momentarily during a test run, when it is restarted it will receive the Tester feedback messages that arrived at the orchestrator when the CLI wasn’t running… providing the orchestrator continues running.
Additional background: This may change in the future, WebSockets is also an option we may implement in the future, but implementing WebSockets would mean we would have to change our entire authn approach. Our chosen cloud infrastructure AWS Api Gateway does not support streaming and it does not support the OAuth Client Credentials Flow with Cognito User Pools.
purpleteamAuth: If you are planning on using the local environment you can stick with the default property values. If you are planning on using the cloud environment you will be given this information when you sign-up for a purpleteam account.
buildUserConfig.fileUri: Configure this property if you do not want to manually pass it as an argument to the CLI. This is the Job file you have configured to specify your System Under Test (SUT) details.
If you installed the purpleteam CLI via git clone (You are intending to run purpleteam CLI standalone), then a relative directory path from the root of the repository (“./testResources/jobs/your_job_file”) is acceptable.
If you installed the purpleteam CLI via npm install Then it’s more likely that you will need this path to be absolute, as the current directory (./) is more than likely not going to be within the purpleteam CLI project itself, but rather wherever the purpleteam binary is itself.
This value can be overridden by passing it in as an option to the commands that require it (currently test and testplan).
outcomes.dir: Configure this property. This is a directory of your choosing that outcome files from the purpleteam API (orchestrator if running in local env, AWS API Gateway if running in cloud env) will be persisted to.
uI: This property is configured by default to use the character user interface (cUi value) (your terminal). This value can be changed in one of the following ways:
- Change it directly in config/config.js
- Add an override to your: config/config.local.json if running in the
localenvironment, or config/config.cloud.json if running in thecloudenvironment - Exporting the
PURPLETEAM_UIenvironment variable (PURPLETEAM_UI=noUi) for example
uI options:
cUi: Is well suited to running the purpleteam CLI directly in your terminal.
With theuIconfigured to usecUithe following putpleteam CLI commands have the associated behaviours:about: Writes to the console using the purpleteam-logger configured with theSignaleTransportstatus: Writes to the console using the purpleteam-logger configured with theSignaleTransport, via blessedtest: Writes to file using purpleteam-logger configured with theFiletransport. Writes to the console using blessed. On a successful test run, an outcomes zip file will be written to the directory specified byoutcomes.dirtestplan: Writes to the console using blessed
noUi: Is well suited to running the purpleteam CLI from another process (your build/CI/CD process for example). With theuIconfigured to usenoUithe following putpleteam CLI commands have the associated behaviours:about: Writes to the console using the purpleteam-logger configured with theSignaleTransport. The about screen is written. Exits with code: “0”status: Writes to the console using the purpleteam-logger configured with theSignaleTransport.orchestrator is down… ororchestrator is upis written. Exits with code: “0”test: Writes to file using purpleteam-logger configured with theFiletransport- If the orchestrator/API is down
orchestrator is down… is written using theSignaleTransport. Exits with code: “0” - If the orchestrator/API is up, CLI logs will be written to the directory specified by
loggers.testerProgress.dirnameas the Test Run progresses and an outcomes zip file will be written to the directory specified byoutcomes.diron Test Run completion. The CLI does not terminate. If the SUT is not found, it will be obvious in the CLI logs
- If the orchestrator/API is down
testplan: Writes to file using purpleteam-logger configured with theFiletransport- If the orchestrator/API is down
orchestrator is down… is written using theSignaleTransport. Exits with code: “0” - If the orchestrator/API is up, CLI logs will be written to the directory specified by
loggers.testPlan.dirnameon completion. Exits with code: “0”
- If the orchestrator/API is down
Purpleteam uses the convict package for it’s configuration.
Sensitive Values (cloud environment only)
There are several ways you can handle the sensitive values that need to be read into the purpleteam CLI to access your instance of the purpleteam cloud service:
- Place sensitive values in-line in the
config.cloud.jsonfile, providing you are confident that you have sufficiently locked down file, directory permissions and access to the host that will be running the purpleteam CLI - Place sensitive values in a similarly structured file but in some other directory that the purpleteam CLI has access to and is sufficiently locked down as previously mentioned. The path of which said file can be added to the array as an element that is feed to
config.loadFilein the mainconfig.jsfile - Place sensitive values in environment variables yourself, or pass them as environment variables in the current shell to the purpleteam CLI:PURPLETEAM_APP_CLIENT_ID=<app-client-id> PURPLETEAM_APP_CLIENT_SECRET=<app-client-secret> PURPLETEAM_API_KEY=<api-key> purpleteam test
The precedence order of where values will be read from is defined by convict.
Run
There are several ways you can run the purpleteam CLI. The following options line up with the Install options detailed above. Make sure you have installed and configured purpleteam correctly before attempting to run:
Clone the git repository option
For those that chose to clone the purpleteam CLI:
You can choose to export the NODE_ENV environment variable before running the following commands, or simply do so as part of running the commands. For example:
NODE_ENV=local or NODE_ENV=cloud.Run the bin/purpleteam file via npm script
- From the root directory of the purpleteam repository
- Run one of the following commands
- To start the CLI:
npm start
# Should print out the purpleteam top level help
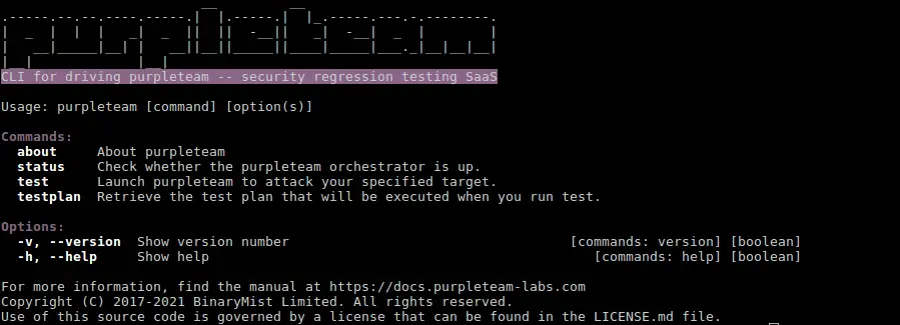
- To start the CLI and pass commands (
statusfor example):
npm start status
Should print the following message if the orchestrator is not running:
☰  notice     [cUi] orchestrator is down, or an incorrect URL has been specified in the CLI config.
- To start the CLI and pass commands (
testfor example):
npm start test
Should print the following message if the orchestrator is not running:
✖  critical   [apiDecoratingAdapter] orchestrator is down, or an incorrect URL has been specified in the CLI config.
- To start the CLI and pass commands (
testfor example) with options:
npm start test -- --help
Should print the available options for the test command:
- To debug the CLI (passing the
statuscommand for example):
npm run debug status
Amongst other messages, you should see the following message:
Debugger listening on ws://localhost:9230/…
- Now open your debugging UI. If you use the chrome developer tools browse to
chrome://inspectand click the inspect link and you will be dropped into the purpleteam CLI code-base.
For further details around running and debuging review the documentation.
Run the bin/purpleteam file directly
- From the root directory of the purpleteam repository
- Run one of the following commands
- To start the CLI:
bin/purpleteam
Should print out the purpleteam top level help
- To start the CLI and pass commands (
statusfor example):
bin/purpleteam status
Should print the following message if the orchestrator is not running:
☰  notice     [cUi] orchestrator is down, or an incorrect URL has been specified in the CLI config.
- To start the CLI and pass commands (
testfor example):
bin/purpleteam test
Should print the following message if the orchestrator is not running:
✖  critical   [apiDecoratingAdapter] orchestrator is down, or an incorrect URL has been specified in the CLI config.
- To start the CLI and pass commands (
testfor example) with options:
bin/purpleteam test --help
Should print the available options for the test command:
Or if you chose to clone the purpleteam CLI repository and npm link it, you can run it as a first class citizen:
purpleteam
NPM install locally option
For those that chose to install locally via npm:
The NODE_ENV environment variable needs to be exported so that the purpleteam CLI knows whether it’s targeting the cloud or local environment and configuration. In the example build project we have used, NODE_ENV is exported as part of the NPM scripts, and it is using the local environment. Feel free to swap the value to cloud if you have signed up for a cloud account.
Providing your package.json and the JavaScript file (index.js in the above example) that is going to run the purpleteam CLI is similar to those configured in the above file examples, you should be able to successfully run the following commands from the root directory of your NodeJS CI/nightly build/build pipeline project.
Run the purpleteam CLI directly
npm run purpleteam
# Should print out the purpleteam top level help
Run the purpleteam CLI directly – with status command
Run the purpleteam CLI directly but pass the status command to purpleteam:
npm run purpleteam status
# Should print the following message if the orchestrator is not yet running. Be patient, purpleteam CLI retries:
# ☰  notice     [cUi] orchestrator is down, or an incorrect URL has been specified in the CLI config.
Run the purpleteam CLI directly – with test command
Run the purpleteam CLI directly but pass the test command to purpleteam:
npm run purpleteam test
# Should print the following message if the orchestrator is not yet running:
# ✖  critical   [apiDecoratingAdapter] orchestrator is down, or an incorrect URL has been specified in the CLI config.
Run the purpleteam CLI directly – with test options
Run the purpleteam CLI directly but you want to see the help options for the test command:
npm run purpleteam test -- --help
# Should print the available options for the test command:
Run your app (build pipeline)
Run your NodeJS CI/nightly build/build pipeline project. This will start the NodeJS application we defined above which will spawn the purpleteam test command.
You could change the const purpleteamArgs = ['purpleteam', 'test']; to use any other purpleteam CLI commands, options, or neither.
When running the purpleteam CLI from another process, you will usually want to export PURPLETEAM_UI=noUi as mentioned in the NPM install locally sub-section and detailed in the Configure uI sub-section.
npm start
# If the orchestrator is not yet running:
# Should print the following via the purpleteam.stdout.on('data'... handler
# ✖  critical   [apiDecoratingAdapter] orchestrator is down, or an incorrect URL has been specified in the CLI config.
If you get a blank screen or purpleteam help text with an error or warning via a ?⃝ warning logged to your terminal, please confirm you have configured purpleteam correctly.
When running the purpleteam CLI embedded, you should expect the behaviours specified under the Configure uI sub-section for the associated purpleteam CLI commands.
Debug your app (build pipeline)
If you need to debug your NodeJS CI/nightly build/build pipeline project, run the following command:
npm run debugApp
Now open your debugging UI. If you use the chrome developer tools browse to chrome://inspect and click the inspect link and you will be dropped into your app (index.js in this case).
Debug your app and purpleteam CLI
If you need to debug your NodeJS CI/nightly build/build pipeline project as well as the purpleteam CLI, do the following:
- Make sure your debugging UI is configured to listen on the application and CLI debug ports:
localhost:9230as defined in the above package.jsonlocalhost:9231as defined in the above index.js
- run the following command:npm run debugAppAndCli
- Then open your debugging UI. If you use the chrome developer tools browse to
chrome://inspectand click the “inspect” link and you will be dropped into your app (index.js in this case) - Step through the index.js file until the purpleteam process is spawned, at which point you will see the second “inspect” link if using the chrome developer tools
- Click the second “inspect” link and you should be dropped into the purpleteam source code. Now you can step through and inspect both your application code and the purpleteam CLI code
NPM install globally option
For those that chose to install globally via npm:
You can choose to export the NODE_ENV environment variable before running the following commands, or simply do so as part of running the commands.
NODE_ENV=local purpleteam
# Or export NODE_ENV then just run:
purpleteam
# Should print out the purpleteam top level help
Run any of the purpleteam CLI commands as you would with the install of any other system wide binary.
If you choose to clone the purpleteam CLI repository and run npm link from it’s root directory, the same applies. Plus you get to continue to modify the purpleteam CLI config without reinstalling.
Usage
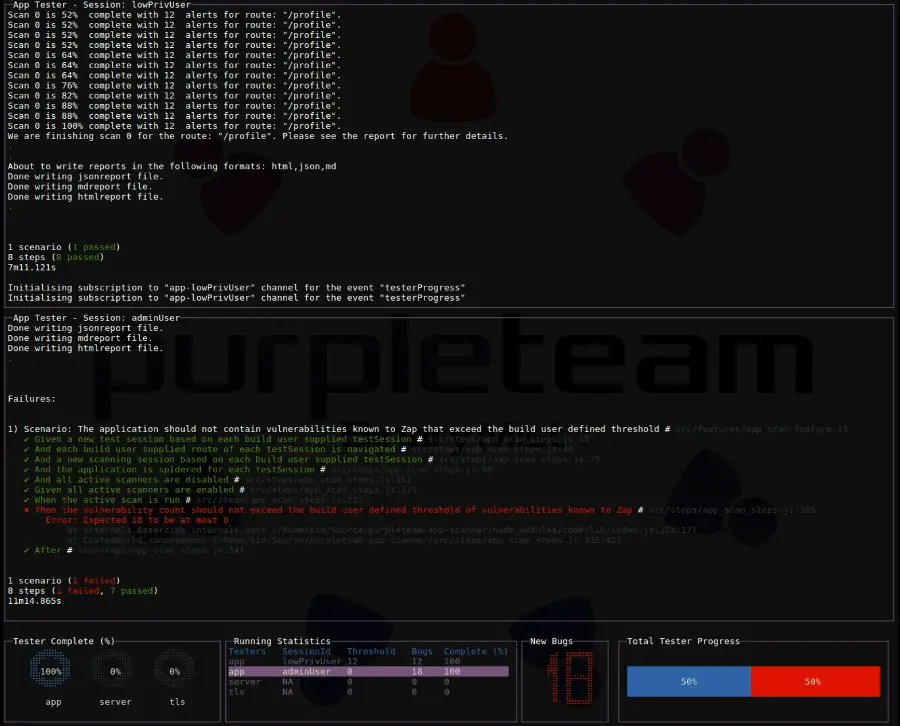
If you are running the purpleteam CLI in the default character user interface (cUi) mode there are some interactions you can perform in the terminal while the CLI is running. The following commands have the associated interactions available:
test: Once testing is under way, you can:- [right-arrow], [left-arrow] through the terminal screens to view the testing progress of each of the Testers in real-time courtesy of the purpleteam API
- [down-arrow], [up-arrow] to highlight the different Running Statistics of the Testers as they are provided in real-time courtesy of the purpleteam API
testplan: Once the test plans have been retreived, you can [right-arrow], [left-arrow] through the terminal screens to view the test plans of each specific Tester
Trouble-Shooting
If you encounter any problems with the CLI set-up and you have read and applied the directions, check the trouble-shooting page.