
Introduction to Git
Welcome to this Git and GitHub basics training guide! In this Git crash course, you will learn the basics of Git so you can use Git to track your code changes and collaborate with other members of your team or open source maintainers.
Whether you are a newcomer to programming, or an experienced one, you have to know how to use Git. Most of the projects that a small or big group of developers work on are done through GitHub or GitLab.
It makes working with other developers so much more exciting and enjoyable, just by creating a new branch, adding all your brilliant ideas to the code that can help the project, committing it, and then pushing it to GitHub or GitLab. Then after the PR(pull request) has been opened, reviewed, and then merged, you can get back to your code and continue adding more awesome stuff. After pulling the changes from the main/master branch, of course.
If what you just read doesn’t make any sense to you, don’t worry. Everything will be explained in this eBook!
This eBook will show you the basics of how to start using Git and try to help you get more comfortable with it.
It does look a bit scary in the beginning, but don’t worry. It’s not as frightening as it seems, and hopefully, after reading this eBook, you can get a bit more comfortable with Git.
Learning Git is essential for every programmer. Even some of the biggest companies use GitHub for their projects. Remember that the more you use it, the more you’re going to get used to it.
Git is without a doubt the most popular open-source version control system for tracking changes in source code out there.
The original author of git is Linus Torvalds, who is also the creator of Linux.
Git is designed to help programmers coordinating work with each other. Its goals include speed, data integrity, and support for distributed workflows.
Version Control
Version control, also called Source control, allows you to track and manage all of the changes to your code.
Why Use Version Control?
- Multiple people could work on the same project simultaneously.
- Serves simultaneously as a repository, project narrative, communication medium, and team and product management tool.
- Records all changes in a log
- Allows team members to work concurrently and provides the facility to merge that work back together.
- Traces each change made to the software.
- Data is transitory and can be lost easily.
What is Version Control System?
Also known as a source code manager (SCM) or a revision control system (RCS), it is a system that keeps track of changes to a file or set of files and in case of any problems, lets you go back in history, comparing changes over time, and easily revert to a working state of your source code. SVN, Mercurial, and the massively popular Git are popular version control systems for developers. All of these are free and open-source.
With distributed version control systems like Git, you would have your source code stored on a remote repository like GitHub and also a local repository stored on your computer.
You will learn more about remote and local repositories in the next few chapters. Still, one of the main points for the moment is that your source code would be stored on a remote repository, so in case that something goes wrong with your laptop, you would not lose all of your changes, but they will be safely stored on GitHub.
Installing Git
In order for you to be able to use Git on your local machine, you would need to install it.
Depending on the operating system that you are using, you can follow the steps here.
Install Git on Linux
With most Linux distributions, the Git command-line tool comes installed out of the box.
If this is not the case for you, you can install Git with the following command:
- On RHEL Linux:
sudo dnf install git-all
- On Debian based distributions including Ubuntu:
sudo apt install git-all
Install Git on Mac
If you are using Mac, Git should be available out of the box as well. However, if this is not the case, there are 2 main ways of installing Git on your Mac:
- Using Homebrew: in case that you are using Homebrew, you can open your terminal and run the following:
brew install git
- Git installer: Alternatively, you could use the following installer:
I would personally stick to Homebrew.
Install Git on Windows
If you have a Windows PC, you can follow the steps on how to install Git on Windows here:
During the installation, make sure to choose the Git Bash option, as this would provide you with a Git Bash terminal which you will use while following along.
Check Git version
Once you have installed Git, in order to check the version of Git that you have installed on your machine, you could use the following command:
git --version
Example output:
git version 2.25.1
In my case, I have Git 2.25.1 installed on my laptop.
Basic Shell Commands
As throughout this eBook, we will be using mainly Git via the command line. It is important to know basic shell commands so that you could find your way around the terminal.
So before we get started, let’s go over a few basic shell commands!
The ls command
The ls command allows you to list the contents of a folder/directory. All that you need to do in order to run the command is to open a terminal and run the following:
ls
The output will show you all of the files and folders that are located in your current directory. In my case, the output is the following:
CONTRIBUTING.md ebook README.md
For more information about the ls command, make sure to check out this page here.
Note: This will work on a Linux/UNIX based systems. If you are on Windows and if you are using the built-in CMD, you would have to use the
dircommand.
The cd command
The cd command stands for Change Directory and allows you to navigate through the filesystem of your computer or server. Let’s say that I wanted to go inside the ebook directory from the output above. What I would need to do is to run the cd command followed by the directory that I want to access:
cd ebook
If I wanted to go back one level up, I would use the cd .. command.
The pwd command
The pwd command stands for Print Working Directory which essentially means that when you run the command, it will show you the current directory that you are in.
Let’s take the example from above. If I run the pwd command, I would get the full path to the folder that I’m currently in:
pwd
Output:
/home/bobby/introduction-to-git
Then I could use the cd command and access the ebook directory:
cd ebook
And finally, if I was to run the pwd command again, I would see the following output:
/home/bobby/introduction-to-git/ebook
Essentially what happened was that thanks to the pwd command, I was able to see that I’m at the /home/bobby/introduction-to-git directory and then after accessing the ebook directory, again by using pwd I was able to see that my new current directory is /home/bobby/introduction-to-git/ebook.
The rm command
The rm command stands for remove and allows you to delete files and folders. Let’s say that I wanted to delete the README.md file, what I would have to do is run the following command:
rm README.md
In case that I had to delete a folder/directory, I would need to specify the -r flag:
rm -r ebook
Note: keep in mind that the
rmcommand would completely delete the files and folders, and the action is irreversible, meaning that you can’t get them back.
The mkdir command
The mkdir command stands for make directory and is used for creating one or more new directories. All you need to do in order to create a new directory using this command is to open a terminal, cd into desired location and run the following:
mkdir My_New_Directory
The above command will create a new, empty directory called My_New_Directory.
You can also create serveral new directories by placing the names of desired directories after each other:
mkdir My_New_Directory My_Another_New_Directory
The touch command
The touch command is used to update timestamps on files. A useful feature of the touch command is that it will create an empty file. This is useful if you want to create file in your directory that doesn’t currently exist
touch README.md
The above will create a new, empty file with the name README.md
One thing that you need to keep in mind is that all shell commands are case sensitive, so if you type LS it would not work.
With that, now you know some basic shell commands which will be beneficial for your day-to-day activities.
Git Configuration
The first time you set up Git on your machine, you would need to do some initial configuration.
There are a few main things that you would need to configure:
- Your details: like your name and email address
- Your Git Editor
- The default branch name: we will learn more about branches later on
We can change all of those things by using the git config command.
Let’s get started with the initial configuration!
The git config command
In order to configure your Git details like your user name and your email address, you need to use the following command:
- Configuring your Git user name:
git config --global user.name "Your Name"
- Configuring your Git email address:
git config --global user.email johndoe@example.com
Usually, it is good to have a matching user name and email for your local Git configuration and your GitHub profile details
- Configuring your Git default editor
In some cases, when running Git commands via your terminal, an editor will open where you could type a commit message, for example. To specify your default editor, you need to run the following command:
git config --global core.editor nano
You can change the nano editor with another editor like vim or emacs based on your personal preferences.
- Configuring the default branch name
Whenever creating a new repository on your local machine, it gets initialized with a specific branch name which might be different from the default branch on GitHub. To make sure that the branch name on your local machine matches the default branch name on GitHub, you can use the following command:
git config --global init.defaultBranch main
Finally, once you are done with all changes, you can check your current Git configuration with the following command:
git config --list
Example output:
user.name=Bobby Iliev
user.email=bobby@bobbyiliev.com
core.repositoryformatversion=0
core.filemode=true
core.bare=false
core.logallrefupdates=true
The ~/.gitconfig file
As we used the --global option in our commands, all of those Global Git settings would be stored in a .gitconfig` file inside your home directory.
We can use the cat command to check the content of the file:
cat ~/.gitconfig
Example output:
[user]
        name = Bobby Iliev
        email = bobby@bobbyiliev.com
You can even change the file manually with your favorite text editor, but I personally prefer to use the git config command to prevent any syntax problems.
Repository specific git configurations
So far we have been using the --global option with all of our changes to our git configurations and this results in any configuration changes applying to all repositories. You might however want to change the configuration for only one specific repository. You can do this easily by running the same git config commands mentioned earlier but with out the --global option. This will save the changes for only the respository you are crrently in and leave your global settings the same as they were before.
The .git directory
Whenever you initialize a new project or clone one from GitHub, it would have a .git directory where all of the Git commits would be recorded at and also a config file where the configuration settings for the particular project would be stored at.
You could use the ls command to check the contents of the .git folder:
ls .git
Output:
COMMIT_EDITMSG HEAD branches config description hooks index info logs objects refs
Note: Before running the command, you would need to be inside your project’s directory. We will learn about this in the next chapters when we learn more about the
git initcommand and cloning an existing repository from GitHub with thegit clonecommand.
Introduction to GitHub
Before we deep dive into all of the various Git commands, let’s quickly get familiar with GitHub.
Git is essentially the tool that you use to track your code changes, and GitHub, on the other side, is a website where you can push your local projects to.
This is essentially needed as it would act as a central hub where you would store your projects and all of your teammates or other people working on the same project as you would push their changes to.
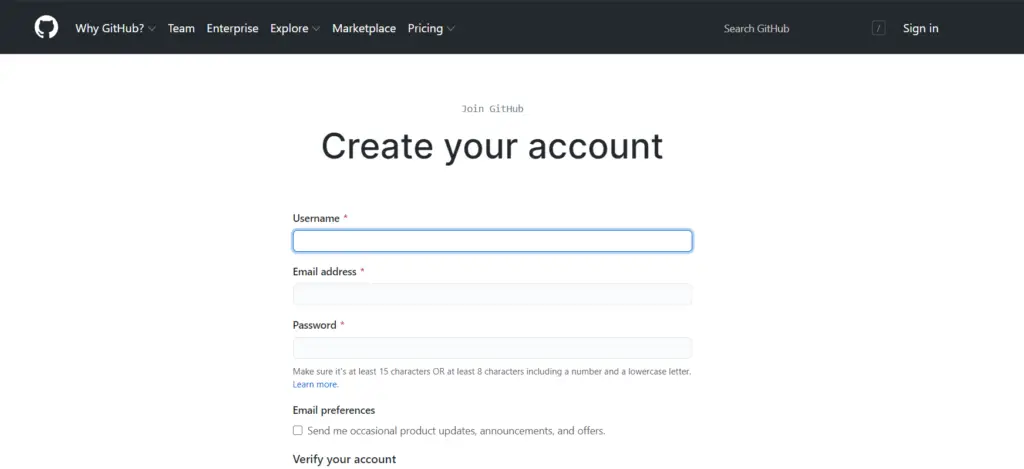
GitHub Registration
Before you get started, you would need to create an account with GitHub. You can do so via this link here:
You will get to the following page where you will need to add your new account details:
GitHub Profile
Once you’ve registered, you can go to https://github.com/YOUR_USER_NAME, and you will be able to see your public profile where you can add some information about yourself. Here is an example profile which you can check: GitHub Profile
Creating a new repository
If you are not familiar with the word repository, you can think of it as a project. It would hold all of the files of your application or website that you are building. People usually call their repository a repo for short.
To create a new repository on GitHub, you have to click on the + sign on the top right corner or click on the green NEW button in the top-left where repositories are mentioned and then click on the New Repository button:
After that, you’ll get to a page where you can specify the information for your new repository like:
- The name of the project: Here, make sure to use something descriptive
- Some general description about the project and what it is about
- Choose whether you want the repository to be Public or Private
Once you’ve added the necessary information and hit the create button, you will get to a page with some instructions on how to push your local project to GitHub:
We will go over those steps more in-depth in the next few chapters.
Public vs. Private repositories
Depending on the project and whether or not it is open source, you can set your repository to be public or private.
The main difference is that, with a public repository anyone on the internet can see that repository. Even though they’ll be able to see the repository and read the code, you will be the maintainer of the project, and you will choose who can commit.
Whereas a private repository will only be accessible to you and those you have invited.
Public repositories are used for open source projects.
Add colaborators to your projects
Colaborators are the people who actively work on the project, for example if a company has taken up a project for which some x, y, z are supposed to work, so these people are added as a colaborator by the the company.
Select a GitHub repository and navigate to the settings tab, in the left side menu bar there is an option Manage access, there you can add the collaborators for your project.
The README.md file
The README.md file is an essential part of each project. The .md extension stands for Markdown.
You can think of the README.md file as the introduction to your repository. It’s beneficial because while looking at someone’s repo, you can just scroll down to their README file and have a look at what their project is all about.
And it is crucial that your project is properly introduced. Because if the project itself isn’t introduced properly, no one will spend their time helping to improve it and try to develop it further.
That’s why having a good README file is necessary and it shouldn’t be overlooked, and you should spend a considerable amount of your time on it.
In this post, I am going to share some tips with you about how you can improve your README file, and hopefully, it will help you with your repositories.
Initializing a Git project
If you are starting a new project or if you have an existing project which you would like to add to Git and then push to GitHub, you need to initialize a new Git project with the git init command.
To keep things simple, let’s say that we want to start building a fresh new project. The first thing that I would usually do is to create a new folder where I would store my project files at. To do that, I can use the mkdir command followed by the name of the folder, which will create a new empty directory/folder:
mkdir new-project
The above command will create a folder called new-project. Then as we learned in chapter 4, we can use the cd command to access the directory:
cd new-project
After that, by using the ls command, we will be able to verify that the directory is completely empty:
ls -lah
Then with that, we are ready to initialize a new Git project:
git init
You will get the following output:
Initialized empty Git repository in /home/devdojo/new-project/.git/
As you can see, what the git init command does is to create a new .git folder which we already discussed in chapter 5.
With that, you’ve successfully created a new empty Git project! Let’s move to the next chapter, where you will learn how to use the git status command to check the current status of your repository.
Git Status
Whenever you make changes to your Git project, you would want to verify what has changed before making a commit or before pushing your changes to GitHub, for example.
To check the current status of your project, you can use the git status command. If you run the git status command in the same directory where you initialized your Git project from the last chapter, you will see the following output:
On branch main

No commits yet

nothing to commit (create/copy files and use "git add" to track)
As this is a fresh new repository, there are no commits and no changes yet. So let’s go ahead and create a README.md file with some generic content. We can run the following command to do so:
echo "# Demo Project" >> README.md
What this would do is to output the # Demo Project and store it in the README.md file.
If you run git status again, you will then see the following output:
Untracked files:
  (use "git add <file>..." to include in what will be committed)
        README.md
nothing added to commit but untracked files present (use "git add" to track)
As you can see, Git is detecting that there is 1 new file that is not tracked at the moment called README.md, which we just created. And already, Git is prompting us to use the git add command to start tracking the file. We will learn more about the git add command in the next chapter!
We are going to be using the git status command throughout the next few chapters a lot! This is particularly helpful, especially when you’ve modified a lot of files and you want to check the current status and see all of the modified, updated, or deleted files.
Git Add
By default, when you create a new file inside your Git project, it is not being tracked by Git. So to tell git that it should start tracking the file, you need to use the git add command.
The syntax is the following:
git add NAME_OF_FILE
In our case, we have only 1 filed inside our project called README.md, so to add this file to Git, we can use the following command:
git add README.md
If you then run git status again, you will see a different output:
Changes to be committed:
  (use "git rm --cached <file>..." to unstage)
        new file:   README.md
Here you would see that there are now some changes staged and ready to be committed. Also, Git tells us that the README.md is a new file that was just staged and has not been tracked before.
In case that you have a couple of files, you could list them all divided by space after the git add command to stage them all rather than running git add multiple times for each individual file:
git add file1.html file2.html file3.html
With the above, we will add the 3 files by running git add just once, however in some cases, you might have a lot of new files, and adding them one by one could be highly time-consuming.
So there is a way to stage absolutely all files in your current project, and this is by specifying a dot after the git add command as follows:
git add .
Note: You need to be careful with this as in some cases, there might be some files that you don’t want to add to Git.
With that, we are ready to move on and learn about the git commit command.
Git Commit
Once you have added/staged your files, the next step is actually to commit the changes. So if you run git status again, you will be able to see that Git tells us that there are changes to be committed:
Changes to be committed:
  (use "git rm --cached <file>..." to unstage)
        new file:   README.md
In this case, it is only the README.md file that will be committed. So in order to do so, we can run the following command:
git commit -m "Your Commit Message Here"
Rundown of the command:
git commit: here, we are telling git that we want to commit the changes that we’ve staged with thegit addcommand-m: this flag indicates that we will specify our commit message directly after that- Finally, in the quotes we’ve got our commit message, it is important to write short and descriptive commit messages
In our case we could set our commit message to something like "Initial commit" or "Add README.md" file, for example.
If you don’t specify the -m flag, Git will open the default text editor that we’ve configured in chapter 5 where you will be able to type the commit message directly.
Committing directly without staging files:
If you have not already staged your changes using git add command you can still directly commit all your changes using the following command.
git commit -a -m "Your Commit Message Here"
The -a flag here will automatically stage all the changes and commit them.
Signing Commits
Git allows you to sign your commits. Commits signed with a verified signature in GitHub and GitLab display a verified label as shown below.
To sign commits, first you need to:
- make sure that you have GNU GPG installed on your host.
- Generate a GPG signing key pair if you don’t already havegpg –full-generate-key
- Use the
gpg --list-secret-keys --keyid-format=longcommand to list the long form of the GPG keys
gpg --list-secret-keys --keyid-format=long
/Users/bobby/.gnupg/pubring.kbx
---------------------------------
sec   rsa4096/E630A0A00CAA7AAA 2021-10-01 [SC] [expires: 2026-10-01]
      5F1F417F8A043C8888888888E630F6D35CFA7ECD
uid                 [ultimate] Bobby Illiev (For signing git commits) <bobby@bobbyiliev.com>
ssb   rsa4096/46EE4AA180001AA6 2021-10-01 [E] [expires: 2026-10-01]
- Copy the long form of the GPG key ID you’d like to use. In this sample, the GPG key ID is
E630A0A00CAA7AAA. - Export the public key:
gpg --armor --export E630A0A00CAA7AAA
- Copy your GPG key, beginning with
-----BEGIN PGP PUBLIC KEY BLOCK-----and ending with-----END PGP PUBLIC KEY BLOCK-----. - Login to GitHub or GitLab and add a new GPG key under settings:
- Set your GPG signing key in Git: (If you intend to add the signing key per repository, the omit the
--globalflag)
git config --global user.signingkey E630A0A00CAA7AAA
- Enable automatic signing for all commits:
git config --global commit.gpgsign true
- Or Sign per commit by passing
-Soption togit commit:
git commit -S -m "your commit message"
After running the git commit command, we can use the git status command again to check the current status:
git status
Output:
On branch main
nothing to commit, working tree clean
As you can see, Git is telling us that there are no changes to be committed as we’ve already committed them.
Let’s go ahead and make another change to the README.md file. You can open the file with your favorite text editor and make the change directly, or you can run the following command:
echo "Git is awesome!" >> README.md
The above would add a new line at the bottom of the README.md file. So if we were to run git status again, we will see the following output:
On branch main
Changes not staged for commit:
  (use "git add <file>..." to update what will be committed)
  (use "git restore <file>..." to discard changes in working directory)
        modified:   README.md

no changes added to commit (use "git add" and/or "git commit -a")
As you can see, Git has detected that the README.md file has been modified and is also prompting us to use the command that we’ve learned to first stage/add the file!
In case that you wanted to change your last commit message, you can run the git commit --amend command. This will open the default editor where you can change your commit message. Also, this allows you to change the commit changes.
The git status command gives us a great overview of the files that have changed, but it does not show us what the changes actually are. In the next chapter, we are going to learn how to check the differences between the last commit and the current changes.
To check for commits that changed particular file you can use the --follow flag:
git log --follow [file]
The above shows the commits that changed the file, even across renames.
Git Diff
As mentioned in the last chapter, the git status command gives us a great overview of the files that have changed, but it does not show us what the changes actually are.
You can check the actual changes that were made with the git diff command. If we were to run the command in our repository, we would see the following output:
diff --git a/README.md b/README.md
index 9366068..2b14655 100644
--- a/README.md
+++ b/README.md
@@ -1 +1,2 @@
 # Demo Project
+Git is awesome
As we only changed the README.md file, Git is showing us the following:
diff --git a/README.md b/README.md: here git indicates that it shows the changes made to theREADME.mdfile since the last commit compared to the current version of the file.@@ -1 +1,2 @@: here git indicates that 1 new line was added+Git is awesome: here, the important part is the+, which indicates that this is a new line that was added. In case that we remove a line, you would see a-sign instead.
In our case, as we only added 1 new line to the file, Git indicates that only 1 file was changed and that only 1 new line was added.
Next, let’s go ahead and stage that change and commit it with the comments that we’ve learned from the previous chapters!
- Stage the changed file:
git add README.md
- Then again run
git statusto check the current status:
git status
The output would look like this, indicating that there is 1 modified file:
On branch main
Changes to be committed:
  (use "git restore --staged <file>..." to unstage)
        modified:   README.md
- Commit the changes:
git commit -m "Update README.md"
Finally, if you run git status again you will see that there are no changes to be committed.
I always run git status and git diff before making any commits, just so that I’m sure what has changed.
Note 1 :
git diff --stagedwill only show the changes to the file in “staged” area.
Note 2 :
git diff HEADwill show all changes to tracked files(file in last snapshot), if you have all the changes staged for commit then both the commands give same output.
In some cases, you would like to see a list of the previous commits. We will learn how to do that in the next chapter.
Git Log
In order to list all of the previous commits, you can use the following command:
git log
This will provide you with your commit history, the output would look like this:
commit da46ce39a3fd663ff802d013f834431d4b4159a5 (HEAD -> main)
Author: Bobby Iliev <bobby@bobbyiliev.com>
Date:   Fri Mar 12 17:14:02 2021 +0000

    Update README.md

commit fa583473b4be2807b45f35b755aa84ac78922259
Author: Bobby Iliev <bobby@bobbyiliev.com>
Date:   Fri Mar 12 17:01:17 2021 +0000

    Initial commit
The entries are listed, in order, from most recent to oldest.
Rundown of the output:
commit da46ce39a3fd663ff802d013f834431d4b4159a5: Here you can see the specific commit IDAuthor: Bobby Iliev...: Then you can see who created the changesDate: Fri Mar 12...: After that, you’ve got the exact time and date when the commit was created- Finally, you have the commit message. This is one of the reasons why it is important to write short and descriptive commit messages so that later on, you could tell what changes were introduced by the particular commit.
If you want to check the differences between the current state of your repository and a particular commit, what you could do is use the git diff command followed by the commit ID:
git diff fa583473b4be2807b45f35b755aa84ac78922259
In my case the output will be the following:
diff --git a/README.md b/README.md
index 9366068..2b14655 100644
--- a/README.md
+++ b/README.md
@@ -1 +1,2 @@
 # Demo Project
+Git is awesome
So the difference between that specific commit and the current state of the repository is the change in the README.md file.
In case that you wanted to see only the commit IDs and commit messages on one line, you could add the --oneline argument:
git log --oneline
Output:
* da46ce3 (HEAD -> main) Update README.md
* fa58347 Initial commit
With that, you now know how to check your commit history! Next, let’s go ahead and learn how to exclude specific files from Git!
Gitignore
While working on a Git repository, you will often have files and directories that you do not want to commit, so that they are not available to others using the repository.
In some cases, you might not want to commit some of your files to Git due to security reasons.
For example, if you have a config file that stores all of your database credentials and other sensitive information, you should never add it to Git and push it to GitHub as other people will be able to get hold of that sensitive information.
Another case where you may not want to commit a file or directory, is when those files are automatically generated and do not contain source code, so that you don’t clutter your repository. Also, sometimes it makes sense not to commit certain files that contain environment information, so that other people can use your code with their environment files.
To prevent these types of files from being committed, you can create a gitignore file which includes a list of all of the files and directories that should be excluded from your Git repository. In this chapter, you will learn how to do that!
Ignoring a specific file
Let’s have a look at the following example if you had a PHP project and a file called config.php, which stores your database connection string details like username, password, host, etc.
To exclude that file from your git project, you could create a file called .gitignore inside your project’s directory:
touch .gitignore
Then inside that file, all that you need to add is the name of the file that you want to ignore, so the content of the .gitignore file would look like this:
config.php
That way, the next time you run git add . and then run git commit and git push, the config.php file will be ignored and will not be added nor pushed to your Github repository.
That way, you would keep your database credentials safe!
Ignoring a whole directory
In some cases, you might want to ignore a whole folder. For example, if you have a huge node_modules folder, there is no need to add it and commit it to your Git project, as that directory is generated automatically whenever you run npm install.
The same would go for the vendor folder in Laravel. You should not add the vendor folder to your Git project, as all of the content of that folder is generated automatically whenever you run composer install.
So to ignore the vendors and node_modules folders, you could just add them to your .gitignore file:
# Ignored folders
/vendor/
node_modules/
Ignoring a whole directory except for a specific file
Sometimes, you want to ignore a directory except for one or a couple of other files within that directory. It could be that the directory is required for your application to run but the files created is not supposed to be pushed to the remote repository or maybe you want to have a README.md file inside the directory for some purpose. To achieve this, your .gitignore file should like like this:
data/*
!data/README.md
The first line indicates that you want to ignore the data directory and all files inside it. However, the second line provides the instruction that the README.md is an exception.
Take note that the ordering is important in this case. Otherwise, it will not work.
Getting a gitignore file for Laravel
To get a gitignore file for Laravel, you could get the file from [the official Laravel Github repository] here(https://github.com/laravel/laravel/).
The file would look something like this:
/node_modules
/public/hot
/public/storage
/storage/*.key
/vendor
.env
.env.backup
.phpunit.result.cache
Homestead.json
Homestead.yaml
npm-debug.log
yarn-error.log
It essentially includes all of the files and folders that are not needed to get the application up and running.
Using gitignore.io
As the number of frameworks and application grows day by day, it might be hard to keep your .gitignore files up to date or it could be intimidating if you had to search for the correct .gitignore file for every specific framework that you use.
I recently discovered an open-source project called gitignore.io. It is a site and a CLI tool with a huge list of predefined gitignore files for different frameworks.
All that you need to do is visit the site and search for the specific framework that you are using.
For example, let’s search for a .gitignore file for Node.js:
Then just hit the Create button and you would instantly get a well documented .gitignore file for your Node.js project, which will look like this:
# Created by https://www.toptal.com/developers/gitignore/api/node
# Edit at https://www.toptal.com/developers/gitignore?templates=node

### Node ###
# Logs
logs
*.log
npm-debug.log*
yarn-debug.log*
yarn-error.log*
lerna-debug.log*

# Diagnostic reports (https://nodejs.org/api/report.html)
report.[0-9]*.[0-9]*.[0-9]*.[0-9]*.json

# Runtime data
pids
*.pid
*.seed
*.pid.lock

# Directory for instrumented libs generated by jscoverage/JSCover
lib-cov

# Coverage directory used by tools like istanbul
coverage
*.lcov

# nyc test coverage
.nyc_output

# Grunt intermediate storage (https://gruntjs.com/creating-plugins#storing-task-files)
.grunt

# Bower dependency directory (https://bower.io/)
bower_components

# node-waf configuration
.lock-wscript

# Compiled binary addons (https://nodejs.org/api/addons.html)
build/Release

# Dependency directories
node_modules/
jspm_packages/

# TypeScript v1 declaration files
typings/

# TypeScript cache
*.tsbuildinfo

# Optional npm cache directory
.npm

# Optional eslint cache
.eslintcache

# Microbundle cache
.rpt2_cache/
.rts2_cache_cjs/
.rts2_cache_es/
.rts2_cache_umd/

# Optional REPL history
.node_repl_history

# Output of 'npm pack'
*.tgz

# Yarn Integrity file
.yarn-integrity

# dotenv environment variables file
.env
.env.test

# parcel-bundler cache (https://parceljs.org/)
.cache

# Next.js build output
.next

# Nuxt.js build / generate output
.nuxt
dist

# Gatsby files
.cache/
# Comment in the public line in if your project uses Gatsby and not Next.js
# https://nextjs.org/blog/next-9-1#public-directory-support
# public

# vuepress build output
.vuepress/dist

# Serverless directories
.serverless/

# FuseBox cache
.fusebox/

# DynamoDB Local files
.dynamodb/

# TernJS port file
.tern-port

# Stores VSCode versions used for testing VSCode extensions
.vscode-test

# End of https://www.toptal.com/developers/gitignore/api/node
Using gitignore.io CLI
If you are a fan of the command-line, the gitignore.io project offers a CLI version as well.
To get it installed on Linux, just run the following command:
git config --global alias.ignore \
'!gi() { curl -sL https://www.toptal.com/developers/gitignore/api/$@ ;}; gi'
If you are using a different OS, I would recommend checking out the documentation here on how to get it installed for your specific Shell or OS.
Once you have the gi command installed, you could list all of the available .gitignore files from gitignore.io by running the following command:
gi list
For example, if you quickly needed a .gitignore file for Laravel, you could just run:
gi laravel
And you would get a response back with a well-documented Laravel .gitignore file:
# Created by https://www.toptal.com/developers/gitignore/api/laravel
# Edit at https://www.toptal.com/developers/gitignore?templates=laravel

### Laravel ###
/vendor/
node_modules/
npm-debug.log
yarn-error.log

# Laravel 4 specific
bootstrap/compiled.php
app/storage/

# Laravel 5 & Lumen specific
public/storage
public/hot

# Laravel 5 & Lumen specific with changed public path
public_html/storage
public_html/hot

storage/*.key
.env
Homestead.yaml
Homestead.json
/.vagrant
.phpunit.result.cache

# Laravel IDE helper
*.meta.*
_ide_*

# End of https://www.toptal.com/developers/gitignore/api/laravel
Conclusion
Having a gitignore file is essential, it is great that you could use a tool like the gitignore.io to generate your gitignore file automatically, depending on your project!
If you like the gitignore.io project, make sure to check out and contribute to the project here.
SSH Keys
There are a few ways to authenticate with GitHub. Essentially you would need this so that you could push your local changes from your laptop to your GitHub repository.
You could use one of the following methods:
- HTTPS: Essentially, this would require your GitHub username and password each time you try to push your changes
- SSH: With SSH, you could generate an SSH Key pair and add your public key to GitHub. That way, you would not be asked for your username and password every time you push your changes to GitHub.
One thing that you need to keep in mind is that the GitHub repository URL is different depending on whether you are using SSH or HTTPS:
- HTTPS:
https://github.com/bobbyiliev/demo-repo.git - SSH:
git@github.com:bobbyiliev/demo-repo.git
Note that when you choose SSH, the https:// part is changed with git@, and you have : after github.com rather than /. This is important as this defines how you would like to authenticate each time.
Generating SSH Keys
To generate a new SSH key pair in case that you don’t have one, you can run the following command:
ssh-keygen
For security reasons you can specify a passphrase, which essentially is the password for your private SSH key.
The above would generate 2 files:
- 1 private SSH key and 1 public SSH key. The private key should always be stored safely on your laptop, and you should not share it with anyone.
- 1 public SSH key, which you need to upload to GitHub.
The two files will be automatically generated at the following folder:
~/.ssh
You can use the cd command to access the folder:
cd ~/.ssh
Then with ls you can check the content:
ls
Output:
id_rsa id_rsa.pub
The id_rsa is your private key, and again you should not share it with anyone.
The id_rsa.pub is the public key that would need to be uploaded to GitHub.
Adding the public SSH key to GitHub
Once you’ve created your SSH keys, you need to upload the public SSH key to your GitHub account. To do so, you first need to get the content of the file.
To get the content of the file, you can use the cat command:
cat ~/.ssh/id_rsa.pub
The output will look like this:
ssh-rsa AAB3NzaC1yc2EAAAADAQAB...... your_user@your_host
Copy the whole thing and then visit GitHub and follow these steps:
- Click on your profile picture on the right top
- Then click on settings
- On the left, click on
SSH and GPG Keys
- After that, click on the
New SSH Keybutton - Then specify a title of the SSH key, it should be something descriptive, for example:
Work Laptop SSH Key. And in theKeyarea, paste your public SSH key - Finally click the
Add SSH Keybutton at the bottom of the page
Conclusion
With that, you now have your SSH Keys generated and added to GitHub. That way, you will be able to push your changes without having to type your GitHub password and user each time.
For more information about SSH keys, make sure to check this tutorial here
Git Push
Then finally, once you’ve made all of your changes, staged them with the git add . command, and committed the changes with the git commit command, you must push the committed changes from your local repository to your remote GitHub repository. This ensures that the remote repository is brought up-to-date with your local repository.
Creating and Linking a Remote Repository
Before you can push to your remote GitHub repository, you need to first create your remote repository via GitHub as per Chapter 6.
Once you have your remote GitHub repository ready, you can add it to your local project with the following command:
git remote add origin git@github.com:your_username/your_repo_name.git
Note: Make sure to change the
your_usernameandyour_repo_namedetails accordingly.
This is how you can link your local Git project with your remote GitHub repository.
If you’ve read the previous chapter, you will most likely notice we are using SSH as the authentication method.
However, if you did not follow the steps from the previous chapter, you can use HTTPS rather than SSH:
git remote add origin https://github.com/your_username/your_repo_name.git
To verify your remote repository, you can run the following command:
git remote -v
Pushing Commits
To push your committed changes to the linked remote repository, you can use the git push command:
git push -u origin main
Note: In this command,
-u origin maintells Git to set the main branch of the remote repository as the upstream branch within thegit pushcommand. This is the best practice when using Git as it allows thegit pushandgit pullcommands to work as intended. Alternatively, you can use--set-upstream origin mainfor this as well.
If you are using SSH with your SSH key uploaded to GitHub, the push command will not ask you for a password and will push your changes to GitHub straight away.
In case that you did not run the git remote add command as outlined in earlier in this chapter, you will receive the following error:
fatal: 'origin' does not appear to be a git repository
fatal: Could not read from remote repository.

Please make sure you have the correct access rights
and the repository exists.
This would mean that you’ve not added your GitHub repository as the remote repository. This is why we run the git remote add command to create that connection between your local repository and the remote GitHub repository.
Note that the connection would be in place if you used the git clone command to clone an existing repository from GitHub to your local machine. We will go through the git pull command in the next few chapters as well.
Checking the Remote Repository
After running the git push command, you can head over to your GitHub project and you will be able to see the commits that you’ve made locally present in remote repository on GitHub. If you were to click on the commits link, you would be able to see all commits just as if you were to run the git log command:
Now that you know how to push your latest changes from your local Git project to your GitHub repository, it’s time to learn how to pull the latest changes from GitHub to your local project.
Git Pull
If you are working on a project with multiple people, the chances are that the codebase will change very often. So you would need to have a way to get the latest changes from the GitHub repository to your local machine.
You already know that you can use the git push command to push your latest commits, so to do the opposite and pull the latest commits from GitHub to your local project, you need to use the git pull command.
To test this, let’s go ahead and make a change directly on GitHub directly. Once you are there, click on the README.md file and then click on the pencil icon to edit the file
Make a minor change to the file, add a descriptive commit message and click on the Commit Changes button
With that, you’ve now made a commit directly on GitHub, so your local repository will be behind the remote GitHub repository.
If you were to try and push a change now to that same branch, it would fail with the following error:
! [rejected]        main -> main (fetch first)
error: failed to push some refs to 'git@github.com:bobbyiliev/demo-repo.git'
hint: Updates were rejected because the remote contains work that you do
hint: not have locally. This is usually caused by another repository pushing
hint: to the same ref. You may want to first integrate the remote changes
hint: (e.g., 'git pull ...') before pushing again.
hint: See the 'Note about fast-forwards' in 'git push --help' for details.
As stated in the output, the remote repository is ahead of your local one, so you need to run the git pull command to get the latest changes:
git pull origin main
The output that you will get will look like this:
remote: Enumerating objects: 5, done.
remote: Counting objects: 100% (5/5), done.
remote: Total 3 (delta 0), reused 0 (delta 0), pack-reused 0
Unpacking objects: 100% (3/3), 646 bytes | 646.00 KiB/s, done.
From github.com:bobbyiliev/demo-repo
 * branch            main       -> FETCH_HEAD
   da46ce3..442afa5  main       -> origin/main

 README.md | 3 ++-
 1 file changed, 2 insertions(+), 1 deletion(-)
We can see that the README.md file was changed and that there were 2 new lines added and 1 line deleted.
Now, if you were to run git log, you will see the commit that you’ve made on GitHub available locally.
Of course, this is a simplified scenario. In the real world, you would not make any changes directly to GitHub, but you would most likely work with other people on the same project, and you would have to pull their latest changes regularly.
You need to make sure that you pull the latest changes every time before you try to push your changes.
Now that you know the basic Git commands let’s go ahead and learn what Git Branches are.
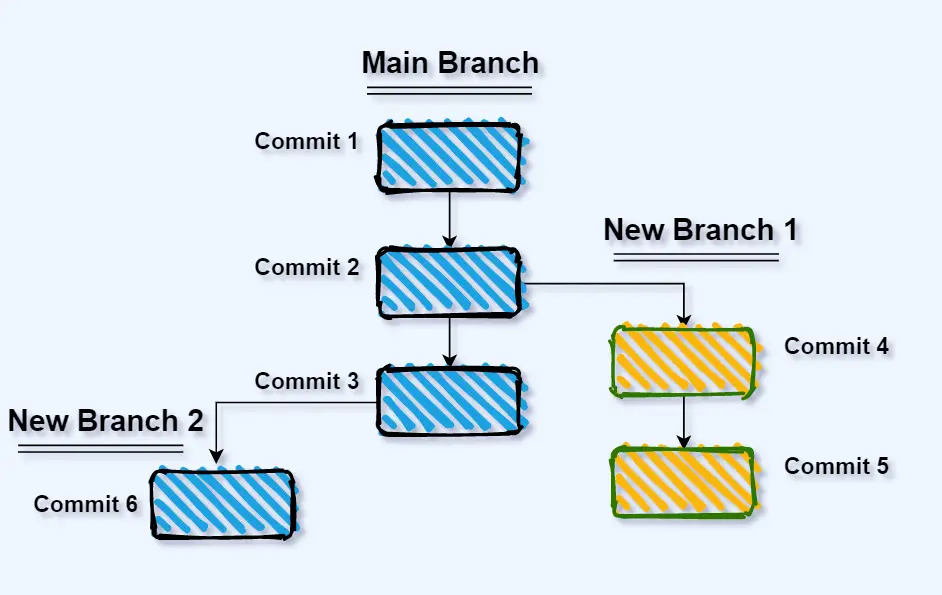
Git Branches
So far, we have been working only on our Main branch, which is created by default when creating a new GitHub repository. In this chapter, you will learn more about Git Branches. Why you need them and how to work with them.
The official definition of a Git branch from the git-scm.com website is the following:
A branch in Git is simply a lightweight movable pointer to one of these commits.
This might be a bit confusing in case that you are just getting started. So you could think of branches as a way to work on your project by adding a new feature of bug fixes without affecting the Main branch.
That way, each new feature or bug fix that you are developing could live on a separate branch, and later on, once you are ready and have fully tested the changes, you can merge the new branch to your main branch. You will learn more about merging in the next chapter!
If we look into the following illustration where we have a few branches, you can see that it looks like a tree, hence the term branching:
Thanks to the multiple branches, you can have multiple people working on different features or fixes at the same time each one working on their own branch.
The image shows 3 branches:
- The main branch
- New Branch 1
- New Branch 2
The main branch is the default branch that you are already familiar with. We can consider the other two branches as two new features that are being developed. One developer could be working on a new contact form for your web application on branch #1, and another developer could be working on a user registration form feature on branch #2.
Thanks to the separate branches, both developers can work on the same project without getting into each others way.
Next, let’s go ahead and learn how to create new branches and see this in action!
Creating a new branch
Let’s start by creating a new branch called newFeature. In order to create the branch, you could use the following command:
git branch newFeature
Now, in order to switch to that new branch, you would need to run the following command:
git checkout newFeature
Note: You can use the
git checkoutcommand to switch between different branches.
The above two commands could be combined into 1, so that you don’t have to create the branch first and then switch to the new branch. You could use this command instead, which would do both:
git checkout -b newFeature
Once you run this command, you will see the following output:
Switched to a new branch 'newFeature'
In order to check what branch you are currently on, you can use the following command:
git branch
Output:
  main
* newFeature
We can tell that we have 2 branches: the main one and the newFeature one that we just created. The star before the newFeature branch name indicates that we are currently on the newFeature branch.
If you were to use the git checkout command to switch to the main branch:
git checkout main
And then run git branch again. You will see the following output indicating that you are now on the main branch:
* main
  newFeature
Making changes to the new branch
Now let’s go ahead and make a change on the new feature branch. First switch to the branch with the git checkout command:
git checkout newFeature
Note: we only need to add the
-bargument when creating new branches
Check that you’ve actually switched to the correct branch:
git branch
Output:
  main
* newFeature
Now let’s create a new file with some demo content. You can do that with the following command:
echo "<h1>My First Feature Branch</h1>" > feature1.html
The above will echo out the <h1>My First Feature Branch</h1> string and store it in a new file called feature1.html.
After that, stage the file and commit the change:
git add feature1.html
git commit -m "Add feature1.html"
The new feature1.html file will only be present on the newFeature branch. If you were to switch to the main branch and run the ls command or check the git log, you will be able to see that the file is not there.
You can check that by using the git log command:
git log
With that, we’ve used quite a bit of the commands that we’ve covered in the previous chapters!
Compare branches
You can also compare two branches with the following commands.
- Shows the commits on
branchAthat are not onbranchB:
git log BranchA..BranchB
- Shows the difference of what is in
branchAbut not inbranchB:
git diff BranchB...BranchA
Renaming a branch
In case that you’ve created a branch with the wrong name or if you think that the name could be improved as it is not descriptive enough, you can rename a branch by running the following command:
git branch -m wrong-branch-name correct-branch-name
If you want to rename your current branch, you could just run the following:
git branch -m my-branch-name
After that, if you run git branch again you will be able to see the correct branch name.
Deleting a branch
If you wanted to completely delete a specific branch you could run the following command:
git branch -d name_of_the_branch
This would only delete the branch from your local repository, in case that you’ve already pushed the branch to GitHub, you can use the following command to delete the remote branch:
git push origin --delete name_of_the_branch
If you wanted to synchronize your local branches with the remote branches you could run the following command:
git fetch
Conclusion
With that, our newFeature branch is now ahead of the main branch with 1 commit. So in order to get that new changes over to the main branch, we need to merge the newFeature branch into our main branch.
In the next chapter, you will learn how to merge your changes from one branch to another!
One thing that you might want to keep in mind is that in the past when creating a new GitHub repository the default branch name was called master. However, new repositories created on GitHub use main instead of master as the default branch name. This is part of GitHub’s effort to remove unnecessary references to slavery and replace them with more inclusive terms.
Git Merge
Once the developers are ready with their changes, they can merge their feature branches into the main branch and make those features live on the website.
If you followed the steps from the previous chapter, then your newFeature branch is now ahead of the main branch with 1 commit. So in order to get that new changes over to the main branch, we need to merge the newFeature branch into our main branch.
Merging a branch
You can do that by following these steps:
- First switch to your
mainbranch:
git checkout main
- After that, in order to merge your
newFeaturebranch and the changes that we created in the last chapter, run the followinggit mergecommand:
git merge newFeature
Output:
Updating ab1007b..a281d25
Fast-forward
 feature1.html | 1 +
 1 file changed, 1 insertion(+)
 create mode 100644 feature1.html
As you were on the main branch when you ran the git merge command, Git will take all of the commits from that branch and merge them into the main branch.
Now, if you run the ls command, you will be able to see the new feature1.html file, and if you check the commit history with the git log command, you will see the commit from the newFeature branch present on your main branch.
Before doing the merge, you could again use the git diff command to check the differences between your current branch and the branch that you want to merge. For example, if you are currently on the main branch, you could use the following:
git diff newFeature
In this case, the merge went through smoothly as there were no merge conflicts. However, if you are working on a real project with multiple people making changes, there might be some merge conflicts. Essentially this happens when changes are made to the same line of a file, or when one developer edits a file on one branch and another developer deletes the same file.
Resolving conflicts
Let’s simulate a conflict. To do so, create a new branch:
git checkout -b conflictDemo
Then edit the feature1.html file:
echo "<p>Conflict Demo</p>" >> feature1.html
The command above will echo out the <p>Conflict Demo</p> string, and thanks to the double grater sign >>, the string will be added to the bottom of the feature1.html file. You can check the content of the file with the cat command:
cat feature1.html
Output:
<h1>My First Feature Branch</h1>
<p>Conflict Demo</p>
You can again run git status and git diff to check what exactly has been modified before committing.
After that, go ahead and commit the change:
git commit -am "Conflict Demo 1"
Note that we did not run the git add command, but instead, we used the -a flag, which stands for add. You can do that for files that have been added to git and have just been modified. If you’ve added a new file, then you would have to stage it first with the git add command.
Now go switch back to your main branch:
git checkout main
And now, if you check the feature1.html file, it will only have the <h1>My First Feature Branch</h1> line as the change that we made is still only present on the conflictDemo branch.
Now let’s go ahead and make a change to the same file:
echo "<p>Conflict: change on main branch</p>" >> feature1.html
Now we are adding again a line to the bottom of the feature1.html file with different content.
Go ahead and stage this and commit the change:
git commit -am "Conflict on main"
Now your main branch and the conflictDemo branch have changes to the same file, on the same line. So let’s run the git merge command and see what happens:
git merge conflictDemo
Output:
Auto-merging feature1.html
CONFLICT (content): Merge conflict in feature1.html
Automatic merge failed; fix conflicts and then commit the result.
As we can see from the output, the merge is failing as there were changes to the same file on the same line, so Git is unsure which is the correct change.
As always, there are multiple ways to fix conflicts. Here we will go through one.
Now if you were to check the content of the feature1.html file you will see the following output:
<h1>My First Feature Branch</h1>
<<<<<<< HEAD
<p>Conflict: change on main branch</p>
=======
<p>Conflict Demo</p>
>>>>>>> conflictDemo
Initially, it could be a little bit overwhelming, but let’s quickly review it:
<<<<<<< HEAD: this part here indicates the start of the changes on your current branch. In our case, the<p>Conflict: change on main branch</p>line is present on themainbranch, which is also the branch that we’ve currently switched to.=======: this line indicates where the changes from the current branch end and where the changes from the new branch are coming from. In our case, the change from the new branch is the<p>Conflict Demo</p>line.>>>>>>> conflictDemo: this indicates the name of the branch that the changes are coming from.
You can resolve the conflict by manually removing the lines that are not needed, so at the end, the file will look like this:
<h1>My First Feature Branch</h1>
<p>Conflict: change on main branch</p>
In case that you are using an IDE like VS Code, for example, it will allow you to choose which changes to keep with a click of a button.
After resolving the conflict, you will need to make another commit as the conflict is now resolved:
git commit -am "Resolve merge conflict"
Conclusion
Git branches and merges allow you to work on a project together with other people. One important thing to keep in mind is to make sure that you pull the changes to your local main branch on a regular basis so that it does not get behind the remote one.
A few more commands which you might find useful once you feel comfortable with what we’ve covered so far are the git rebase command and the git cherry-pick command, which lets you pick which commits from a specific branch you would like to carry over to your current branch.
Reverting changes
As with everything, there are multiple ways to do a specific thing. But what I would usually do in this case I want to undo my latest commit and then commit my new changes is the following.
- Let’s say that you made some changes and you committed the changes:
git commit -m "Committing the wrong changes"
- After that if you run
git log, you will see the history of everything that has been committed to a repository. - Unfortunately, after you commit the wrong changes, you realize that you forget to add files to the commit or forget to add a small change to committed files.
- To solve that all you need to do is make these changes and stage them by running
git addthen you canamendthe last commit by running the following command:
git commit --amend
Note: The above command will also let you change the commit message if you need.
Resetting Changes ( Resetting Is Dangerous )
You need to be careful with resetting commands because this command will erase commits from the repository and delete it from the history.
Example:
git reset --soft HEAD~1
The above command will reset back with 1 point.
Note: the above would undo your commit, but it would keep your code changes if you would like to get rid of the changes as well, you need to do a hard reset: git reset --hard HEAD~1
Syntax:
git reset [--soft|--hard] [<reference-to-commit>]
- After that, make your new changes
- Once you are done with the changes, run
git addto add any of the files that you would like to be included in the next commit:
git add .
- Then use
git commitas normal to commit your new changes:
git commit -m "Your new commit message"
- After that, you could again check your history by running:
git log
Here’s a screenshot of the process:
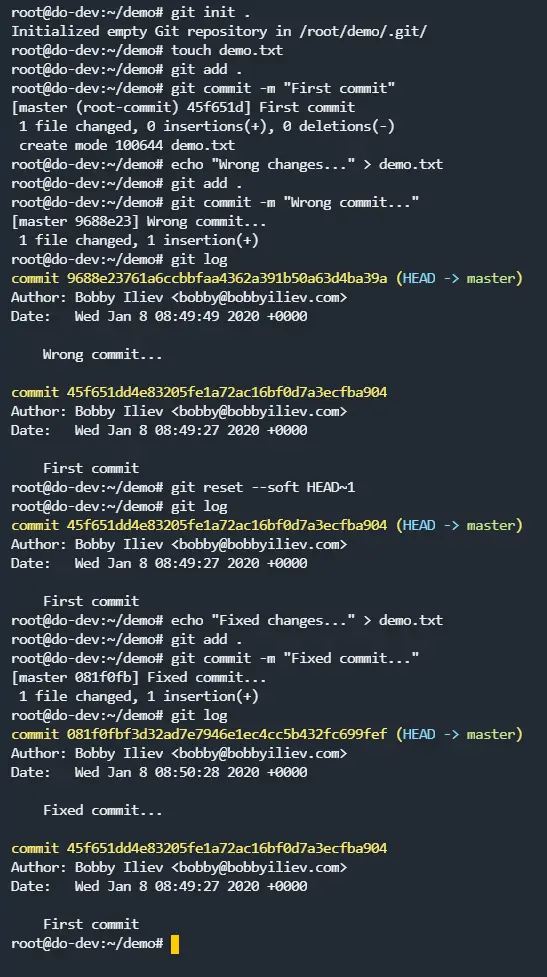
Note: You can reset your changes by more than one commit by using the following syntax:
git reset --soft HEAD~n
where n is the number of commits you want to reset back.
Another approach would be to use git revert COMMIT_ID instead.
Here is a quick video demo on how to do the above:
Git Clone
More often than not, rather than starting a new project from scratch, you would either join a company and start working on an existing project, or you would contribute to an already established open source project. So in this case, in order to get the repository from GitHub to your local machine, you would need to use the git clone command.
The most straightforward way to clone your GitHub repository is to first visit the repository in your browser, and then click on the green Code button and choose the method that you want to use to clone the repository:
In my case, I would go for the SSH method as I already have my SSH keys configured as per chapter 14.
As I am cloning this repository here, the URL would look like this:
git@github.com:bobbyiliev/introduction-to-bash-scripting.git
Once you have this in my clipboard, head back to your terminal, go to a directory where you would like to clone the repository to and then run the following command:
git clone git@github.com:bobbyiliev/introduction-to-bash-scripting.git
The output that you would get will look like this:
Cloning into 'introduction-to-bash-scripting'...
remote: Enumerating objects: 21, done.
remote: Counting objects: 100% (21/21), done.
remote: Compressing objects: 100% (16/16), done.
remote: Total 215 (delta 7), reused 14 (delta 4), pack-reused 194
Receiving objects: 100% (215/215), 3.08 MiB | 5.38 MiB/s, done.
Resolving deltas: 100% (114/114), done.
Essentially what the git clone command does is to more or less download the repository from GitHub to your local folder.
Now you can start making the changes to the project by creating a new branch, writing some code, and finally committing and pushing your changes!
One important thing to keep in mind is that in case that you are not the maintainer of the repository and do not have the right to push to the repository, you would need to first fork the original repository and then clone the forked repository from your account. In the next chapter, we will go through the full process of forking a repository!
Forking in Git
When contributing to an open-source project, you will not be able to make the changes directly to the project. Only the repository maintainers have that privilege.
What you need to do instead is to fork the specific repository, make the changes to the forked project and then submit a pull request to the original project. You will learn more about pull requests in the next chapters.
If you clone a repository that you don’t have the access to and then try to push the changes directly to that repository, you would get the following error:
ERROR: Permission to laravel/laravel.git denied to bobbyiliev.
Fatal: Could not read from remote repository.

Please make sure you have the correct access rights
and the repository exists.
This is where Forks come into play!
In order to fork a repository, you need to visit the repository via your browser and click on the Fork button on the top right then choose the account that you want to fork the repository to then it might take a few seconds for the repository to be forked under your account With that, you would have an exact copy of the repository in question under your account.
The benefit here is that you can now clone the forked repository under your account, make the changes to that repository as normal, and then once you are ready, you can submit a pull request to the original repository contributing your changes.
As we’ve now mentioned submitting pull requests a few times already, let’s go ahead and learn more about pull requests in the next chapter!
Git Workflow
Now that you know the basic commands, let’s put it all together and go through a basic Git workflow.
Usually, the workflow looks something like this:
- First, you clone an existing project with the
git clonecommand, or if you are starting a new project, you initialize it with thegit initcommand. - After that, before starting with your code changes, it’s best to create a new Git branch where you would work on. You can do that with the
git checkout -b YOUR_BRANCH_NAMEcommand. - Once you have your branch ready, you would start making the changes to your code.
- Then, once you are ready with the changes, you need to stage them with the
git addcommand. - Then, to commit/save the changes to your local Git repository, you need to run the
git commitcommand and provide a descriptive commit message. - To push your local changes to your remote GitHub project, you would use the
git push origin YOUR_BRANCH_NAMEcommand - Finally, once you’ve pushed your changes, you would need to submit a pull request (PR) from your branch to the main branch of the repository.
- It is considered good practice to add a couple of people as reviewers and ask them to review the changes.
- Finally, once the changes have been approved, the PR would get merged into the main branch taking all of your changes from your branch into the main branch.
The overall process will look like this:

My advice is to create a new repository and go over this process a few times until you feel completely comfortable with all of the commands.
Pull Requests
You already know how to merge changes from one branch to another on your local Git repository.
To do the same thing on GitHub, you would need to open a Pull Request (or a Merge Request if you are using GitLab) or a PR for short and request a merge from your feature branch to the main branch.
The steps that you would need to take to open a Pull Request are:
- If you are working on an open-source project that you are not the maintainer of, first fork the repository as per chapter 21. Skip this step if you are the maintainer of the repository.
- Then clone the repository locally with the
git clonecommand:
git clone git@github.com:your_user/your_repo
- Create a new branch with the
git checkoutcommand:
git checkout -b branch_name
- Make your code changes
- Stage the changes with
git add
git add .
- And then commit them with
git commit:
git commit -m "Commit Message"
- Then push your new branch to GitHub with
git push:
git push origin branch_name
- After that, visit the repository on GitHub and click on the
Pull Requestsbutton and then click on the greenNew pull requestbutton:
- Then review the changes and add a title and description and hit the create button
- If you are working on a project with multiple contributors, make sure to select a few reviewers. Essentially reviewers are people who you would like to review your code before it gets merged to the
mainbranch.
For a visual representation of the whole process, make sure to check out this step by step tutorial as well:
https://www.digitalocean.com/community/tutorials/hacktoberfest-how-to-submit-your-first-pull-request-on-github
Git And VS Code
As much as I love to use the terminal to do my daily tasks in the end, I would rather do multiple tasks within one window (GUI) or perform everything from the terminal itself.
In the past, I was using the text editors (vim, nano, etc.) in my terminal to edit the code in my repositories and then go along with the git client to commit my changes. Still, then I switched to Visual Studio Code to manage and develop my code.
I will recommend you to check this article on why you should use Visual Studio. It is an article from Visual Studio’s website itself.
Why you should use Visual Studio
Visual Studio Code has integrated source control management (SCM) and includes Git support in-the-box. Many other source control providers are available through extensions on the VS Code Marketplace. It also has support for handling multiple Source Control providers simultaneously so you can open all of your projects at the same time and make changes whenever this is needed.
Installing VS Code
You need to install Visual Studio Code. It runs on the macOS, Linux, and Windows operating systems.
Follow the platform-specific guides below:
You need to install Git first before you get these features. Make sure you install at least version 2.0.0. If you do not have git installed on your machine, feel free to check this really useful article on How to get started with Git
You need to set your username and email in the Git configuration, or git will fail back to using information from your local machine when you commit. We need to provide this information because Git embeds this information into each commit we do.
To set this, you can execute the following commands:
git config --global user.name "John Doe"
git config --global user.email "johnde@domain.com"
The information will be saved in your ~/.gitconfig file.
[user]
    name = John Doe
    email = johndoe@domain.com
With Git installed and set up on your local machine, you are now ready to use Git for version control with Visual Studio or using the terminal.
Cloning a repository in VS Code
The good thing is that Visual Studio will auto-detect if you’ve opened a folder that is a repository. If you’ve already opened a repository, it will be visible in the Source Control View.
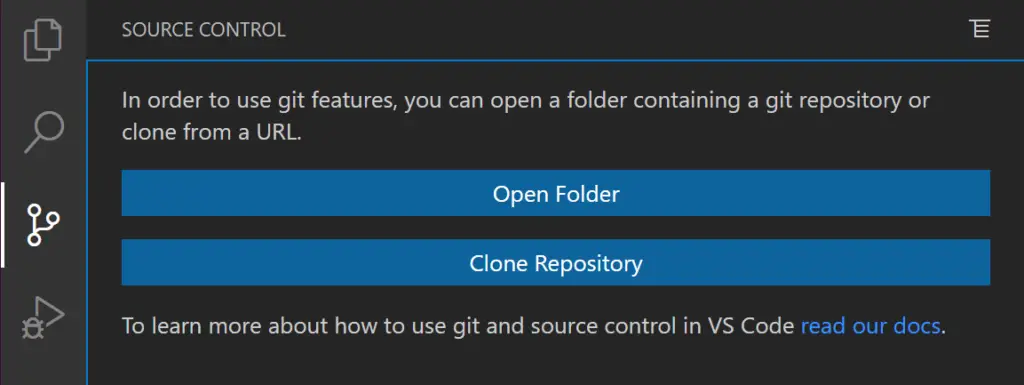
If you haven’t opened a folder yet, the Source Control view will give you the option to Open Folder from your local machine or Clone Repository.
If you select Clone Repository, you will be asked for the URL of the remote repository (for example, on GitHub) and the parent directory under which to put the local repository.
For a GitHub repository, you would find the URL from the GitHub Code dialog.
Create a branch
To create a branch open the command pallet:
- Windows: Ctrl + Shift + P
- Linux: Ctrl + Shift _ P
- MacOS: Shift + CMD + P
And select Git Create Branch...
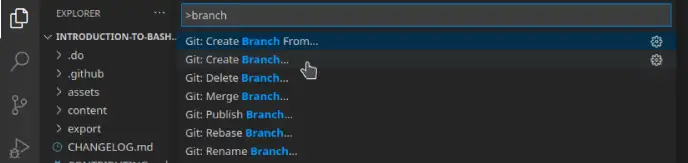
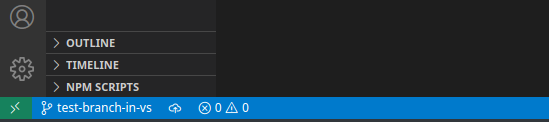
Then you just need to enter a name for the branch. Keep in mind that in the bottom left corner, you can see in which branch you are. The default one will be the main, and if you successfully create the branch, you should see the name of the newly created branch.
If you want to switch branches, you can open the command pallet and search for Git checkout to and then select the main branch or switch to a different branch.

Setup a commit message template
If you want to speed up the process and have a predefined template for your commit messages, you can create a simple file that will contain this information.
To do that, open your terminal if you’re on Linux or macOS and create the following file: .gitmessage in your home directory. To create the file, you can open it in your favorite text editor and then simply put the default content you would like and then just save and exit the file. Example content is:
cat ~/.gitmessage
#Title

#Summary of the commit

#Include Co-authored-by for all contributors.
To tell Git to use it as the default message that appears in your editor when you run git commit and set the commit.template configuration value:
$ git config --global commit.template ~/.gitmessage
$ git commit
Conclusion
If you prefer to code in Visual Studio Code and you also use version control, I will recommend you to give it a go and interact with the repositories in VS code. I believe that everyone has their own style, and they might do things differently depending on their mood as well. As long as you can add/modify your code and then commit your changes to the repository, there is no exactly correct/wrong way to achieve this. For example, you can edit your code in vim and push the changes using the git client in your terminal or do the coding in Visual Studio and then commit the changes using the terminal as well. You’re free to do it the way you want it and the way you find it more convenient as well. I believe that using git within VS code can make your workflow more efficient and robust.
Additional sources:
- Version Control – Read more about integrated Git support.
- Setup Overview – Set up and start using VS Code.
- GitHub with Visual Studio – Read more about the GitHub support in VS code
- You can also check this mini video tutorial on how to use the basics of Git version control in Visual Studio Code
Source:
- Contributed by: Alex Georgiev.
- Initially posted here.
GitHub CLI
The GitHub CLI or gh is basically GitHub on command-line.
You can interact with your GitHub account directly through your command line and manage things like pull requests, issues, and other GitHub actions.
In this tutorial, I will give a quick overview of how to install gh and how to use it!
GitHub CLI Installation
As I will be using Ubuntu, to install gh you need to run the following commands:
sudo apt-key adv --keyserver keyserver.ubuntu.com --recv-key C99B11DEB97541F0
sudo apt-add-repository https://cli.github.com/packages
sudo apt update
sudo apt install gh
If you are on a Mac, you can install gh using Homebrew:
brew install gh
For any other operating systems, I recommend following the steps from the official documentation here.
Once you have gh installed, you can verify that it works with the following command:
gh --version
This would output the gh version:
gh version 1.0.0 (2020-09-16)
https://github.com/cli/cli/releases/tag/v1.0.0
In my case, I’m running the latest gh v1.0.0, which got released just a couple of days ago.
Authentication
Once you have gh installed, you need to login to your GitHub account.
To do so, you need to run the following command:
gh auth login
You will see the following output:
? What account do you want to log into?  [Use arrows to move, type to filter]
> GitHub.com
  GitHub Enterprise Server
You have an option to choose between GitHub.com or GitHub Enterprise. Click enter and then follow the authentication process.
Another useful command is the gh help command. This will give you a list with the available gh commands that you could use:
USAGE
  gh <command> <subcommand> [flags]

CORE COMMANDS
  gist:       Create gists
  issue:      Manage issues
  pr:         Manage pull requests
  release:    Manage GitHub releases
  repo:       Create, clone, fork, and view repositories

ADDITIONAL COMMANDS
  alias:      Create command shortcuts
  api:        Make an authenticated GitHub API request
  auth:       Login, logout, and refresh your authentication
  completion: Generate shell completion scripts
  config:     Manage configuration for gh
  help:       Help about any command

FLAGS
  --help      Show help for command
  --version   Show gh version

EXAMPLES
  $ gh issue create
  $ gh repo clone cli/cli
  $ gh pr checkout 321

ENVIRONMENT VARIABLES
  See 'gh help environment' for the list of supported environment variables.

LEARN MORE
  Use 'gh <command> <subcommand> --help' for more information about a command.
  Read the manual at https://cli.github.com/manual

FEEDBACK
  Open an issue using 'gh issue create -R cli/cli'
Then let’s clone an existing project which we will use to play with. As an example, we can use the LaraSail repository. Rather than cloning the repository using the standard git clone command, we will use gh to do so:
gh repo clone thedevdojo/larasail
You will see the following output:
Cloning into 'larasail'...
After that cd into that folder:
cd larasail
We are now ready to move to some of the more useful gh commands!
Useful GitHub CLI commands
Using gh, you can pretty much get all of the information for your repository on GitHub without having even to leave your terminal.
Here’s a list of some useful commands:
Working with GitHub issues
To list all open issues, run:
gh issue list
The output that you will see is:
Showing 4 of 4 open issues in thedevdojo/larasail

#25  Add option to automatically create database                                                  (enhancement)  about 3 months ago
#22  Remove PHP mcrypt as it is no longer needed                                                                 about 3 months ago
#11  Add redis support                                                                                           about 8 months ago
#10  Wondering about the security of storing root MySQL password in /etc/.larasail/tmp/mysqlpass                 about 3 months ago
You can even create a new issue with the following command:
gh issue create --label bug
Or if you wanted to view an existing issue, you could just run:
gh issue view '#25'
This would return all of the information for that specific issue number:
Add option to automatically create a database
Open • bobbyiliev opened about 3 months ago • 0 comments

Labels: enhancement

  Add an option to automatically create a new database, a database user and
  possibly update the database details in the .env file for a specific project


View this issue on GitHub: https://github.com/thedevdojo/larasail/issues/25
Working with your GitHub repository
You can use the gh repo command to create, clone, or view an existing repository:
gh repo create
gh repo clone cli/cli
gh repo view --web
For example, if we ran the gh repo view, we would see the same README information for our repository directly in our terminal.
Working with Pull requests
You can use the gh pr command with a set of arguments to fully manage your pull requests.
Some of the available options are:
  checkout:   Check out a pull request in git
  checks:     Show CI status for a single pull request
  close:      Close a pull request
  create:     Create a pull request
  diff:       View changes in a pull request
  list:       List and filter pull requests in this repository
  merge:      Merge a pull request
  ready:      Mark a pull request as ready for review
  reopen:     Reopen a pull request
  review:     Add a review to a pull request
  status:     Show status of relevant pull requests
  view:       View a pull request
With the above commands, you are ready to execute some of the main GitHub actions you would typically take directly in your terminal!
Conclusion
Now you know what the GitHub CLI tool is and how to use it! For more information, I would recommend checking out the official documentation here:
https://cli.github.com/manual/
I’m a big fan of all command-line tools! They can make your life easier and automate a lot of the daily repetitive tasks!
Initially posted here: What is GitHub CLI and how to get started
Git Stash
git stash is a handy command that helps you in cases where you might need to stash away your local changes and reset your codebase to the most recent commit in order to work on a more urgent bug/feature.
In other words, this command allows you to revert your current working directory to match the HEAD commit while keeping all the local modifications safe.
Once you are ready to get back to working on the code you had stashed away, just restore them with a single command!
Stashing Your Work
git stash
For example, consider a file named index.html which has been modified since the last commit.
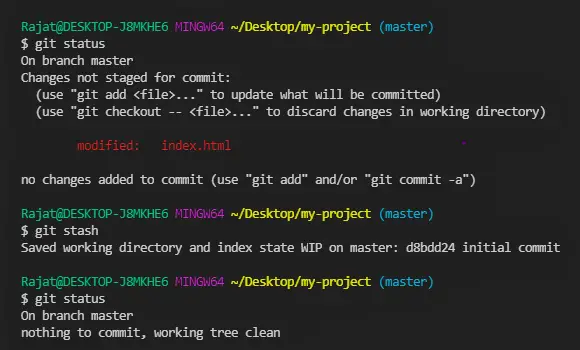
Notice that the running git status command says that there are no new changes once the git stash command is executed!
Here WIP stands for Work-In-Progress and these are used to index the various stashed copies of your work.
An important thing to keep in mind before stashing all new changes is that, by default, git stash will not stash all the untracked and ignored files. (Here, untracked files are the files that weren’t part of the last commit i.e, new files in your local repo)
In case you want to include these untracked files in the stash, you’ll need to add the -u option.
git stash -u
Similarly, all the files in the .gitignore file (i.e, the ignored files) will also be excluded from your stash. But you can include them by using the -a option
git stash -a
The following illustrations depict the behaviour of the git stash command when the above two options are included:
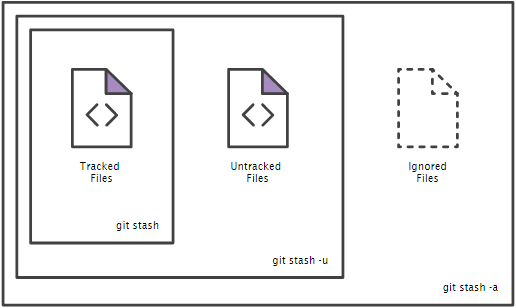
Restoring the Stashed Changes
git stash apply
This command is used to reapply all the local modifications done before that copy of the work was stashed.
Note that another command that can be used to achieve this is the git stash pop command. Here popping refers to the process of removing the most recent stash content and reapplying them to your working copy.
The difference between these two commands is that the git stash pop command will remove these particular changes from the stash whereas the git stash apply command will retain those changes in the stash even after restoring them.
Consider the previous example itself, in which the file index.html was stashed. In the following image, you can see how restoring all those changes affects your local repo.
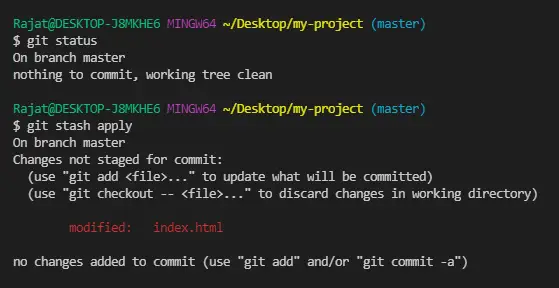
But what if you have multiple stashes and aren’t sure which one you want to start working on? This is where the next command comes into the picture!
Handling Multiple Stashed Copies of Your Work
Similar to the process involved in resetting the local repository to a particular commit, the first step involved in handling multiple stashes is to take a look at the various stashes available.
git stash list
This command shows an indexed list of all the available stashes along with a message corresponding to their respective recent commits.
Consider the following example wherein there are two available stashes. One, when a new script file was added and another when this script file was altered.
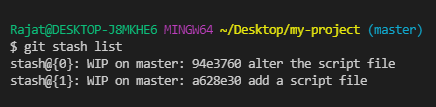
Note that the most recent stash is always indexed as 0.
Once you know which stash you want to restore to your local codebase, the command used to restore those modifications is:
git stash apply n
The alternative syntax used to achieve this is as follows:
git stash apply "stash@{n}"
Here n is the index of the stash you want to restore.
Git Alias
If there is a common but complex Git command that you type frequently, consider setting up a simple Git alias for it. Aliases enable more efficient workflows by requiring fewer keystrokes to execute a command. It is important to note that there is no direct git alias command. Aliases are created through the use of the git config command and the Git configuration files.
git config --global alias.co checkout
Now when I use the command git co, it is just as if I had typed that longer git checkout command.
git co -b branch1
Output
Switched to a new branch 'branch1'
Creating the aliases will not modify the source commands. So git checkout will still be available even though we now have the git co alias.
git checkout -b branch2
Output
Switched to a new branch 'branch2'
Aliases can also be used to wrap a sequence of Git commands into new Git command.
Git Rebase
Rebasing is often used as an alternative to merging. Rebasing a branch updates one branch with another by applying the commits of one branch on top of the commits of another branch. For example, if working on a feature branch that is out of date with a dev branch, rebasing the feature branch onto dev will allow all the new commits from dev to be included in feature. Here’s what this looks like visually:
Visualization of the command :

Syntax :
git rebase feature dev
where branch1 is the branch we want to rebase to the master.
Difference between Merge and Rebase :
Many people think that Merge and Rebase commands perform the same job but actually they are completely different and we will discuss this in the following lines.
This command is used to integrate changes from some branch to another branch with keeping the merged branch at its base so you can easily return to earlier version of code if you want and the following picture show that :
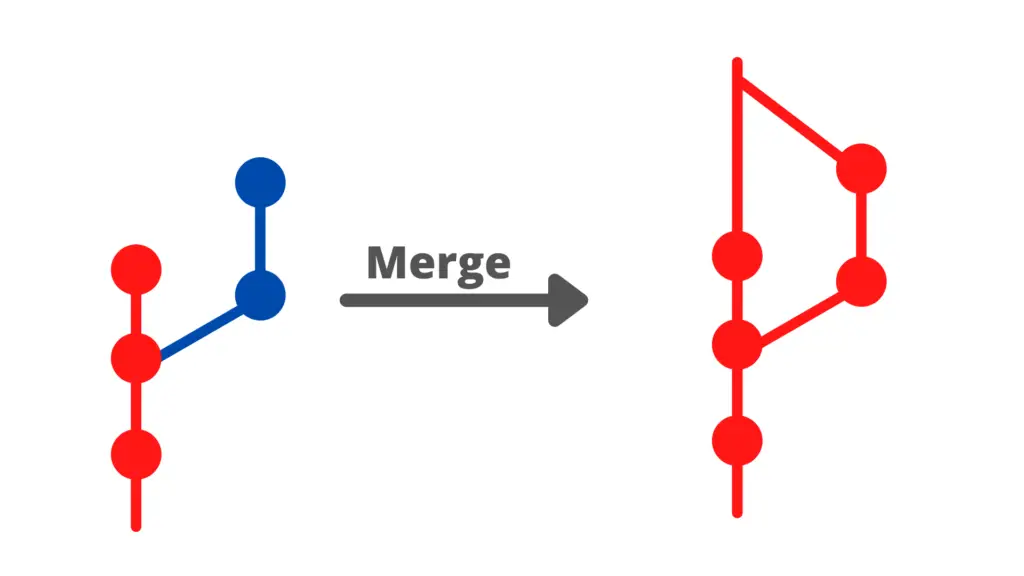
typical use of rebasing
Updating a Feature Branch
Lets say you’re working away on a feature branch, minding your own business.

Then you notice some new commits on dev that you’d like to have in your feature branch, since the new commits may affect how you implement the feature.

You decide to run git rebase dev from your feature branch to get up-to-date with dev. However when you run the rebase command, there are some conflicts between the changes you made on feature and the new commits on dev. Thankfully, the rebase process goes through each commit one at a time and so as soon as it notices a conflict on a commit, git will provide a message in the terminal outlining what files need to be resolved. Once you’ve resolved the conflict, you git add your changes to the commit and run git rebase –continue to continue the rebase process. If there are no more conflicts, you will have successfully rebased your feature branch onto dev.

Now you can continue working on your feature with the latest commits from dev included in feature and all is well again in the world. This process can repeat itself if the dev branch is updated with additional commits.
- Rebase :On the other hand
Rebasecommand is used to transfer the base of the branch to be based at the last commit of the current branch which make them as one branch as shown in the picture at the top.
Git Cheat Sheet
Here is a list of the Git commands mentioned throughout the eBook
- Git Configuration
Before you initialize a new git repository or start making commits, you should set up your git identity.
To change the name that is associated with your commits, you can use the git config command:
git config --global user.name "Your Name"
The same would go for changing your email address associated with your commits as well:
git config --global user.email "yourmail@example.com"
That way, once you have the above configured when you make a commit and then check the git log, you will be able to see that the commit is associated with the details that you’ve configured above.
git log
In my case the output looks like this:
commit 45f96b8c2ef143011f11b5f6cc7a3ae20db5349d (HEAD -> main, origin/master, origin/HEAD)
Author: Bobby Iliev <bobby@bobbyiliev.com>
Date:   Fri Jun 19 17:03:53 2020 +0300

    Nginx server name for www version (#26)
Initializing a project
To initialize a new local git project, open your git or bash terminal, cd to the directory that you would like your project to be stored at, and then run:
git init .
If you already have an existing project in GitHub, for example, you can clone it by using the git clone command:
git clone your_project_url
Current status
To check the current status of your local git repository, you need to use the following command:
git status
This is probably one of the most used commands as you would need to check the status of your local repository quite often to be able to tell what files have been changed, staged, or deleted.
Add a file to the staging area
Let’s say that you have a static HTML project, and you have already initialized your git repository.
After that, at a later stage, you decide to add a new HTML file called about-me.html, then you’ve added some HTML code in there already. To add your new file so that it is also tracked in git, you first need to use the git add command:
git add file_name
This will stage your new file, which essentially means that the next time you make a commit, the change will be part of the commit.
To check that, you can again run the git status command:
git status
You will see the following output:
On branch main
Your branch is up to date with 'origin/main'.

Changes to be committed:
  (use "git reset HEAD <file>..." to unstage)

        new file:   about-me.html
Removing files
To remove a file from your git project, use the following command:
git rm some_file.txt
Then after that, if you run git status again, you will see that the some_file.txt file has been deleted:
On branch main
Your branch is up to date with 'origin/main'.

Changes to be committed:
  (use "git reset HEAD <file>..." to unstage)

        deleted:    some_file.txt
Discard changes for a file
In case that you’ve made a mistake and you want to discard the changes for a specific file and reset the content of that file as it was in the latest commit, you need to use the command below:
git checkout -- file_name
This is a convenient command as you can quickly revert a file to its original content.
Commit to local
Once you’ve made your changes and you’ve staged them with the git add command, you need to commit your changes.
To do so, you have to use the git commit command:
git commit
This will open a text editor where you could type your commit message.
Instead, you could use the -m flag to specify the commit message directly in your command:
git commit -m "Nice commit message here"
List branches
To list all of the available local branches, just run the following command:
git branch -a
You would get a list of both local and remote branches, the output would look like this:
  bugfix/nginx-www-server-name
  develop
* main
  remotes/origin/HEAD -> origin/master
  remotes/origin/bugfix/nginx-www-server-name
  remotes/origin/develop
  remotes/origin/main
The remotes keyword indicates that those branches are remote branches.
Fetch changes from remote and merge the current branch with upstream
If you are working together with a team of developers working on the same project, more often than not, you would need to fetch the changes that your colleagues have made to have them locally on your PC.
To do that, all you need to do is to use the git pull command:
git pull origin branch_name
Note that this will also merge the new changes to the current branch that you are checked into.
Create a new branch
To create a new branch, all you need to do is use the git branch command:
git branch branch_name
Instead of the above, I prefer using the following command as it creates a new branch and also switches you to the newly created branch:
git checkout -b branch_name
If the branch_name already exists, you would get a warning that the branch name exists and you would not be checked out to it,
Push local changes to remote
Then finally, once you’ve made all of your changes, you’ve staged them with the git add . command, and then you committed the changes with the git commit command, you have to push those changes to the remote git repository.
To do so, just use the git push command:
git push origin branch_name
Delete a branch
git branch -d branch_name
Switch to a new branch
git checkout branch_name
As mentioned above, if you add the -b flag, it would create the branch if it does not exist.
Download Lighe eBook :
https://mega.nz/file/bE0w1BSa#FiKWxMyNIDwNcdyRM99K0jNbV1AciNyXQ3eWRJ2_LXA
Download Dark eBook
https://mega.nz/file/mAtw3LLS#EwOdJIfukm27UgFRfufHfCgDBDdldjMBzOPBvcEAcxs
