

Understanding the filesystem UUID (Universally Unique Identifier) is a vital job of a Linux administrator. Every day, tons of files are generated inside a Linux server. Some files are static; some are dynamic. Some files are temporary, and some are permanent. Unix scripting and server maintenance also requires the skill of well understanding Linux filesystem. As a Linux admin, to connect the files with a server or database and top-level troubleshooting, it is important to identify the filesystem UUID of your Linux system.
An engineer, Theodore Yue Tak Ts’o had created a library named libuuidto identify all the Linux filesystems uniquely. Hence, this library file is now used in the UUID (Universally Unique Identifier) system. The UUID is a 128-bit number system that can label each file with a unique random number so that an administrator can recognize his system files by name. In this post, we will be discussing the process of how to identify the UUID of Linux filesystem.
Universally Unique Identifier(UUID)
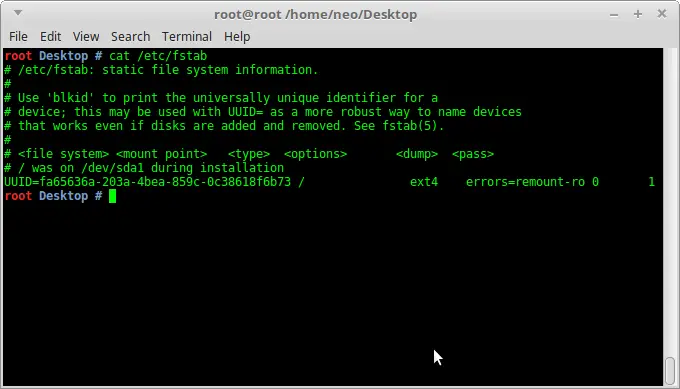
The filesystem table (fstab) is the location where all the mounting properties are logged inside the etc directory of Linux root. We can see the fstab table using the cat command in the terminal. In the output, we will find the UUID of our fstab file.
The UUID is assigned in a 32 hexadecimal system, divided into five parts and separated by hyphens. The form of a UUID is like 8-4-4-4-12. Here for an example, I’m showing the UUID of my fstab from the terminal using cat command.
$ cat /etc/fstab
Here, you can see my fstab UUID is assigned as:
fa65636a-203a-4bea-859c-0c38618f6b73
Here, the 32 characters have actually turned into 36 characters with 4 hyphens. If we look closely at the formation of UUID, we can the structure is like this:
AAAAAAAA-BBBB-CCCC-DDDD-FFFFFFFFFFFF
The formation of UUID contains a timestamp variation, the encoded MAC address, and some randomly generated numbers.
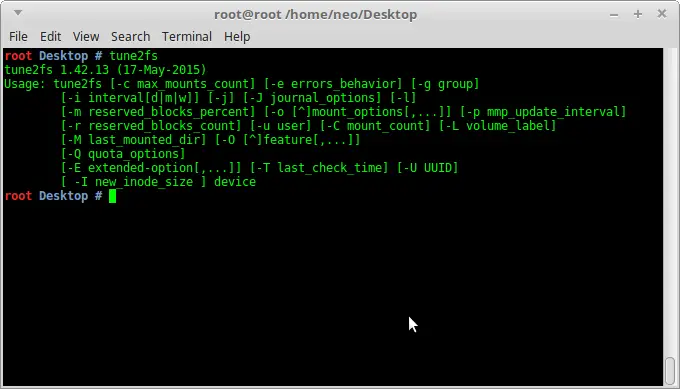
1. Identifying FileSystem UUID in Linux By tune2fs Command
The tune2fs is a command in Linux that can be used to adjust the framework of tunable files. You may know that in Windows, files are mostly created in NTFS or Fat32, but in Linux, files are generated in ext2, ext3, or ext4 filesystems. If you need to change the variables or parameters of those files, you can use the tune2fs command.
The tune2fs is a powerful command that can also determine the current file settings of your Linux filesystem. If you want to see the details usages of tune2fs, just simply type tune2fs in the Terminal, it will show the lists that can be done by tune2fs.
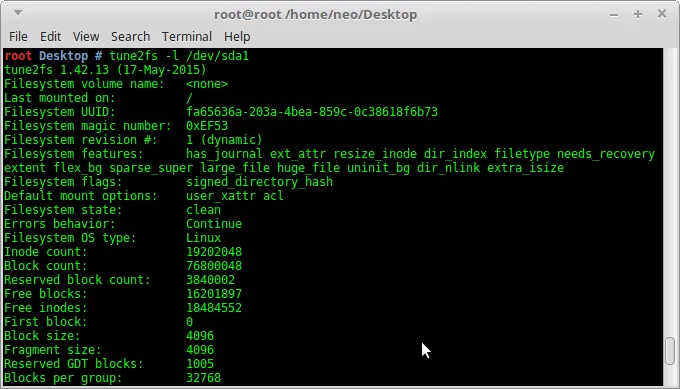
Let, we want to see the filesystem UUID properties of my dev/sda1 location. For that, we need to type the following command in the terminal using the tune2fs command. If you find any error like, permission denied while trying to open /dev/sda1; you can try the second command that includes sudo (superuser do).
$ tune2fs -l /dev/sda1
$ sudo tune2fs -l /dev/sda1
2. Identifying FileSystem UUID By blkid Command
For determining the block device attributes of the Linux filesystem, we can use the block identification(blkid)command in the terminal. The blkid command can identify the UUID and details information of the Linux filesystem.
Let, we want to find the UUID of the /dev/sda1 location. For that, we need to type the following command in the terminal. And in the output, we will find the UUID, partition ID, and the type of the driver.
$ blkid /dev/sda1
/dev/sda1: UUID="3e7268c4-2b78-42eb-950c-b38d1451771d" TYPE="ext4" PARTUUID="eaef9435-01"
3. Identifying FileSystem UUID in Linux By lsblk Command
Blockwise List information, lsblk command is used to see the detailed information and the UUID of the filesystem in Linux. The lsblk command can show the name, device type, major-minor device numbers, removable device, mount point, size of the device, etc.
$ sudo lsblk
4. Determining Disk Partition UUID in Linux By udevadm Command
Userspace device manager administrator or, in short, udevadm is a command used in Linux to identify the runtime and kernel events of a file. Runtime contents are associated with the processes undergoing inside the device. Usually, these files are temporary. The udevadm command can gather file info from the database, trigger any action under administrative user, control the udev daemon, monitor the Kernel, and test an event.
Let, we want to check the removable file status on the terminal using udevadm, we can type the following command in the terminal.
$ udevadm monitor
And the monitor will print the received events for:
UDEV - the event which udev sends out after rule processing
KERNEL - the kernel uevent
After this stage, if we insert any removable device, it will print the disk status in the terminal.
5. Identifying Disk Partition UUID By dumpe2fs Command
The dumpe2fs command is used to identify the blocksize, superblock information of a file system. If you lose your superblock on a filesystem, you lose the access to that filesystem. The dumpe2fs command can determine where the file is mounted, the UUID of the filesystem, filesystem magic number, filesystem flags, error behavior, Filesystem OS type, free blocks, Flex block group size, and many more things.
Let, if we want to run the dumpe2fs command on the location of sda1 in our Linux filesystem, all we need is to type the following command in the terminal.
$ sudo dumpe2fs /dev/sda1
You can also check the dumpe2fs version of your Linux machine.
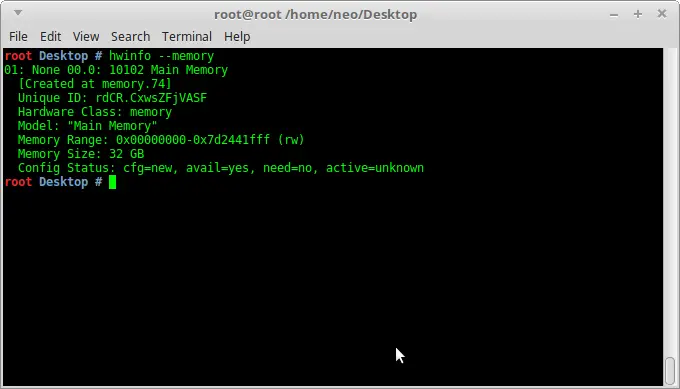
6. Identifying FileSystem UUID in Linux By hwinfo Command
Hardware information or in short, the hwinfo command is a very professional command to identify the filesystem UUID of Linux. It is used to monitor the system’s condition and health. This command can extract information form hardware. It can gather information from hard disk, monitor, keyboard, mouse, network card and etc.
The hwinfo command is useful to determine the file version, write to the log file, to get the partition information, network card Information, CPU information, information of system hardware, etc. You can install hwinfo inside your Linux machine from the following commands.
- For Ubuntu:
$ sudo apt-get install hwinfo
$ sudo apt install hwinfo
- For Arch Linux:
$ sudo pacman -S hwinfo
- For RHEL/CentOS:
$ sudo yum install hwinfo
- For openSUSE Leap:
$ sudo zypper install hwinfo
Now, after the installation of hwinfo is done, you can run the following commands in your terminal to identify the hardware information.
$ sudo hwinfo
$ sudo hwinfo --all
$ sudo hwinfo --short
$ sudo hwinfo --block --short
$ sudo hwinfo --cpu
$ sudo hwinfo --network
$ sudo hwinfo --netcard
$ sudo hwinfo --disk
$ sudo hwinfo --partition
$ sudo hwinfo --usb
$ sudo hwinfo --memory
$ sudo hwinfo --pci
$ sudo hwinfo --log hwinfo.txt
7. Identifying FileSystem UUID By uuid Command
By using the Universally Unique Identifier (UUID) command in your Linux filesystem, you can determine the file name, file version, file count numbers, file format, and the unique ID number of the file.
If your Linux system doesn’t have the UUID installed, you can try the following terminal command to install UUID.
$ sudo apt install uuid
To get the UUID information of your filesystem, run this command in your terminal.
$ ls -lh /dev/disk/by-uuid/
Linux maintains a hierarchy of file system. In the entire post, I have been trying to introduce you with the methods of how to identify filesystem UUID in Linux, and how to get into the flow of filesystem. We have discussed what UUID is and how we can identify the UUID of filesystems in several methods. Some terminal commands are mentioned above in the post to determine file status and runtime. Some commands and methods are about how to identify the hardware types.
I’ve tried to come up with the methods that I used to run in order to check the filesystem in Linux. It is possible that I might forget to mention some points. It will be very much appreciated if you write what I’ve missed in the comment box. You can also write your comments about this post. And don’t forget to share this post on social media so that your Linux geek friends can go through this post.
