


Sentinel ATT&CK aims to simplify the rapid deployment of a threat hunting capability that leverages Sysmon and MITRE ATT&CK on Azure Sentinel.
DISCLAIMER: This tool is not a magic bullet. It will require tuning and real investigative work to be truly effective in your environment.
Overview
Sentinel ATT&CK provides the following set of tools:
- A Sysmon configuration file compatible with Azure Sentinel and mapped to specific ATT&CK techniques
- A Sysmon log parser mapped against the OSSEM data model
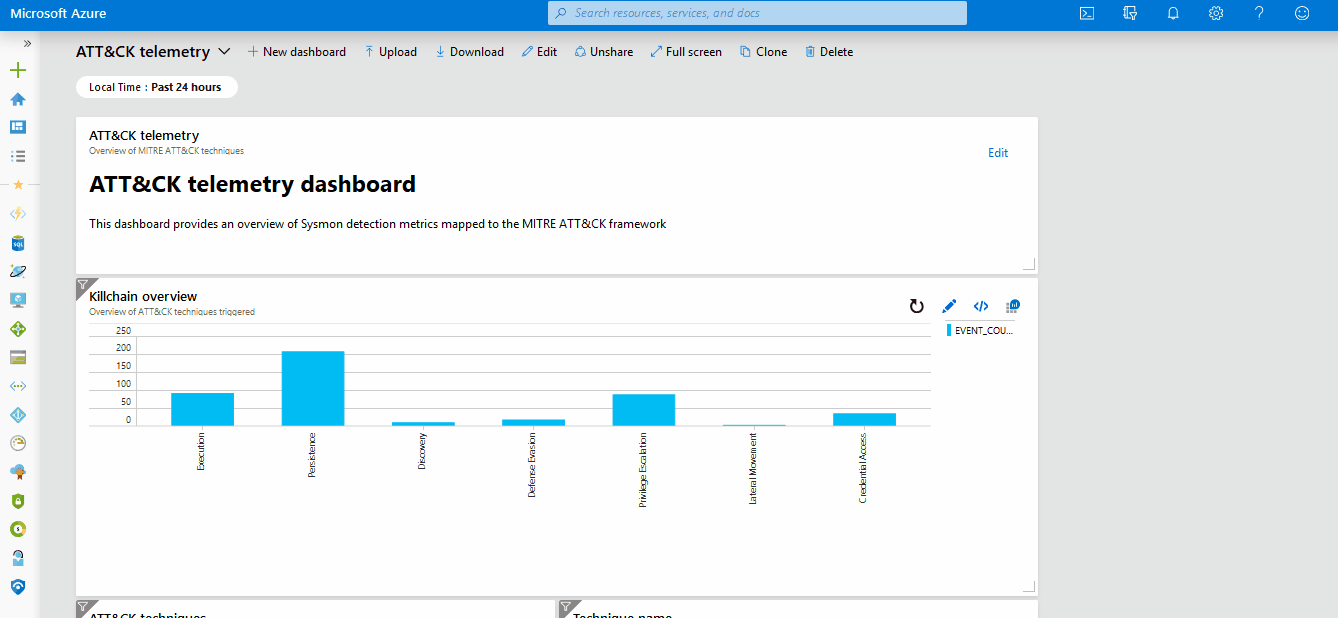
- A dashboard providing an overview of ATT&CK techniques executed on your Azure environment
- 117 ready-to-use Kusto detection rules covering 156 ATT&CK techniques
- A Hunting Jupyter notebook to assist with process drill-downs
- Azure threat hunting workbooks inspired by the Threat Hunting App for Splunk to help simplify your threat hunts
- A Terraform script to provision a lab to test Sentinel ATT&CK
- Comprehensive guides to help you use the materials in this repository
Usage
Head over to the WIKI to learn how to deploy and run Sentinel ATT&CK.
A copy of the DEF CON 27 cloud village presentation introducing Sentinel ATT&CK can be found here and here.
Sentinel ATT&CK test lab
Within the lab folder a terraform script is provided to automate the deployment of a testing lab.
Please note: the terraform script deploys a highly insecure test environment. It is not meant to be used in production and the environment should be destroyed immediately after use.
The terraform script provisions:
- An Azure Sentinel instance
- A Windows 10 virtual machine (PC1)
- A Windows Server 2012 Active Directory domain controller (DC1)
- Post-deployment scripts to install and configure sysmon on PC1
- Post-deployment scripts to install and configure Active Directory on DC1
Set-up
- Install/configure/authenticate Terraform following these Microsoft docs.
- Create a variables.tfvars file in the lab directory, using the variables.tfvars.txt file as a template and making sure to complete all fields.The variables.tfvars file is the heart of the terraform playbook and it allows:
- To specify authentication credentials (the file is ignored by git)
- To define the lab name, active directory domain and provisioning location (eg. west us)
- To define workstation and server accounts
- To define workstation and server names, vm sizes and image configurations
- Add administrator password, lab domain and lab netbios name to your create-ad.ps1 script
- Add administrator username, password and lab domain to the install-utilities.ps1 script
- Run the following command:
terraform init - Run the following command:
terraform apply --var-file="variables.tfvars"Note: You can safely ignore the deprecation warnings from terraform - After deployment, if you intend to keep the lab running for a sustained period of time, you should run the following two clean-up commands:
terraform destroy -target azurerm_storage_blob.utilsblobterraform destroy -target azurerm_storage_blob.adblob - The lab can be destroyed at any moment by running the following command:
terraform deploy --var-file="variables.tfvars"
As a next step you should onboard Sysmon data into Sentinel.
Onboarding sysmon data to Azure Sentinel
This is a quick, super terse guide to onboarding Sysmon data to Azure Sentinel. At the end of this guide you’ll have a basic, yet functioning Sentinel lab to test out the detection rules provided in this repository.
- Step 1: Provision a Windows 10 virtual machine (or machines) in your Azure environment.You can follow microsoft’s official documentation or use the included terraform deployment script to quickly provision a lab. If you use the terraform script create a variables.tfvars file in the root directory, using the variables.tfvars.txt file as a template and making sure to complete all fields.
- Step 2: Provision a log analytics workspace NOTE: If during step 1 you have deployed your lab using the included terraform deployment script you can skip this step. The second step is to provision a log analytics workspace into which an Azure Sentinel will be deployed
- Step 3: Deploy an Azure Sentinel instanceNOTE: If during step 1 you have deployed your lab using the included terraform deployment script you can skip this step. The third step is to deploy the Azure Sentinel SIEM instance View demo
- Step 4: Install Sysmon and load the provided sysmon configuration file on virtual machinesNOTE: If during step 1 you have deployed your lab using the included terraform deployment script you can skip this step. In order for the virtual machines in your lab/network to send the correct data to Sentinel you must:
- Install Sysmon on the virtual machines to monitor; to do so follow the official documentation
- Download the provided sysmon configuration file on the virtual machines to monitor
- Load the conguration file by executing the following command within the directory containing sysmonconfig.xml
sysmon -c sysmonconfig.xml
- Step 5: Enable security eventsThe fifth step is to enable the collection of security events View demo
- Step 6: Activate windows event logs as data sourcesThe sixth step is to activate the collection of the correct event logs. The correct event logs are:
- Application
- Microsoft-Windows-Sysmon/Operational
- Microsoft-Windows-WMI-Activity/Operational
- System
- Step 7: Connect Virtual Machine(s) to SentinelThe seventh step is to connect the virtual machine to Sentinel to being collecting sysmon data View demo
- Step 8: Check Sysmon data transmissionThe eighth step is to check that sysmon data is correctly being forwarded to sentinel, the following Kusto Query can be run to verify the correct transmission of sysmon data:
Event | where Source == "Microsoft-Windows-Sysmon" | limit 20Note that at this stage raw, unparsed data is being sent to sentinel View demo - Step 9: Install Sysmon event parserThe final step is to install the parser to ensure Sysmon events are stored and parsed according to the OSSEM standard and to allow for compatibility with the repository’s detection rules. View demo
Next, you should install the ATT&CK telemetry dashboard.
Contributing
As this repository is constantly being updated and worked on, if you spot any problems we warmly welcome pull requests or submissions on the issue tracker.