

In this tutorial I will show you how to set up an asynchronous replication with the database management system PostgreSQL 10.4. PostgreSQL is an open source database server with more than 15 years of active development time. It is a powerful database with a wide range of functions, which even large loads don’t cause any problems. Some of the new features you will find in PostgreSQL 10 are:
- Logical replication
- Quorum Commit for Synchronous Replication
- SCRAM-SHA-256 authentication
- Full text search for JSON and JSONB & more
The goal of replication is to increase the availability and data security of your database. The setup will be done on Ubuntu 16.04 hosts and within a private network. For databases it is generally best practice to run them within private networks and not to make them directly accessible over the Internet. Please also keep in mind that this is an asynchronous replication. Under certain circumstances, asynchronous replication may result in data loss. As a rule, asynchronous replication is used to add an extra layer of security to the data. If you need to protect your data at all costs, you should use a synchronous configuration. With synchronous replication, the transaction must have been executed on at least two servers before the master reports a success to the client.
In your gridscale panel you can rebuild the server setup in a short time with our templates even without much experience. Just test gridscale and see the Features and the simplicity of the gridscale panel for yourself.
Preparations
For the following tutorial you need 2 Ubuntu 16.04, 18.04 or 20.04 servers.
Master IP: 1.0.0.1 – read/write
Slave IP: 1.0.0.2 – read only
If you follow the gridscale tutorial, first create both servers with Ubuntu Template. To install Postgres you can first assign a public IP to both servers and then move the servers to a private network.
Postgres Master Configuration
After installing Postgres, switch to the default Postgres superuser account and log into the PostgreSQL terminal with it.
Here you create a new role for replication.
CREATE ROLE pgrep WITH REPLICATION LOGIN ;
Then set the password encryption to scram-sha-256.
postgres=# set password_encryption = 'scram-sha-256 ;
And set the password for the role.
\password pgrep
Customize postgresql.conf
First stop the PostgreSQL service with :
systemctl stop postgresql
n the postgresql.conf file, adjust the Postgres Master Server for replication. Choose an editor of your choice for editing (vim, nano etc.). The file is located under /etc/postgresql/10/main.
The following lines must be commented out within the file and provided with the appropriate values.
Make sure the PostgreSQL server is listening on your interface by entering the internal IP of the master host.
listen_addresses = '10.0.0.1'
After that the Write-Ahead Log settings have to be adjusted.
wal_level = replica
archive_mode = on
archive_command = 'rsync -a %p postgres@standbyhost:/var/lib/postgresql/10/main/archive/%f'
The archive_command variable is used to archive the XLOG from the database instance to a specific location. The advantage here is that you can use any shell script you like. Options are e.g. to send the data to an FTP server, to a cloud storage provider or simply to another server. A popular method is to use rsync (as in the example above).
Hint: For the rsync method to work in the above example, you need to adjust the IP of the standby host and SSH access for rsync.
Then we continue with the settings for replication.
max_wal_senders = 3
wal_keep_segments = 64
With wal_keep_segments you set the minimum number of log segments to be stored on the master. Note that a segment is 16mb in size and in case of emergency you have enough extra memory on the master host.
Then save the file.
Because Archive Mode has been activated, a new directory must now be created for archiving in the PGDATA directory. With the following commands you create the directory, assign the necessary permissions and change the owner to User postgres.
mkdir -p /var/lib/postgresql/10/main/archive/
chmod 700 /var/lib/postgresql/10/main/archive/
chown -R postgres:postgres /var/lib/postgresql/10/main/archive/
pg_hba.conf
In the following the PostgreSQL Client Authentication is adjusted, the configuration file is located at /etc/postgresql/10/main/pg_hba.conf.
Database administrative login by Unix domain socket
 local all postgres peer# TYPE DATABASE USER ADDRESS METHOD# "local" is for Unix domain socket connections only
 local all all peer# IPv4 local connections:host all all 0.0.0.0/0 md5
 IPv6 local connections:host all all ::0/128 md5
 Allow replication connections from localhost, by a user with the# replication privilege.hostssl replication pgrep 10.0.0.2/32 scram-sha-256
In the bottom line the role, IP address for the slave host and the authentication method are defined. Then you save and exit the file.
Postgres Slave Configuration
After the master has been configured, you switch to your slave host.
First stop the PostgreSQL service.
systemctl stop postgresql
Optionally, you can now make the same settings on postgresql.conf and pg_hba.conf on your slave as on the master (so your slave can also act as master if failover has been set up).
Then change the following line in the postgresql.conf as follows:
hot_standby = on
and save the whole thing.
Now change to your PGDATA directory.
cd /var/lib/postgresql/10/
Then rename the existing main/ directory on the slave.
mv main/ main-backup
chmod 700 main/
The next step is to copy the main directory from the master to your slave via pg_basebackup command. After entering the command you will be asked for your password for the user pgrep.
pg_basebackup -h 10.0.0.1 -D /var/lib/postgresql/10/main/ -P -U pgrep --wal-method=stream
Change to your new main/ directory
cd main/
and create a new file named recovery.conf.
vim recovery.conf
Now copy the following configuration into the file:
standby_mode = 'on'primary_conninfo = 'host=10.0.0.1 port=5432 user=pgrep password=[your password]'trigger_file = '/tmp/MasterNow'#restore_command = '[your-restore-command]''
The first line defines that the slave starts in standby mode. Under “primary_conninfo” the parameters for the connection to the master are defined. And the line “trigger_file” specifies that the slave will step in as master if a trigger file exists (for this Failover-Feature you need additional software like repmgr).
Test the replication
After adjusting the configuration of master and slave, the systems must be restarted.
So reboot to Master and Slave.
reboot now
Last but not least you can start the PostgreSQL service on master and slave.
A look into the log file tells you if everything worked out as it should.
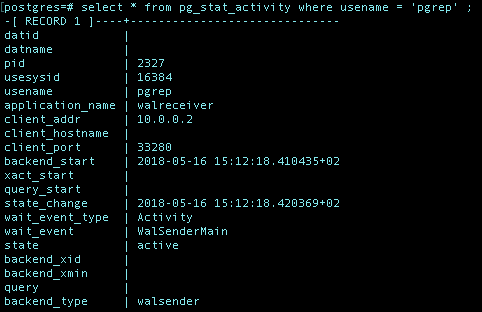
And on the master server you can inspect your pgrep user with the following command (in the psql terminal):
select * from pg_stat_activity where usename = 'pgrep' ;
Summary
In this tutorial you learned how to set up a database replication with Postgres. Postgres is a powerful database system, which you will enjoy for a long time because of its extensive functionalities. Studying the Postgres documentation is therefore inevitable. In the field of database replication, experience values count above all, that’s why you just have to stay tuned until Replication Pro!