

Top 40 Important Docker Commands for Software Developers
Docker has taken the world by storm since its inception in 2013. If you’re an experienced programmer crafting innovation using modern-day stacks, chance are that you’ve worked with, or at least heard of docker. Don’t worry if you’re a beginner and finding it hard to get the grasp of docker. We’ve prepared this guide for introducing docker to beginners and outlined the 40 most useful docker commands. Although docker is not all about commands and interfaces, a mastery over the basic commands will help you visualize its workings almost effortlessly.
Docker Fundamentals
Six years ago, docker started as an OS-level virtualization provider that allowed developers to deploy their products inside containers. You can think of containers as mini-virtual machines. It provides functionalities similar to Linux VMware tools but requires very low CPU resources. As a result, companies can deploy thousands of products in a single platform.
Docker achieves this low-level resource consumption by its design. It provides less isolation than standalone VMware guest machines and strips off many unwanted features not required by applications running in servers. So, choosing one from Docker and full-fledged hypervisors like VMware depends solely on project requirements.
Another handy feature of docker is that it provides exact environments for your products. Suppose you’re building a mobile app and want to share the project with fellow collaborators. Usually, they need to download the exact libraries and frameworks with often the same version required by your app. It leads to various configuration issues and decreases development efforts significantly.
Since docker creates an image of the product environment, all of your collaborators can download this image and use it regardless of their system configuration. Docker will fetch and build the environment all by itself. You’ll learn most of this via our examples.
Understanding Dockerfile
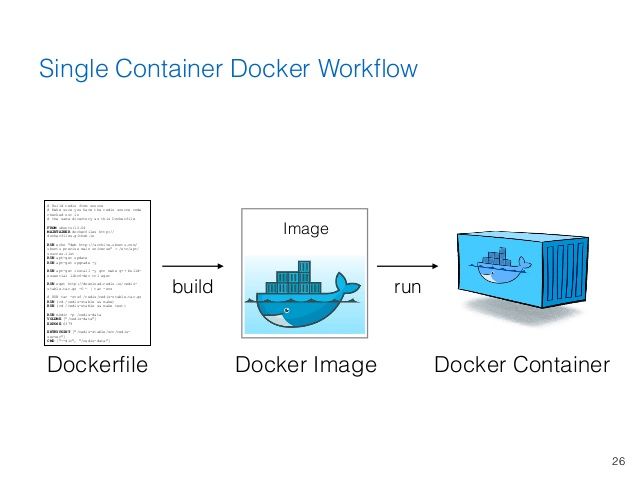
In docker, the Dockerfile is the component that allows us to define the environment of a tool. It is nothing but a text file containing instructions written in a format that the docker runtime can understand. Creating and managing Dockerfiles are straightforward. So we’ll leave the syntactical study of Dockerfiles for some other day.
In practice, you’ll use the Dockerfile to define the packages used by your application, fetching, and building them. When you share this Dockerfile to collaborators, they can easily set up the environment by using docker to build this image. Hopefully, this simple yet essential knowledge will be enough to help you understand the commands we discuss today.
Useful Docker Commands to Master
Docker has massively grown since its early days. Today it offers multiple services ranging across different virtualization needs. So, there are a plethora of commands available for the docker cli. Our editors have selected the most used commands since it will help you understand the core concepts better.
Basic Docker Commands for Beginners
We discuss the fundamental commands of docker in the following section. They will help you in spinning up your own containers and provide some much-needed insight into docker.
1. Create a Container Using Images from Docker Hub
The Docker Hub is the official Docker repository for docker images. It contains thousands of pre-built images created by open source developers and enterprises. You can easily spin up a working docker container using an image from this repo.
$ docker create -it ubuntu:xenial bash
The above command pulls the Ubuntu Xenial image from Docker Hub and creates a container using this image. The -it flag is used to tell docker for adding the integrated terminal to this container. Additionally, the bash portion tells docker to run the bash command.
2. List Docker Containers
Once created, you’ll want to check whether the container is created successfully or not. The ps command tells docker to list out the current containers.
$ docker ps
Chances are this command will not display any running containers. It happens because you haven’t started your docker container yet. However, you can use the -a flag for telling docker to list all containers.
$ docker ps -a
This command should display the container you created in the previous command.
3. Start Your Container
In order to use your containers in docker, you’ll need to start them first. The docker start command lets you do this very quickly, as shown in the next example.
$ docker start CONTAINER_ID
Here, CONTAINER_ID is the id of your container. You’ll get this when you run the docker ps -a command. Copy it from there and use it for this example. It will start up your container within seconds.
4. Connecting to Your Container
Once started successfully, you’ll need to connect to this container for being able to use it. The docker attach command is here for this purpose. The next command shows you how to connect to the container you created earlier.
$ docker attach CONTAINER_ID
This will result in a change in your prompt. And you’re now inside a Ubuntu Xenial-based container. What you do inside this container will remain inside it. You can verify the container by running cat /etc/issue.
5. Terminating the Container
You can easily terminate an active container using the docker stop command. It is one of the most helpful docker commands for beginners since it allows easy exit from a running container. The next command shows you how this works.
$ docker stop CONTAINER_ID
You’ll need to run this from another terminal since the earlier terminal in running the container and doesn’t have docker inside it. Another easy workaround is to simply exit the container using Ctrl + D or typing exit inside the container.
6. Deleting a Container
Since containers are like a small piece of virtual machines, you can easily delete them without facing the consequences in the host machine. Use the following command to delete the container you created earlier.
$ docker rm CONTAINER_ID
It will delete the container instantly. However, all your files and configurations made inside this container will also be deleted. So, make sure to move them elsewhere if you need them in the upcoming future.
7. Killing a Container
Docker also allows users to kill a running container. The difference between stopping a container and killing one is quite subtle, at least in docker. When you use docker stop, it first terminates the processes running inside the container, and then terminates the container.
$ docker kill CONTAINER_ID
But, the docker kill command kills the entire container process running in the host machine. This may lead to unwanted misconfiguration or corrupt the container processes. So, be cautious when using such docker commands for Ubuntu.
8. Detaching from Containers
Suppose you’ve started and attached yourself to a container. Now you want to leave this container running but want to use your terminal session. Since the docker commands stop and kill terminates the container, you can’t use them for your purpose.
Ctrl+P Ctrl+Q
Holding down the above key combination inside a running container will detach you from that container. For example, I simply hold down Ctrl and press P and Q one after another.
9. Copying Contents between Containers and the File System
Often you might want to copy the configuration files of your current product from the container and to the filesystem or even some other containers. The docker cp command allows you to do this. It acts like the Unix cp -a command and copies contents recursively.
$ docker cp CONTAINER_ID:/test_file test_file
This command will copy the test_file from the container with CONTAINER_ID to the host machine. The next one shows us how to copy a document from the host to a container.
$ docker cp test_file CONTAINER_ID:/test_file
10. Running Commands inside Containers
Although you can run commands directly from a running container, you might not want to attach containers all the time, especially if you’ve hundreds of containers. Since this is a common scenario, the docker runtime provides a robust command to execute container-specific commands from the admin’s terminal instance.
$ docker exec CONTAINER_ID command
This will allow you to run the command inside the CONTAINER_ID container.
11. List all Docker Images
Docker images are the building block of containers. As you should remember, containers are created using an image as its base. It’s normal for developers to have multiple docker images across their systems. The next command shows us how to list all the images in your machine.
$ docker images
Simply calling this command will display all top-level docker images alongside their size, tags, and repository. The -q option can be used for only fetching the IMAGE_ID.
12. Removing Docker Images
Sometimes you may want to remove one or more docker images that are not required anymore. The next command shows how to do this.
$ docker rmi <IMAGE_ID>
However, if the image is tagged by multiple repos, you’ll need to delete it using the following manner.
$ docker rmi REPOSITORY:TAG
You can find this information when you run the command docker images.
Productive Docker Commands for Intermediate Devs
If you’ve already grasped the concept of docker and containers, you might want to look at some advanced features. We discuss various useful docker commands intended at increasing developers’ productivity in the following section.
13. Adding Persistent Volumes for Containers
So when we delete a container, all data associated with it are lost. Docker allows developers to create “volumes” that provide persistent storage for these data. Volumes are simply a mechanism that binds your container to a pre-defined space on your filesystem.
$ docker create -it -v $(pwd):/var/www ubuntu:xenial bash
Running the above command will bind your current working directory to the /var/www location of your container. Now you can modify files in your present directory, and the changes will be reflected inside docker.
14. Creating and Running Containers using Docker Run
So far, we’ve first created our docker containers and then started it. However, docker allows us to do both of these using just a single command. Check out the below example to see how this works.
$ docker run -it -d ubuntu:xenial bash
When you run this command, it’ll fetch the Xenial image, create the container, and start it with bash. However, you won’t see the effect directly in your terminal. This is because we’ve instructed the docker to run this container in the background using the -d flag. Eliminating this will take you to the container as soon as it’s created.
15. Creating a Named Container
The –name option can be used to create containers that bear specific names. You can use them as a replacement to CONTAINER_ID for most docker commands. The next command shows this in action.
$ docker create --name TEST nginx
This command will pull the Nginx image from Docker Hub and create the container called TEST in this case. You can now start it and attach your session to use the container. It works the same with the docker run command.
16. Exposing Ports for Containers
You can communicate with your containers directly from the host without using the docker runtime at all. This works by using some sort of networking schemes defined by the admin. Exposing some ports for the container is one such widely technique.
$ docker run --name NEW nginx -p 8080:80
The above command creates a container named NEW and binds its port 80 to the port 8080 of the host system. So, you’ll now be able to send requests/responses to your container using this port.
17. Look for Changes in a Container
Often the slightest misconfiguration may lead to unwanted problems and take hours to debug. The docker diff command comes to handy in many such cases. You can use it to inspect any change in the filesystem of your container.
$ docker diff CONTAINER_ID
So if you know for sure that a certain container is entirely healthy, you can use this command once in a while for viewing the changes in this container’s filesystem.
18. Creating a New Image from Modified Containers
Docker allows developers to create an entirely new image based on the changes of an already existing container. This will come in use when you want to create multiple containers for different phases of your application.
$ docker commit CONTAINER_ID REPOSITORY:TAG
The above command will create a new image using the CONTAINER_ID container.
19. Monitoring Server for Docker Containers
The docker events command allows developers to monitor servers for real-time information on containers, images, plugins, and many more. You can try this in your system using two command-line shells.
$ docker events
Enter the above command in the first shell. Now spawn a docker container in another shell. Run some docker commands inside that container, and you’ll get real-time notifications in the first terminal.
20. Inspect Image Histories
As discussed earlier, the images are the building blocks for docker containers. So, you can easily view image histories for detecting sudden problems in a container. It’s straightforward to use this command.
$ docker history IMAGE_ID
Simply get the image id of the container using docker ps and use it as shown above. It will display how the current image is created.
21. Loading Docker Images from Tars
Another great feature of docker is the ability to load images from tar. It also allows users to load images from the standard input. The syntax of the load command is shown below.
$ docker load < IMAGE.tar.gz
You can also use the following command.
$ docker load --input IMAGE.tar
Now list your docker images to verify the effects of these commands.
22. Display System-Wide Information about Docker
Viewing the system-wide information about the docker runtime will help you monitor your containers. Additionally, it provides crucial information that can be helpful to debuggers due to its revealing nature. Use the below command to display this in your host system.
$ docker info
Although seemingly simple, this command will provide a plethora of information regarding both the host machine and docker containers.
23. Renaming Docker Containers
One of the most useful docker commands for starting developers is the docker rename command. It is a simple command that merely renames the container, but has great significance for beginners.
$ docker rename CONTAINER NEW_NAME
You can use either CONTAINER_ID or the Name parameter for representing your container. The NEW_NAME field is for the new container name. You can get both the name and id of a container using the docker ps -a command.
24. Restarting Docker Containers
Often you’ll need to deal with containers that are either hanged or have some new problem. One of the many reasons for this might be extra resource consumption. Restarting containers should be the first thing you should do in such cases, as done with computers.
$ docker restart CONTAINER[S]
By default, the above command will restart your container after 10 seconds. However, you can specify this value by using the -t flag. Values must be in integer.
Docker Commands for Networking
It is essential to have hassle-free communication between your containers. Thankfully, Docker network commands will make it easy for you. We’ve discussed only the basic networking commands in the following section.
25. List all Networks
The network utility is one of the best tools of the docker cli. You can use it to list all networks available to your docker daemon in the following way.
$ docker network ls
It will print out any networks that can be connected by your containers.
26. Connect to Networks
You can quickly connect one or more running docker containers to a multi-host network. The next command demonstrates this.
$ docker network connect NET CONTAINER_ID
Here, NET represents the network you want to connect to, and CONTAINER_ID represents the container. You can also use the Container name instead of it.
27. Disconnect from Networks
Disconnecting your networks from a network is also as easy as connecting them. Check out the below example to find out how this works.
$ docker network disconnect NET CONTAINER_ID
Once executed, this command will disconnect the container from the NET network. You can also add the -f flag to force disconnect it.
28. Create Networks
You can also leverage the docker network command for creating personalized networks between your containers. This is regularly used in production. The next command demonstrates how to create container networks.
$ docker network create NET
This command can take several additional options for providing enhance functionalities such as specifying network parameters. You can find more about them here.
29. View Detailed Information on Networks
The docker network command allows developers to monitor their network information in very detail. It makes debugging much easier and configuration almost effortless. The next command shows a simple example of this.
$ docker network inspect NET
This command will provide all kinds of information available for the network NET. You can use the -v flag to make the output more human-readable. Additionally, you may use -f to format the output based on a template.
30. Delete Networks
The docker network rm command can be used for removing one or more container networks very quickly. The below command demonstrates this for you.
$ docker network rm NET
You may also do remove instead of rm for this command as they’re aliases.
31. Delete All Unused Networks
Docker allows admins to delete all unused networks. It is called pruning in docker terms. The below command will demonstrate how this works.
$ docker network prune
It is an interactive command and will ask confirmation for each removal. You can add the -f flag to turn this off. This command is safe since it doesn’t depend on the user.
Miscellaneous Docker Commands
There’s plenty of additional commands available to the docker daemon. However, we can’t simply discuss all of them in such a single guide. So, don’t be alarmed if you do not find some specific commands in our list. Here are some additional docker commands for Ubuntu-like systems.
32. Build Images from Dockerfile
The Dockerfile is the primary build configuration tool for docker containers. You can learn how to create them here. In this example, we demonstrate how you to build a container image from a Dockerfile.
$ docker build . -t APP:v1
This command will create the image using the Dockerfile residing in the current working directory. It will set APP as the repo name and v1 as the tag. You’ll need to specify the path if the Dockerfile exists in some other directory.
33. Removing all Unused Resources
Since host systems usually hold hundreds of containers, there arise dangling resources very often. It can be unproductive and may affect the workload of the server. You can use the following command to remove all such resources.
$ docker system prune
It will delete all unused containers, volumes, and networks. Additionally, you can add the -a flag to delete all unused containers and images from the docker runtime.
34. Removing Specific Volumes
You can easily delete some specific volumes that are no longer needed by your containers. It’s a common practice during production. The docker volume command can be used for this purpose, as shown in the next example.
$ docker volume rm VOLUME_NAME
It will result in the deletion of the specified volume. You can pass the -f option to skip the confirmations.
35. Searching Images in Docker Hub
The docker cli also allows developers to search for specified images in the Docker hub directly from the terminal. You can use the docker search command for this purpose.
$ docker search nginx
When executed, it will look for the official Nginx image in the official repository. You can add several filters to narrow down or specify your search.
36. Delete Containers upon Exit
You can create containers that will be deleted once your job is finish and your exit from it. It can be useful in a number of situations, such as for troubleshooting. The next command shows this in action.
$ docker run --rm --it xenial /bin/bash
This command creates and starts a Xenial-based container with bash running inside. You can do your staff here, and as soon as you terminate the container, the docker engine will delete this container automatically.
37. Get Networking Logs at Host
Having the logs of your container networks at hand is extremely useful. You can use the following command to get container logs at the host machine.
$ journalctl -u docker.service
You can find most of your troubleshooting solutions by inspecting the output of this command.
38. Export Container File Systems as Tars
The docker cli provides the export command that can be used for exporting the filesystem of a container as a tar archive. Check out the below command to understand how this works.
$ docker export giant_panda > new.tar
This command is equivalent to the next command.
$ docker export --output="new.tar" giant_panda
39. View Version Information
You can easily view the version information for your docker client and server counterparts the below commands.
$ docker version
You can also get the docker daemon version alongside the build information by using the next one.
$ docker -v
40. View Help Information
The Docker documentation is simply inspiring. You can get help on the overall daemon using simply the command docker.
$ docker
To get additional data on child commands, use the following syntax.
$ docker command[S] --help
$ docker network --help
So you can easily extend the depth of the cli documentation.
Finally
Docker commands are essential for modern system maintainers and developers. It’s hard to explain docker’s impact on modern application deployments accurately. Almost all mainstream enterprises have adapted docker. So, high-paying job opportunities are also being available for CS grads worldwide. So, learning some of these commands will prove to be a big investment for future engineers. Hopefully, we were able to provide you the knowledge sought by you. Comment us your thoughts and let us know if you have any more questions about docker.
