

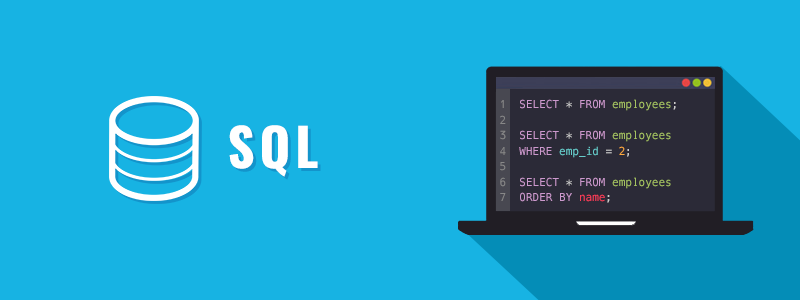
Introduction to SQL
This is an open-source introduction to SQL guide that will help you to learn the basics of SQL and start using relational databases for your SysOps, DevOps, and Dev projects. No matter if you are a DevOps/SysOps engineer, developer, or just a Linux enthusiast, you will most likely have to use SQL at some point in your career.
The guide is suitable for anyone working as a developer, system administrator, or a DevOps engineer and wants to learn the basics of SQL.
Databases
Before we dive deep into SQL, let’s quickly define what a database is.
The definition of databases from Wikipedia is:
A database is an organized collection of data, generally stored and accessed electronically from a computer system.
In other words, a database is a collection of data stored and structured in different database tables.
Tables and columns
You’ve most likely worked with spreadsheet systems like Excel or Google Sheets. At the very basic, database tables are quite similar to spreadsheets.
Each table has different columns which could contain different types of data.
For example, if you have a todo list app, you would have a database, and in your database, you would have different tables storing different information like:
- Users – In the users table, you would have some data for your users like:
username,name, andactive, for example. - Tasks – The tasks table would store all of the tasks that you are planning to do. The columns of the tasks table would be for example,
task_name,status,due_dateandpriority.
The Users table will look like this:
+----+----------+---------------+--------+
| id | username | name          | active |
+----+----------+---------------+--------+
| 1  |    bobby | Bobby Iliev   |   true |
| 2  |    grisi | Greisi I.     |   true |
| 3  |    dev     | Dev         |  false |
+----+----------+---------------+--------+
Rundown of the table structure:
- We have 4 columns:
id,username,nameandactive. - We also have 3 entries/users.
- The
idcolumn is a unique identifier of each user and is auto-incremented.
In the next chapter, we will learn how to install MySQL and create our first database.
Install MySQL
Now that you know what a database, table, and column are, the next thing that you would need to do is install a database service where you would be running your SQL queries on.
We will be using MySQL as it is free, open-source, and very widely used.
Installing MySQL
Depending on your operating system, to install MySQL run the following commands.
Install MySQL on Ubuntu
To install MySQL on a Linux or Ubuntu machine, run the following commands:
- First update your
aptrepository:
sudo apt update -y
- Then install MySQL:
sudo apt install mysql-server mysql-client
We are installing two packages, one is the actual MySQL server, and the other is the MySQL client, which would allow us to connect to the MySQL server and run our queries.
To check if MySQL is running, run the following command:
sudo systemctl status mysql.service
To secure your MySQL server, you could run the following command:
sudo mysql_secure_installation
Then follow the prompt and choose a secure password and save it in a secure place like a password manager.
With that, you would have MySQL installed on your Ubuntu server. The above should also work just fine on Debian.
Install MySQL on Mac
I would recommend installing MySQL using Homebrew:
brew install mysql
After that, start MySQL:
brew services start mysql
And finally, secure it:
mysql_secure_installation
In case that you ever need to stop the MySQL service, you could do so with the following command:
brew services stop mysql
Install MySQL on Windows
To install MySQL on Windows, I would recommend following the steps from the official documentation here:
https://dev.mysql.com/doc/refman/8.0/en/windows-installation.html
Accessing MySQL via CLI
To access MySQL run the mysql command followed by your user:
mysql -u root -p
Creating a database
After that, switch to the demo database that we created in the previous chapter:
USE demo;
To exit the just type the following:
exit;
Configuring .my.cnf
By configuring the ~/.my.cnf file in your user’s home directory, MySQL would allow you to log in without prompting you for a password.
To make that change, what you need to do is first create a .my.cnf file in your user’s home directory:
touch ~/.my.cnf
After that, set secure permissions so that other regular users could not read the file:
chmod 600 ~/.my.cnf
Then using your favourite text editor, open the file:
nano ~/.my.cnf
And add the following configuration:
[client]
user=YOUR_MYSQL_USERNAME
password=YOUR_MYSQL_PASSWORD
Make sure to update your MySQL credentials accordingly, then save the file and exit.
After that, if you run just mysql, you will be authenticated directly with the credentials that you’ve specified in the ~/.my.cnf file without being prompted for a password.
The mysqladmin command
As a quick test, you could check all of your open SQL connections by running the following command:
mysqladmin proc
The mysqladmin tool would also use the client details from the ~/.my.cnf file, and it would list your current MySQL process list.
Another cool thing that you could try doing is combining this with the watch command and kind of monitor your MySQL connections in almost real-time:
watch -n1 mysqladmin proc
To stop the watch command, just hit CTRL+C
GUI clients
If you prefer using GUI clients, you could take a look a the following ones and install them locally on your laptop:
This will allow you to connect to your database via a graphical interface rather than the mysql command-line tool.
Creating Tables
Before we get started with SQL, let’s learn how to create tables and columns.
As an example, we are going to create a users table with the following columns:
id– this is going to be the primary key of the table and would be the unique identifier of each user.username– this column would hold the username of our users.name– here, we will store the full name of users.status– here, we will store the status of a user, which would indicate if a user is active or not.
You need to specify the data type of each column.
In our case it would be like this:
id– Integerusername– Varcharname– Varcharstatus– Number
Data types
The most common data types that you would come across are:
CHAR(size): Fixed-length character string with a maximum length of 255 bytes.VARCHAR(size): Variable-length character string. Max size is specified in parenthesis.TEXT(size): A string with a maximum length of 65,535 bytes.INTEGER(size) orINT(size): A medium integer.BOOLEANorBOOL: Holds a true or false value.DATE: Holds a date.
Let’s have the following users table as an example:
id: We would want to set the ID toINT.name: The name should fit in aVARCHARcolumn.about: As the about section could be longer, we could set the column data type toTEXT.birthday: For the birthday column of the user, we could useDATE.
For more information on all data types available, make sure to check out the official documentation here.
Creating a database
As we briefly covered in the previous chapter, before you could create tables, you would need to create a database by running the following:
- First access MySQL:
mysql -u root -p
- Then create a database called
demo_db:
CREATE DATABASE demo_db;
Note: the database name needs to be unique, if you already have a database named
demo_dbyou would receive an error that the database already exists.
You can consider this database as the container where we would create all of the tables in.
Once you’ve created the database, you need to switch to that database:
USE demo_db;
You can think of this as accessing a directory in Linux with the cd command. With USE, we switch to a specific database.
Alternatively, if you do not want to ‘switch’ to the specific database, you would need to specify the so-called fully qualified table name. For example, if you had a users table in the demo_db, and you wanted to select all of the entries from that table, you could use one of the following two approaches:
- Switch to the
demo_dbfirst and then run a select statement:
USE demo_db;
SELECT username FROM users;
- Alternatively, rather than using the
USEcommand first, specify the database name followed by the table name separated with a dot:db_name.table_name:
SELECT username FROM demo_db.users;
We are going to cover the SELECT statement more in-depth in the following chapters.
Creating tables
In order to create a table, you need to use the CREATE TABLE statement followed by the columns that you want to have in that table and their data type.
Let’s say that we wanted to create a users table with the following columns:
id: An integer valueusername: A varchar valueabout: A text typebirthday: Dateactive: True or false
The query that we would need to run to create that table would be:
CREATE TABLE users
(
    id INT,
    username VARCHAR(255),
    about TEXT,
    birthday DATE,
    active BOOL
);
Note: You need to select a database first with the
USEcommand as mentioned above. Otherwise you will get the following error: `ERROR 1046 (3D000): No database selected.
To list the available tables, you could run the following command:
SHOW TABLES;
Output:
+-------------------+
| Tables_in_demo_db |
+-------------------+
| users             |
+-------------------+
Creating a new table from an existing table
You can create a new table from an existing table by using the CREATE TABLE AS statement.
Let’s test that by creating a new table from the table users which we created earlier.
CREATE TABLE users2 AS
(
    SELECT * FROM users
);
The output that you would get would be:
Query OK, 0 rows affected (0.07 sec)
Records: 0  Duplicates: 0  Warnings: 0
Note: When creating a table in this way, the new table will be populated with the records from the existing table (based on the SELECT Statement)
Rename tables
You can rename a table by using ALTER TABLE statement.
Let’s change name of user2 table to user3
ALTER TABLE user2 RENAME TO user3
Dropping tables
You can drop or delete tables by using the DROP TABLE statement.
Let’s test that and drop the table that we’ve just created:
DROP TABLE users;
The output that you would get would be:
Query OK, 0 rows affected (0.03 sec)
And now, if you were to run the SHOW TABLES; query again, you would get the following output:
Empty set (0.00 sec)
Allowing NULL values
By default, each column in your table can hold NULL values. In case that you don’t wanted to allow NULL values for some of the columns in a specific table, you need to specify this during the table creation or later on change the table to allow that.
For example, let’s say that we want the username column to be a required one, we would need to alter the table create statement and include NOT NULL right next to the username column like this:
CREATE TABLE users
(
    id INT,
    username VARCHAR(255) NOT NULL,
    about TEXT,
    birthday DATE,
    active BOOL
);
That way, when you try to add a new user, MySQL will let you know that the username column is required.
Specifying a primary key
The primary key column, which in our case is the id column, is a unique identifier for our users.
We want the id column to be unique, and also, whenever we add new users, we want the ID of the user to autoincrement for each new user.
This can be achieved with a primary key and AUTO_INCREMENT. The primary key column needs to be NOT NULL as well.
If we were to alter the table creation statement, it would look like this:
CREATE TABLE users
(
    id INT PRIMARY KEY AUTO_INCREMENT,
    username VARCHAR(255) NOT NULL,
    about TEXT,
    birthday DATE,
    active BOOL
);
Updating tables
In the above example, we created a new table and then dropped it as it was empty. However, in a real-life scenario, this would really be the case.
So whenever you need to add or remove a new column from a specific table, you would need to use the ALTER TABLE statement.
Let’s say that we wanted to add an email column with type varchar to our users table.
The syntax would be:
ALTER TABLE users ADD email VARCHAR(255);
After that, if you were to describe the table, you would see the new column:
DESCRIBE users;
Output:
+----------+--------------+------+-----+---------+
| Field    | Type         | Null | Key | Default |
+----------+--------------+------+-----+---------+
| id       | int          | NO   | PRI | NULL    |
| username | varchar(255) | NO   |     | NULL    |
| about    | text         | YES  |     | NULL    |
| birthday | date         | YES  |     | NULL    |
| active   | tinyint(1)   | YES  |     | NULL    |
| email    | varchar(255) | YES  |     | NULL    |
+----------+--------------+------+-----+---------+
If you wanted to drop a specific column, the syntax would be:
ALTER TABLE table_name DROP COLUMN column_name;
Note: Keep in mind that this is a permanent change, and if you have any critical data in the specific column, it would be deleted instantly.
You can use the ALTER TABLE statement to also change the data type of a specific column. For example, you could change the about column from TEXT to LONGTEXT type, which could hold longer strings.
Note: Important thing to keep in mind is that if a specific table already holds a particular type of data value like an integer, you can’t alter it to varchar, for example. Only if the column does not contain any values, then you could make the change.
Truncate table
The TRUNCATE TABLE command is used to delete all of the data from an existing table, but not the table itself.
- Syntax of Truncate table:
TRUNCATE TABLE table_name;
- Example:
Consider a Sellers table having the following records:
+----+----------+-----+-----------+----------+
| ID | NAME     |Items| CITY      | SALARY   |
+----+----------+-----+-----------+----------+
|  1 | Shivam   |  34 | Ahmedabad |  2000.00 |
|  2 | Ajay     |  22 | Delhi     |  4400.00 |
|  3 | Kaushik  |  28 | Kota      |  2000.00 |
|  4 | Chaitali |  25 | Mumbai    |  6600.00 |
|  5 | Hardik   |  26 | Bhopal    |  8100.00 |
|  6 | Maria    |  23 | MP        |  4200.00 |
|  7 | Muffy    |  29 | Indore    |  9000.00 |
+----+----------+-----+-----------+----------+
Following is the example of a Truncate command:
TRUNCATE TABLE Sellers;
After that if you do a COUNT(*) on that table you would see that the table is completely empty.
Basic Syntax
In this chapter, we will go over the basic SQL syntax.
SQL statements are basically the ‘commands’ that you run against a specific database. Through the SQL statements, you are telling MySQL what you want it to do, for example, if you wanted to get the username of all of your users stored in the users table, you would run the following SQL statement:
SELECT username FROM users;
Rundown of the statement:
SELECT: First, we specify theSELECTkeyword, which indicates that we want to select some data from the database. Other popular keywords are:INSERT,UPDATEandDELETE.username: Then we specify which column we want to select.FROM users: After that, we specify the table that we want to select the data from using theFROMkeyword.- The semicolon
;is highly recommended to put at the end. Standard SQL syntax requires it, but some “Database Management Systems’ (DBMS)” are tolerant about it, but it’s not worth the risk.
If you run the above statement, you will get no results as the new users table that we’ve just created is empty.
As a good practice, all SQL keywords should be with uppercase, however, it would work just fine if you use lower case as well.
Let’s go ahead and cover the basic operations next.
INSERT
To add data to your database, you would use the INSERT statement.
Let’s use the table that we created in the last chapter and insert 1 user into our users table:
INSERT INTO users (username, email, active)
VALUES ('bobby', 'bobby@bobbyiliev.com', true);
Rundown of the insert statement:
INSERT INTO: first, we specify theINSERT INTOkeyword, which tells MySQL that we want to insert data a table.users (username, email, active): then, we specify the table nameusersand the columns that we want to insert data into.VALUES: then, we specify the values that we want to insert in. The order of attributes is the same as inusers (...).
SELECT
Once we’ve inserted that user, let’s go ahead and retrieve the information.
To retrieve information from your database, you could use the SELECT statement:
SELECT * FROM users;
Output:
+----+----------+-------+----------+--------+---------------+
| id | username | about | birthday | active | email         |
+----+----------+-------+----------+--------+---------------+
|  1 | bobby    | NULL  | NULL     |      1 | bobby@b...com |
+----+----------+-------+----------+--------+---------------+
We specify * right after the SELECT keyword, this means that we want to get all of the columns from the users table.
If we wanted to the only the username and the email columns instead, we would change the statement to:
SELECT username, email FROM users;
This will return all of the users, but as of the time being we have only 1:
+----------+----------------------+
| username | email                |
+----------+----------------------+
| bobby    | bobby@bobbyiliev.com |
+----------+----------------------+
UPDATE
In order to modify data in your database, you could use the UPDATE statement.
The syntax would look like this:
UPDATE users SET username='bobbyiliev' WHERE id=1;
Rundown of the statement:
UPDATE users: First, we specify theUPDATEkeyword followed by the table that we want to update.SET username='bobbyiliev': Then we specify the columns that we want to update and the new value that we want to set.WHERE id=1: Finally, by using theWHEREclause, we specify which user should be updated. In our case it is the user with ID 1.
NOTE: If we don’t specify a
WHEREclause, all of the entries inside theuserstable would be updated, and all users would have theusernameset tobobbyiliev. You need to be careful when you use theUPDATEstatement without aWHEREclause, as every single row will be updated.
We are going to cover WHERE more in-depth in the next few chapters.
DELETE
As the name suggests, the DELETE statement would remove data from your database.
The syntax is as follows:
DELETE FROM users WHERE id=1;
Similar to the UPDATE statement, if you don’t specify a WHERE clause, all of the entries from the table will be affected, meaning that all of your users will be deleted.
Comments
In case that you are writing a larger SQL script, it might be helpful to add some comments so that later on, when you come back to the script, you would know what each line does.
As with all programming languages, you can add comments in SQL as well.
There are two types of comments:
- Inline comments:
To do so, you just need to add -- before the text that you want to comment out:
SELECT * FROM users; -- Get all users
- Multiple-line comments:
Similar to some other programming languages in order to comment multiple lines, you could wrap the text in /* */ as follows:
/*
Get all of the users
from your database
*/
SELECT * FROM users;
You could write that in a .sql file and then run it later on, or execute the few lines directly.
Conclusion
Those were some of the most common basic SQL statements.
In the next chapters, we are going to go over each of the above statements more in-depth.
SELECT
As we briefly covered in the previous chapter, the SELECT statement allows us to retrieve data from single or multiple tables on the database. In this chapter, we will be performing the query on a single table.
It corresponds to the projection operation of Relational Algebra.
You can use SELECT to get all of your users or a list of users that match a certain criteria.
Before we dive into the SELECT statement let’s quickly create a database:
CREATE DATABASE sql_demo;
Switch to that database:
USE sql_demo;
Create a new users table:
CREATE TABLE users
(
    id INT PRIMARY KEY AUTO_INCREMENT,
    username VARCHAR(255) NOT NULL,
    about TEXT,
    email VARCHAR(255),
    birthday DATE,
    active BOOL
);
Insert some data that we could work with:
INSERT INTO users
  ( username, email, active )
VALUES
  ('bobby', 'b@devdojo.com', true),
  ('devdojo', 'd@devdojo.com', false),
  ('tony', 't@devdojo.com', true);
Output:
Query OK, 3 rows affected (0.00 sec)
Records: 3  Duplicates: 0  Warnings: 0
We are going to learn more about the INSERT statement in the following chapters.
SELECT all columns
Now that we’ve got some data in the users table, let’s go ahead and retrieve all of the entries from that table:
SELECT * FROM users;
Rundown of the statement:
SELECT: First, we specify the action that we want to execute, in our case, we want to select or get some data from the database.*: The star here indicates that we want to get all of the columns associated with the table that we are selecting from.FROM: The from statement tells MySQL which table we want to select the data from. You need to keep in mind that you can select from multiple tables, but this is a bit more advanced, and we are going to cover this in the next few chapters.users: This is the table name that we want to select the data from.
This will return all of the entries in the users table along with all of the columns:
+----+----------+-------+----------+--------+---------------+
| id | username | about | birthday | active | email         |
+----+----------+-------+----------+--------+---------------+
|  1 | bobby    | NULL  | NULL     |      1 | b@devdojo.com |
|  2 | devdojo  | NULL  | NULL     |      0 | d@devdojo.com |
|  3 | tony     | NULL  | NULL     |      1 | t@devdojo.com |
+----+----------+-------+----------+--------+---------------+
3 rows in set (0.00 sec)
As you can see, we get a list of the 3 users that we’ve just created, including all of the columns in that table. In some cases, the table might have a lot of columns, and you might not want to see all of them. For example, we have the about and birthday columns that are all NULL at the moment. So let’s see how we could limit that and get only a list of specific columns.
Pattern matching
SQL pattern matching let’s you to search for patterns if you don’t know the exact word or phrase you are looking for. To do this, we use so-called wildcard characters to match a pattern together with LIKE and ILIKE operators.
Two of the most common wildcard characters are _ and %.
_ matches any single character and % matches an arbitrary number of characters.
Let’s see an example how you would look for a username ending with y:
SELECT * FROM users WHERE username LIKE '%y';
Output:
+----+----------+-------+----------+--------+---------------+
| id | username | about | birthday | active | email         |
+----+----------+-------+----------+--------+---------------+
|  1 | bobby    | NULL  | NULL     |      1 | b@devdojo.com |
|  3 | tony     | NULL  | NULL     |      1 | t@devdojo.com |
+----+----------+-------+----------+--------+---------------+
As you can see above, we used % to match any number of characters preceding the character y.
If we know the exact number of characters we want to match, we can use _. Each _ represents a single character.
So, if we want to look up an username that has e as its second character, we would do something like this:
SELECT * FROM users WHERE username LIKE '_e%';
Output:
+----+----------+-------+----------+--------+---------------+
| id | username | about | birthday | active | email         |
+----+----------+-------+----------+--------+---------------+
|  2 | dev      | NULL  | NULL     |      0 | d@dev.com     |
+----+----------+-------+----------+--------+---------------+
Please, keep in mind that LIKE operator is case sensitive, meaning it won’t mach capital letters with lowercase letters and vice versa. If you wish to ignore capitalization, use ILIKE operator instead.
Formatting
As we mentioned in the previous chapters, each SQL statement needs to end with a semi-colon: ;. Alternatively, rather than using a semi-colon, you could use the \G characters which would format the output in a list rather than a table.
The syntax is absolutely the same but you just change the ; with \G:
SELECT * FROM users \G
The output will be formatted like this:
*************************** 1. row ***************************
      id: 1
username: bobby
   about: NULL
birthday: NULL
  active: 1
   email: b@dev.com
*************************** 2. row ***************************
      id: 2
username: devdojo
   about: NULL
birthday: NULL
  active: 0
   email: d@dev.com
...
This is very handy whenever your table consists of a large number of columns and they can’t fit on the screen, which makes it very hard to read the result set.
SELECT specific columns only
You could limit this to a specific set of columns. Let’s say that you only needed the username and the active columns. In this case, you would change the * symbol with the columns that you want to select divided by a comma:
SELECT username,active FROM users;
Output:
+----------+--------+
| username | active |
+----------+--------+
| bobby    |      1 |
| dev      |      0 |
| tony     |      1 |
+----------+--------+
As you can see, we are getting back only the 2 columns that we’ve specified in the SELECT statement.
NOTE: SQL names are case insensitive. For example, username ≡ USERNAME ≡ userName.
SELECT with no FROM Clause
In a SQL statement, a column can be a literal with no FROM clause.
SELECT 'Sunil' as username;
Output:
+----------+
| username |
+----------+
| Sunil    |
+----------+
SELECT with Arithmetic Operations
The select clause can contain arithmetic expressions involving the operation +, –, *, and /.
SELECT username, active*5 as new_active FROM users;
Output:
+----------+------------+
| username | new_active |
+----------+------------+
| bobby    |          5 |
| devdojo  |          0 |
| tony     |          5 |
+----------+------------+
LIMIT
The LIMIT clause is very handy in case that you want to limit the number of results that you get back. For example, at the moment, we have 3 users in our database, but let’s say that you only wanted to get 1 entry back when you run the SELECT statement.
This can be achieved by adding the LIMIT clause at the end of your statement, followed by the number of entries that you want to get. For example, let’s say that we wanted to get only 1 entry back. We would run the following query:
SELECT * FROM users LIMIT 1;
Output:
+----+----------+-------+----------+--------+---------------+
| id | username | about | birthday | active | email         |
+----+----------+-------+----------+--------+---------------+
|  2 | bobby    | NULL  | NULL     |      1 | b@dev.com     |
+----+----------+-------+----------+--------+---------------+
If you wanted to get 2 entries, you would change LIMIT 2 and so on.
COUNT
In case that you wanted to get only the number of entries in a specific column, you could use the COUNT function. This is a function that I personally use very often.
The syntax is the following:
SELECT COUNT(*) FROM users;
Output:
+----------+
| COUNT(*) |
+----------+
|        3 |
+----------+
MIN, MAX, AVG, and SUM
Another useful set of functions similar to COUNT that would make your life easier are:
MIN: This would give you the smallest value of a specific column. For example, if you had an online shop and you wanted to get the lowest price, you would use theMINfunction. In our case, if we wanted to get the lowest user ID, we would run the following:
SELECT MIN(id) FROM users;
This would return 1 as the lowest user ID that we have is 1.
MAX: Just likeMIN, but it would return the highest value:
SELECT MAX(id) FROM users;
In our case, this would be 3 as we have only 3 users, and the highest value of the id column is 3.
AVG: As the name suggests, it would sum up all of the values of a specific column and return the average value. As we have 3 users with ids 1, 2, and 3, the average would be 6 divided by 3 users which is 2.
SELECT AVG(id) FROM users;
SUM: This function takes all of the values from the specified column and sums them up:
SELECT SUM(id) FROM users;
DISTINCT
In some cases, you might have duplicate entries in a table, and in order to get only the unique values, you could use DISTINCT.
To better demonstrate this, let’s run the insert statement one more time so that we could duplicate the existing users and have 6 users in the users table:
INSERT INTO users
  ( username, email, active )
VALUES
  ('bobby', 'b@devdojo.com', true),
  ('devdojo', 'd@devdojo.com', false),
  ('tony', 't@devdojo.com', true);
Now, if you run SELECT COUNT(*) FROM users; you would get 6 back.
Let’s also select all users and show only the username column:
SELECT username FROM users;
Output:
+----------+
| username |
+----------+
| bobby    |
| dev      |
| tony     |
| bobby    |
| dev      |
| tony     |
+----------+
As you can see, each name is present multiple times in the list. We have bobby, devdjo and tony showing up twice.
If we wanted to show only the unique usernames, we could add the DISTINCT keyword to our select statement:
SELECT DISTINCT username FROM users;
Output:
+----------+
| username |
+----------+
| bobby    |
| dev      |
| tony     |
+----------+
As you can see, the duplicate entries have been removed from the output.
Conclusion
The SELECT statement is essential whenever working with SQL. In the next chapter, we are going to learn how to use the WHERE clause and take the SELECT statements to the next level.
WHERE
The WHERE clause allows you to specify different conditions so that you could filter out the data and get a specific result set.
You would add the WHERE clause after the FROM clause.
The syntax would look like this:
SELECT column_name FROM table_name WHERE column=some_value;
WHERE Clause example
If we take the example users table from the last chapter, let’s say that we wanted to get only the active users. The SQL statement would look like this:
SELECT DISTINCT username, email, activem FROM users WHERE active=true;
Output:
+----------+---------------+--------+
| username | email         | active |
+----------+---------------+--------+
| bobby    | b@dev.com     |      1 |
| tony     | t@dev.com     |      1 |
+----------+---------------+--------+
As you can see, we are only getting tony and bobby back as their active column is true or 1. If we wanted to get the inactive users, we would have to change the WHERE clause and set the active to false:
+----------+---------------+--------+
| username | email         | active |
+----------+---------------+--------+
| dev      | d@dev.com     |      0 |
+----------+---------------+--------+
As another example, let’s say that we wanted to select all users with the username bobby. The query, in this case, would be:
SELECT username, email, active FROM users WHERE username='bobby';
The output would look like this:
+----------+---------------+--------+
| username | email         | active |
+----------+---------------+--------+
| bobby    | b@dev.com     |      1 |
| bobby    | b@dev.com     |      1 |
+----------+---------------+--------+
We are getting 2 entries back as we have 2 users in our database with the username bobby.
Operators
In the example, we used the = operator, which checks if the result set matches the value that we are looking for.
A list of popular operators are:
!=: Not equal operator>: Greater than>=: Greater than or equal operator<: Less than operator<=: Less than or equal operator
For more information about other available operators, make sure to check the official documentation here.
AND keyword
In some cases, you might want to specify multiple criteria. For example, you might want to get all users that are active, and the username matches a specific value. This could be achieved with the AND keyword.
Syntax:
SELECT * FROM users WHERE username='bobby' AND active=true;
The result set would contain the data that matches both conditions. In our case, the output would be:
+----+----------+-------+----------+--------+---------------+
| id | username | about | birthday | active | email         |
+----+----------+-------+----------+--------+---------------+
|  2 | bobby    | NULL  | NULL     |      1 | b@dev.com     |
|  5 | bobby    | NULL  | NULL     |      1 | b@dev.com     |
+----+----------+-------+----------+--------+---------------+
If we were to change the AND statement to active=false, we would not get any results back as none of the entries in our database match that condition:
SELECT * FROM users WHERE username='bobby' AND active=false;
-- Output:
Empty set (0.01 sec)
OR keyword
In some cases, you might want to specify multiple criteria. For example, you might want to get all users that are active, or their username matches a specific value. This could be achieved with the OR keyword.
As with any other programming language, the main difference between AND and OR is that with AND, the result would only return the values that match the two conditions, and with OR, you would get a result that matches either of the conditions.
For example, if we were to run the same query as above but change the AND to OR, we would get all users that have the username bobby and also all users that are not active:
SELECT * FROM users WHERE username='bobby' OR active=false;
Output:
+----+----------+-------+----------+--------+---------------+
| id | username | about | birthday | active | email         |
+----+----------+-------+----------+--------+---------------+
|  2 | bobby    | NULL  | NULL     |      1 | b@dev.com     |
|  3 | dev      | NULL  | NULL     |      0 | d@dev.com     |
|  5 | bobby    | NULL  | NULL     |      1 | b@dev.com     |
|  6 | dev      | NULL  | NULL     |      0 | d@dev.com     |
+----+----------+-------+----------+--------+---------------+
LIKE operator
Unlike the = operator, the LIKE operator allows you to do wildcard matching similar to the * symbol in Linux.
For example, if you wanted to get all users that have the y letter in them, you would run the following:
SELECT * FROM users WHERE username LIKE '%y%';
Output
+----+----------+-------+----------+--------+---------------+
| id | username | about | birthday | active | email         |
+----+----------+-------+----------+--------+---------------+
|  2 | bobby    | NULL  | NULL     |      1 | b@dev.com     |
|  4 | tony     | NULL  | NULL     |      1 | t@dev.com     |
+----+----------+-------+----------+--------+---------------+
As you can see, we are getting only tony and bobby but not devdojo as there is no y in devdojo.
This is quite handy when you are building some search functionality for your application.
IN operator
The IN operator allows you to provide a list expression and would return the results that match that list of values.
For example, if you wanted to get all users that have the username bobby and devdojo, you could use the following:
SELECT * FROM users WHERE username IN ('bobby', 'devdojo');
Output:
+----+----------+-------+----------+--------+---------------+
| id | username | about | birthday | active | email         |
+----+----------+-------+----------+--------+---------------+
|  2 | bobby    | NULL  | NULL     |      1 | b@dev.com     |
|  3 | dev      | NULL  | NULL     |      0 | d@dev.com     |
|  5 | bobby    | NULL  | NULL     |      1 | b@dev.com     |
|  6 | dev      | NULL  | NULL     |      0 | d@dev.com     |
+----+----------+-------+----------+--------+---------------+
This allows you to simplify your WHERE expression so that you don’t have to add numerous OR statements.
IS operator
If you were to run SELECT * FROM users WHERE about=NULL; you would get an empty result set as the = operator can’t be used to check for NULL values. Instead, you would need to use the IS operator instead.
The IS operator is only used to check NULL values, and the syntax is the following:
SELECT * FROM users WHERE about IS NULL;
If you wanted to get the results where the value is not NULL, you just need to change IS to IS NOT:
SELECT * FROM users WHERE about IS NOT NULL;
BETWEEN operator
The BETWEEN operator allows to select value with a given range.The values can be numbers, text, or dates. BETWEEN operator is inclusive: begin and end values are included.
For Example if you want to select those user which have id between 3 and 6.
SELECT * FROM users WHERE id BETWEEN 3 AND 6;
Output:
+----+----------+-------+----------+--------+---------------+
| id | username | about | birthday | active | email         |
+----+----------+-------+----------+--------+---------------+
|  3 | dev      | NULL  | NULL     |      0 | d@dev.com     |
|  5 | bobby    | NULL  | NULL     |      1 | b@dev.com     |
|  6 | dev      | NULL  | NULL     |      0 | d@dev.com     |
+----+----------+-------+----------+--------+---------------+
Conclusion
In this chapter, you’ve learned how to use the WHERE clause with different operators to get different type of results based on the parameters that you provide.
In the next chapter, we will learn how to order the result set.
Sorting with ORDER and GROUP BY
In the last chapter, you’ve learned how to use the SELECT statement with the WHERE clause and filter the result set based on some conditions.
More often than not, you would want to order the results in a specific way based on a particular column. For example, you might want to order the users alphabetically, based on their username.
In this chapter, you will learn how to use the ORDER BY and GROUP BY clauses.
ORDER BY
The main thing that you need to keep in mind when using ORDER BY is to specify the column or columns you want to order by. In case that you want to specify multiple columns to order by, you need to separate each column with a comma.
If we were to run the following statement without providing an ORDER BY clause:
SELECT id, username FROM users;
We will get the following output:
+----+----------+
| id | username |
+----+----------+
|  2 | bobby    |
|  3 | dev      |
|  4 | tony     |
|  5 | bobby    |
|  6 | dev      |
|  7 | tony     |
+----+----------+
As you can see, the result set is sorted by the primary key, which in our case is the id of each user. If we wanted to sort the output by username, we would run the following query:
SELECT id, username FROM users ORDER BY username;
Note: The
ORDER BYstatement is followed by the column’s name that we want to order by.
The output, in this case, will be:
+----+----------+
| id | username |
+----+----------+
|  2 | bobby    |
|  5 | bobby    |
|  3 | dev      |
|  6 | dev      |
|  4 | tony     |
|  7 | tony     |
+----+----------+
Note: You can use
ORDER BYwith and without specifying aWHEREclause. If you’ve used aWHEREclause, you need to put theORDER BYclause after theWHEREclause.
The default sorting is ascending and is specified with the ASC keyword, and you don’t need to add it explicitly, but if you want to sort by descending order, you need to use the DESC keyword.
If we use the query above and add DESC at the end as follows:
SELECT id, username FROM users ORDER BY username DESC;
We will see the following output:
+----+----------+
| id | username |
+----+----------+
|  4 | tony     |
|  7 | tony     |
|  3 | dev      |
|  6 | dev      |
|  2 | bobby    |
|  5 | bobby    |
+----+----------+
As you can see, we’ve got the same list of users sorted alphabetically but in reverse order.
GROUP BY
The GROUP BY statement allows you to use a function like COUNT, MIN, MAX etc., with multiple columns.
For example, let’s say that we wanted to get all of the counts of all users grouped by username.
In our case, we have two users with username bobby, two users with username tony, and two users with username devdojo. This represented in an SQL statement would look like this:
SELECT COUNT(username), username FROM users GROUP BY username;
The output, in this case, would be:
+-----------------+----------+
| COUNT(username) | username |
+-----------------+----------+
|               2 | bobby    |
|               2 | dev      |
|               2 | tony     |
+-----------------+----------+
The GROUP BY statement grouped the identical usernames. Then it ran a COUNT on each of bobby, tony and devdojo.
The main thing to remember here is that the GROUP BY should be added after the FROM clause and after the WHERE clause.
HAVING Clause
The HAVING clause allows you to filter out the results on the groups formed by the GROUP BY clause.
For example, let’s say that we wanted to get all usernames that are duplicates, i.e., all the usernames present in more than one table record.
In our case, we have two users with username bobby, two users with username tony, and two users with username devdojo. This represented in an SQL statement would look like this:
SELECT COUNT(username), username
FROM users
GROUP BY username
HAVING COUNT(username) > 1;
The output, in this case, would be:
+-----------------+----------+
| COUNT(username) | username |
+-----------------+----------+
|               2 | bobby    |
|               2 | dev      |
|               2 | tony     |
+-----------------+----------+
The GROUP BY clause grouped the identical usernames, calculated their counts and filtered out the groups using the HAVING clause.
NOTE :- The WHERE clause places conditions on the selected columns, whereas the HAVING clause places conditions on groups created by the GROUP BY clause.
INSERT
To add data to your database, you would use the INSERT statement. You can insert data into one table at a time only.
The syntax is the following:
INSERT INTO table_name
  (column_name_1,column_name_2,column_name_n)
VALUES
  ('value_1', 'value_2', 'value_3');
You would start with the INSERT INTO statement, followed by the table that you want to insert the data into. Then you would specify the list of the columns that you want to insert the data into. Finally, with the VALUES statement, you specify the data that you want to insert.
The important part is that you need to keep the order of the values based on the order of the columns that you’ve specified.
In the above example the value_1 would go into column_name_1, the value_2 would go into column_name_2 and the value_3 would go into column_name_x.
Let’s use the table that we created in the last chapter and insert 1 user into our users table:
INSERT INTO users
  (username, email, active)
VALUES
  ('greisi', 'g@dev.com', true);
Rundown of the insert statement:
INSERT INTO users: First, we specify theINSERT INTOkeywords which tells MySQL that we want to insert data into theuserstable.users (username, email, active): Then, we specify the table nameusersand the columns that we want to insert data into.VALUES: Then, we specify the values that we want to insert in.
Inserting multiple records
We’ve briefly covered this in one of the previous chapters, but in some cases, you might want to add multiple records in a specific table.
Let’s say that we wanted to create 5 new users, rather than running 5 different queries like this:
INSERT INTO users (username, email, active) VALUES ('user1', 'user1@dev.com', true);
INSERT INTO users (username, email, active) VALUES ('user1', 'user2@dev.com', true);
INSERT INTO users (username, email, active) VALUES ('user1', 'user3@dev.com', true);
INSERT INTO users (username, email, active) VALUES ('user1', 'user4@dev.com', true);
INSERT INTO users (username, email, active) VALUES ('user1', 'user5@dev.com', true);
What you could do is to combine this into one INSERT statement by providing a list of the values that you want to insert as follows:
INSERT INTO users
  (username, email, active)
VALUES
  ('user1', 'user1@dev.com', true),
  ('user2', 'user2@dev.com', true),
  ('user3', 'user3@dev.com', true),
  ('user4', 'user4@dev.com', true),
  ('user5', 'user5@dev.com', true);
That way, you will add 5 new entries in your users table with a single INSERT statement. This is going to be much more efficient.
Inserting multiple records using another table
In the previous section, we have discussed how we can insert multiple records using a single INSERT query. But sometimes there are cases where we need to insert multiple records which are residing in some other table.
In this section, we are going to learn how we can insert multiple records at once using a single INSERT query.
Consider a table, say prospect_users, which stores the information of the people who want to become the users of our service, but they are not yet actual users.
In order to add them to our user database, we have to insert there entries into our users table. We can achieve the same by writing an INSERT query with multiple VALUES listed in them (as discussed in previous section).
But there is an easier way where we achieve the same by querying the prospect_users table.
INSERT INTO users (username, email, active)
SELECT username, email, active
FROM prospect_users
WHERE active=true;
Using the above statement, an entry for each active prospect users will be made in our users table.
UPDATE
As the name suggests, whenever you have to update some data in your database, you would use the UPDATE statement.
You can use the UPDATE statement to update multiple columns in a single table.
The syntax would look like this:
UPDATE users SET username='bobbyiliev' WHERE id=1;
Rundown of the statement:
UPDATE users: First, we specify theUPDATEkeyword followed by the table that we want to update.username='bobbyiliev': Then we specify the columns that we want to update and the new value that we want to set.WHERE id=1: Finally, by using theWHEREclause, we specify which user should be updated. In our case, it is the user with ID 1.
The most important thing that you need to keep in mind is that if you don’t specify a WHERE clause, all of the entries inside the users table would be updated, and all users would have the username set to bobbyiliev.
Important: You need to be careful when you use the
UPDATEstatement without aWHEREclause as every single row will be updated.
If you have been following along all of the user entries in our users table, it currently have no data in the about column:
+----+----------+-------+
| id | username | about |
+----+----------+-------+
|  2 | bobby    | NULL  |
|  3 | dev      | NULL  |
|  4 | tony     | NULL  |
|  5 | bobby    | NULL  |
|  6 | dev      | NULL  |
|  7 | tony     | NULL  |
+----+----------+-------+
Let’s go ahead and update this for all users and set the column value to 404 bio not found, For example:
UPDATE users SET about='404 bio not found';
The output would let you know how many rows have been affected by the query:
Query OK, 6 rows affected (0.02 sec)
Rows matched: 6  Changed: 6  Warnings: 0
Now, if you were to run a select for all users, you would get the following result:
+----+----------+-------------------+
| id | username | about             |
+----+----------+-------------------+
|  2 | bobby    | 404 bio not found |
|  3 | dev      | 404 bio not found |
|  4 | tony     | 404 bio not found |
|  5 | bobby    | 404 bio not found |
|  6 | dev      | 404 bio not found |
|  7 | tony     | 404 bio not found |
+----+----------+-------------------+
Let’s now say that we wanted to update the about column for the user with an id of 2. In this case, we need to specify a WHERE clause followed by the ID of the user that we want to update as follows:
UPDATE users SET about='Hello World :)' WHERE id=2;
The output here should indicate that only 1 row was updated:
Query OK, 1 row affected (0.01 sec)
Rows matched: 1  Changed: 1  Warnings: 0
Now, if you again run the SELECT id, username, about FROM users query, you would see that the user with id of 2 now has an updated about column data:
+----+----------+-------------------+
| id | username | about             |
+----+----------+-------------------+
|  2 | bobby    | Hello World :)    |
|  3 | dev      | 404 bio not found |
|  4 | tony     | 404 bio not found |
|  5 | bobby    | 404 bio not found |
|  6 | dev      | 404 bio not found |
|  7 | tony     | 404 bio not found |
+----+----------+-------------------+
DELETE
As the name suggests, the DELETE statement would remove data from your database.
The syntax is as follows:
DELETE FROM users WHERE id=5;
The output should indicate that 1 row was affected:
Query OK, 1 row affected (0.01 sec)
Important: Just like the
UPDATEstatement, if you don’t specify aWHEREclause, all of the entries from the table will be affected, meaning that all of your users will be deleted. So, it is critical to always add aWHEREclause when executing aDELETEstatement.
DELETE FROM users;
The output should indicate (where x is the number of tuples in the table):
Query OK, x row(s) affected (0.047 sec)
Similar to the Linux rm command, when you use the DELETE statement, the data would be gone permanently, and the only way to recover your data would be by restoring a backup.
JOIN
The JOIN clause allows you to combine the data from 2 or more tables into one result set.
As we will be selecting from multiple columns, we need to include the list of the columns we want to choose data from after the FROM clause is separated by a comma.
In this chapter, we will go over the following JOIN types:
CROSSJoinINNERJoinLEFTJoinRIGHTJoin
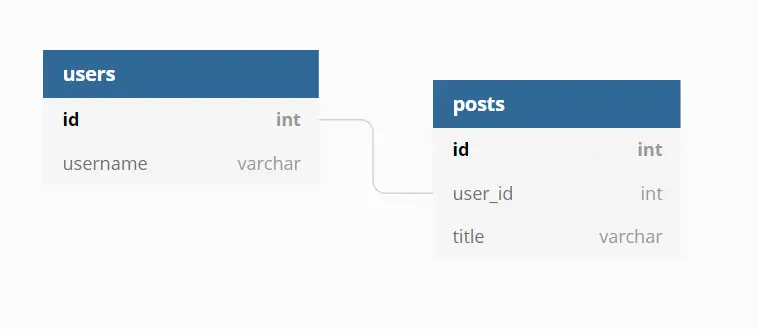
Before we get started, let’s create a new database and two tables that we are going to work with:
- We are going to call the database
demo_joins:
CREATE DATABASE demo_joins;
- Then, switch to the new database:
USE demo_joins;
- Then, the first table will be called
users, and it will only have two columns:idandusername:
CREATE TABLE users
(
    id INT PRIMARY KEY AUTO_INCREMENT,
    username VARCHAR(255) NOT NULL
);
- Then, let’s create a second table called
posts, and to keep things simple, we will have three two columns:id,user_idandtitle:
CREATE TABLE posts
(
    id INT PRIMARY KEY AUTO_INCREMENT,
    user_id INT,
    title VARCHAR(255) NOT NULL
);
The
user_idcolumn would be used to reference the user’s ID that the post belongs to. It is going to be a one to many relations, e.g. one user could have many posts:
- Now, let’s add some data into the two tables first by creating a few users:
INSERT INTO users
  ( username )
VALUES
  ('bobby'),
  ('devdojo'),
  ('tony'),
  ('greisi');
- And finally add some posts:
INSERT INTO posts
  ( user_id, title )
VALUES
  ('1', 'Hello World!'),
  ('2', 'Getting started with SQL'),
  ('3', 'SQL is awesome'),
  ('2', 'MySQL is up!'),
  ('1', 'SQL - structured query language');
Now that we’ve got our tables and demo data ready, let’s go ahead and learn how to use joins.
CROSS JOIN
The CROSS join allows you to put the result of two tables next to each other without specifying any WHERE conditions. This makes the CROSS join the simplest one, but it is also not of much use in a real-life scenario.
So if we were to select all of the users and all of the posts side by side, we would use the following query:
SELECT * FROM users CROSS JOIN posts;
The output will be all of your users and all of the posts side by side:
+----+----------+----+--------+-----------------+
| id | username | id |user_id | title           |
+----+----------+----+--------+-----------------+
|  4 | greisi   |  1 |      1 | Hello World!    |
|  3 | tony     |  1 |      1 | Hello World!    |
|  2 | dev      |  1 |      1 | Hello World!    |
|  1 | bobby    |  1 |      1 | Hello World!    |
|  4 | greisi   |  2 |      2 | Getting started |
|  3 | tony     |  2 |      2 | Getting started |
|  2 | dev      |  2 |      2 | Getting started |
|  1 | bobby    |  2 |      2 | Getting started |
|  4 | greisi   |  3 |      3 | SQL is awesome  |
|  3 | tony     |  3 |      3 | SQL is awesome  |
|  2 | dev      |  3 |      3 | SQL is awesome  |
|  1 | bobby    |  3 |      3 | SQL is awesome  |
|  4 | greisi   |  4 |      2 | MySQL is up!    |
|  3 | tony     |  4 |      2 | MySQL is up!    |
|  2 | dev      |  4 |      2 | MySQL is up!    |
|  1 | bobby    |  4 |      2 | MySQL is up!    |
|  4 | greisi   |  5 |      1 | SQL             |
|  3 | tony     |  5 |      1 | SQL             |
|  2 | dev      |  5 |      1 | SQL             |
|  1 | bobby    |  5 |      1 | SQL             |
+----+----------+----+--------+-----------------+
As mentioned above, you will highly unlikely run a CROSS join for two whole tables in a real-life scenario. If the tables have tens of thousands of rows, an unqualified CROSS JOIN can take minutes to complete.
You would most likely use one of the following with a specific condition.
In MySQL, CROSS JOIN and INNER JOIN are equivalent to JOIN.
INNER JOIN
The INNER join is used to join two tables. However, unlike the CROSS join, by convention, it is based on a condition. By using an INNER join, you can match the first table to the second one.
As we have a one-to-many relationship, a best practice would be to use a primary key for the posts id column and a foreign key for the user_id; that way, we can ‘link’ or relate the users table to the posts table. However, this is beyond the scope of this SQL basics eBook, though I might extend it in the future and add more chapters.
As an example and to make things a bit clearer, let’s say that you wanted to get all of your users and the posts associated with each user. The query that we would use will look like this:
SELECT *
FROM users
INNER JOIN posts
ON users.id = posts.user_id;
Rundown of the query:
SELECT * FROM users: This is a standard select we’ve covered many times in the previous chapters.INNER JOIN posts: Then, we specify the second table and which table we want to join the result set.ON users.id = posts.user_id: Finally, we specify how we want the data in these two tables to be merged. Theuser.idis theidcolumn of theusertable, which is also the primary ID, andposts.user_idis the foreign key in the email address table referring to the ID column in the users table.
The output will be the following, associating each user with their post based on the user_id column:
+----+----------+----+---------+-----------------+
| id | username | id | user_id | title           |
+----+----------+----+---------+-----------------+
|  1 | bobby    |  1 |       1 | Hello World!    |
|  2 | dev      |  2 |       2 | Getting started |
|  3 | tony     |  3 |       3 | SQL is awesome  |
|  2 | dev      |  4 |       2 | MySQL is up!    |
|  1 | bobby    |  5 |       1 | SQL             |
+----+----------+----+---------+-----------------+
Note that the INNER JOIN could (in MySQL) equivalently be written merely as JOIN, but that can vary for other SQL dialects:
SELECT *
FROM users
JOIN posts
ON users.id = posts.user_id;
The main things that you need to keep in mind here are the INNER JOIN and ON clauses.
With the inner join, the NULL values are discarded. For example, if you have a user who does not have a post associated with it, the user with NULL posts will not be displayed when running the above INNER join query.
To get the null values as well, you would need to use an outer join.
Types of INNER JOIN
- Theta Join ( θ ) :- Theta join combines rows from different tables provided they satisfy the theta condition. The join condition is denoted by the symbol
θ.
Here the comparison operators(≤, ≥, ˂, ˃, =, ̚ )come into picture.
Notation :- R1 ⋈θ R2.
For example, suppose we want to buy a mobile and a laptop, based on our budget we have thought of buying both such that mobile price should be less than that of laptop.SELECT mobile.model, laptop.model FROM mobile, laptop WHERE mobile.price < laptop.price; - Equijoin :- When Theta join uses only equality (=) comparison operator, it is said to be equijoin.
For example, suppose we want to buy a mobile and a laptop, based on our budget we have thought of buying both of the same prices.SELECT mobile.model, laptop.model FROM mobile, laptop WHERE mobile.price = laptop.price; - Natural Join ( ⋈ ) :- Natural join does not use any comparison operator. It does not concatenate the way a Cartesian product does.
We can perform a Natural Join only if at least one standard column exists between two tables. In addition, the column must have the same name and domain.SELECT * FROM mobile NATURAL JOIN laptop;
LEFT JOIN
Using the LEFT OUTER join, you would get all rows from the first table that you’ve specified, and if there are no associated records within the second table, you will get a NULL value.
In our case, we have a user called graisi, which is not associated with a specific post. As you can see from the output from the previous query, the graisi user was not present there. To show that user, even though it does not have an associated post with it, you could use a LEFT OUTER join:
SELECT *
FROM users
LEFT JOIN posts
ON users.id = posts.user_id;
The output will look like this:
+----+----------+------+---------+-----------------+
| id | username | id   | user_id | title           |
+----+----------+------+---------+-----------------+
|  1 | bobby    |    1 |       1 | Hello World!    |
|  2 | dev      |    2 |       2 | Getting started |
|  3 | tony     |    3 |       3 | SQL is awesome  |
|  2 | dev      |    4 |       2 | MySQL is up!    |
|  1 | bobby    |    5 |       1 | SQL             |
|  4 | greisi   | NULL |    NULL | NULL            |
+----+----------+------+---------+-----------------+
RIGHT JOIN
The RIGHT OUTER join is the exact opposite of the LEFT OUTER join. It will display all of the rows from the second table and give you a NULL value in case that it does not match with an entry from the first table.
Let’s create a post that does not have a matching user id:
INSERT INTO posts
  ( user_id, title )
VALUES
  ('123', 'No user post!');
We specify 123 as the user ID, but we don’t have such a user in our users table.
Now, if you were to run the LEFT outer join, you would not see the post as it has a null value for the corresponding users table.
But if you were to run a RIGHT outer join, you would see the post but not the greisi user as it does not have any posts:
SELECT *
FROM users
RIGHT JOIN posts
ON users.id = posts.user_id;
Output:
+------+----------+----+---------+-----------------+
| id   | username | id | user_id | title           |
+------+----------+----+---------+-----------------+
|    1 | bobby    |  1 |       1 | Hello World!    |
|    2 | dev      |  2 |       2 | Getting started |
|    3 | tony     |  3 |       3 | SQL is awesome  |
|    2 | dev      |  4 |       2 | MySQL is up!    |
|    1 | bobby    |  5 |       1 | SQL             |
| NULL | NULL     |  6 |     123 | No user post!   |
+------+----------+----+---------+-----------------+
Joins can also be limited with WHERE conditions. For instance, in the preceding example, if we wanted to join the tables and then restrict to only username bobby.
SELECT *
FROM users
RIGHT JOIN posts
ON users.id = posts.user_id
WHERE username = 'bobby';
Output:
+------+----------+----+---------+-----------------+
| id   | username | id | user_id | title           |
+------+----------+----+---------+-----------------+
|    1 | bobby    |  1 |       1 | Hello World!    |
|    1 | bobby    |  5 |       1 | SQL             |
+------+----------+----+---------+-----------------+
Conclusion
Joins are fundamental to using SQL with data. The whole concept of joins might be very confusing initially but would make a lot of sense once you get used to it.
The best way to wrap your head around it is to write some queries, play around with each type of JOIN, and see how the result set changes.
For more information, you could take a look at the official documentation here.
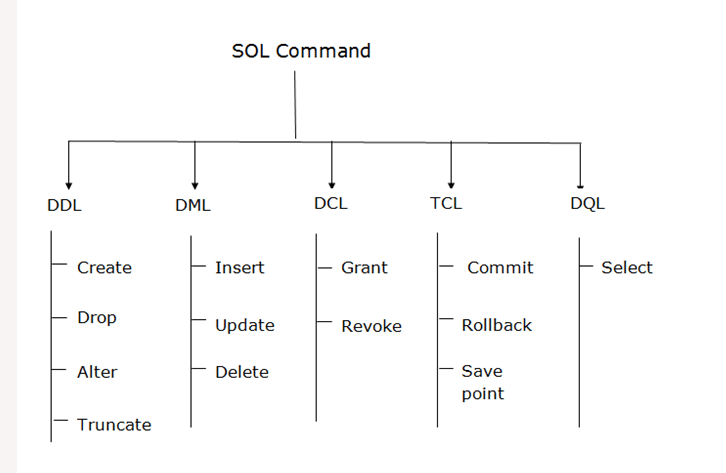
SQL Commnad Categories
SQL | DDL, DQL, DML, DCL and TCL Commands
Structured Query Language(SQL), as we all know, is the database language by which we can perform certain operations on the existing database. Also, we can use this language to create a database. SQL uses specific commands like Create, Drop, Insert, etc., to carry out the required tasks.
- DDL – Data Definition Language
- DQl – Data Query Language
- DML – Data Manipulation Language
- DCL – Data Control Language
Though many resources claim there to be another category of SQL clauses TCL – Transaction Control Language, so we will see in detail about TCL as well.
DDL (Data Definition Language):
DDL or Data Definition Language consists of the SQL commands used to define the database schema. It simply deals with descriptions of the database schema and is used to create and modify the structure of database objects in the database. These commands usually are not used by a general user, who should be accessing the database via an application.
List of DDL commands:
CREATE: This command is used to create the database or its objects (like table, index, function, views, store procedure, and triggers).
CREATE TABLE Persons (
    PersonID int,
    LastName varchar(255),
    FirstName varchar(255),
    Address varchar(255),
    City varchar(255)
);
DROP: This command is used to delete objects from the database.
DROP TABLE table_name;
ALTER: This is used to alter the structure of the database.
ALTER TABLE Persons
ADD Age int;
TRUNCATE: This is used to remove all records from a table, including all spaces allocated for the records.
TRUNCATE TABLE Persons;
COMMENT: This is used to add comments to the data dictionary.
--SELECT * FROM Customers;
SELECT * FROM Persons;
– RENAME: This is used to rename an object existing in the database.
ALTER TABLE Persons
RENAME COLUMN Age TO Year;
DQL (Data Query Language):
DQL statements are used for performing queries on the data within schema objects. The purpose of the DQL Command is to get some schema relation based on the query passed to it. We can define DQL as follows. It is a component of the SQL statement that allows getting data from the database and imposing order upon it. It includes the SELECT statement. This command allows getting the data out of the database to perform operations with it. When a SELECT is fired against a table(s), the result is compiled into a different temporary table, which is displayed or perhaps received by the program, i.e. a front-end.
List of DQL:
SELECT: It is used to retrieve data from the database.
SELECT * FROM table_name;
+--------+--------------+------------+--------+---------+
| emp_id | emp_name     | hire_date  | salary | dept_id |
+--------+--------------+------------+--------+---------+
|      1 | Ethan Hunt   | 2001-05-01 |   5000 |       4 |
|      2 | Tony Montana | 2002-07-15 |   6500 |       1 |
|      3 | Sarah Connor | 2005-10-18 |   8000 |       5 |
|      4 | Rick Deckard | 2007-01-03 |   7200 |       3 |
|      5 | Martin Blank | 2008-06-24 |   5600 |    NULL |
+--------+--------------+------------+--------+---------+
The SQL commands that deal with the manipulation of data present in the database belong to DML or Data Manipulation Language, including most of the SQL statements. It is the component of the SQL statement that controls access to data and the database. DCL statements are grouped with DML statements.
List of DML commands:
INSERT: It is used to insert data into a table.
INSERT INTO Customers
  (CustomerName, ContactName, Address, City, PostalCode, Country)
VALUES
  ('Cardinal', 'Tom B. Erichsen', 'Skagen 21', 'Stavanger', '4006', 'Norway');
UPDATE: It is used to update existing data within a table.
UPDATE Customers
SET ContactName='Alfred Schmidt', City='Frankfurt'
WHERE CustomerID = 1;
DELETE: It is used to delete records from a database table.
DELETE FROM Customers WHERE CustomerName='Alfreds Futterkiste';
LOCK: Table control concurrency.
LOCK TABLES table_name [READ | WRITE]
--------------------------------------
UNLOCK TABLES;
CALL: Call a PL/SQL or JAVA subprogram.
CREATE PROCEDURE procedure_name
AS sql_statement
GO;
Execute a Stored Procedure
EXEC procedure_name;
EXPLAIN PLAN: It describes the access path to data.
DCL (Data Control Language):
DCL includes commands such as GRANT and REVOKE, which mainly deal with the database system’s rights, permissions, and other controls.
List of DCL commands:
GRANT: This command gives users access privileges to the database.REVOKE: This command withdraws the user’s access privileges given by using the GRANT command.
Though many resources claim there to be another category of SQL clauses TCL – Transaction Control Language, we will see in detail about TCL. TCL commands deal with the transaction within the database.
List of TCL commands:
COMMIT: Commits a Transaction.ROLLBACK: Rollbacks a transaction in case of any error occurs.SAVEPOINT:Sets a savepoint within a transaction.SET TRANSACTION: Specify characteristics for the transaction.
SQL Sub Queries
A subquery is a SQL query nested inside a larger query.
- A subquery may occur in
- A SELECT clause
- A FROM clause
- A WHERE clause
- The subquery can be nested inside a SELECT, INSERT, UPDATE, or DELETE statement or inside another subquery.
- A subquery is usually added within the WHERE Clause of another SQL SELECT statement.
- The inner query executes first before its parent query so that the results of an inner query can be passed to the outer query.
You can use a subquery in a SELECT, INSERT, DELETE, or UPDATE statement to perform the following tasks:
- Compare an expression to the result of the query.
- Determine if an expression is included in the results of the query.
- Check whether the query selects any rows.
Subqueries with the SELECT Statement:
Consider the CUSTOMERS table having the following records
+----+----------+-----+-----------+----------+
| ID | NAME     | AGE | ADDRESS   | SALARY   |
+----+----------+-----+-----------+----------+
|  1 | Ramesh   |  35 | Ahmedabad |  2000.00 |
|  2 | Khilan   |  25 | Delhi     |  1500.00 |
|  3 | Kaushik  |  23 | Kota      |  2000.00 |
|  4 | Chaitali |  25 | Mumbai    |  6500.00 |
|  5 | Hardik   |  27 | Bhopal    |  8500.00 |
|  6 | Komal    |  22 | MP        |  4500.00 |
|  7 | Muffy    |  24 | Indore    | 10000.00 |
+----+----------+-----+-----------+----------+
Now, let us check the following subquery with a SELECT statement.
Example:
SELECT *
FROM CUSTOMERS
WHERE ID IN (
    SELECT ID
    FROM CUSTOMERS
    WHERE SALARY > 4500
);
This would produce the following result.
+----+----------+-----+---------+----------+
| ID | NAME     | AGE | ADDRESS | SALARY   |
+----+----------+-----+---------+----------+
|  4 | Chaitali |  25 | Mumbai  |  6500.00 |
|  5 | Hardik   |  27 | Bhopal  |  8500.00 |
|  7 | Muffy    |  24 | Indore  | 10000.00 |
+----+----------+-----+---------+----------+
Subqueries with the UPDATE Statement:
The subquery can be used in conjunction with the UPDATE statement. Either single or multiple columns in a table can be updated when using a subquery with the UPDATE statement.
Example:
Assuming, we have CUSTOMERS_BKP table available which is backup of CUSTOMERS table. The following example updates SALARY by 0.25 times in the CUSTOMERS table for all the customers whose AGE is greater than or equal to 27.
UPDATE CUSTOMERS
SET SALARY = SALARY * 0.25
WHERE AGE IN (
    SELECT AGE
    FROM CUSTOMERS_BKP
    WHERE AGE >= 27
);
This would impact two rows and finally CUSTOMERS table would have the following records.
+----+----------+-----+-----------+----------+
| ID | NAME     | AGE | ADDRESS   | SALARY   |
+----+----------+-----+-----------+----------+
|  1 | Ramesh   |  35 | Ahmedabad |   125.00 |
|  2 | Khilan   |  25 | Delhi     |  1500.00 |
|  3 | Kaushik  |  23 | Kota      |  2000.00 |
|  4 | Chaitali |  25 | Mumbai    |  6500.00 |
|  5 | Hardik   |  27 | Bhopal    |  2125.00 |
|  6 | Komal    |  22 | MP        |  4500.00 |
|  7 | Muffy    |  24 | Indore    | 10000.00 |
+----+----------+-----+-----------+----------+
Subqueries with the DELETE Statement:
The subquery can be used in conjunction with the DELETE statement like with any other statements mentioned above.
Example:
Assuming, we have a CUSTOMERS_BKP table available which is a backup of the CUSTOMERS table. The following example deletes the records from the CUSTOMERS table for all the customers whose AGE is greater than or equal to 27.
DELETE FROM CUSTOMERS
WHERE AGE IN (
    SELECT AGE
    FROM CUSTOMERS_BKP
    WHERE AGE >= 27
);
This would impact two rows and finally the CUSTOMERS table would have the following records.
+----+----------+-----+---------+----------+
| ID | NAME     | AGE | ADDRESS | SALARY   |
+----+----------+-----+---------+----------+
|  2 | Khilan   |  25 | Delhi   |  1500.00 |
|  3 | Kaushik  |  23 | Kota    |  2000.00 |
|  4 | Chaitali |  25 | Mumbai  |  6500.00 |
|  6 | Komal    |  22 | MP      |  4500.00 |
|  7 | Muffy    |  24 | Indore  | 10000.00 |
+----+----------+-----+---------+----------+
SQL – UNIONS CLAUSE
The SQL UNION clause/operator is used to combine the results of two or more SELECT statements without returning any duplicate rows.
- While using this UNION clause, each SELECT statement must have:
- The same number of columns selected
- The same number of column expressions
- The same data type and
- Have them in the same order
But they need not have to be in the same length.
Example
Consider the following two tables.
Table 1 − customers table is as follows:
+----+----------+-----+-----------+----------+
| id | name     | age | address   | salary   |
+----+----------+-----+-----------+----------+
|  1 | Ramesh   |  32 | Ahmedabad |  2000.00 |
|  2 | Khilan   |  25 | Delhi     |  1500.00 |
|  3 | kaushik  |  23 | Kota      |  2000.00 |
|  4 | Chaitali |  25 | Mumbai    |  6500.00 |
|  5 | Hardik   |  27 | Bhopal    |  8500.00 |
|  6 | Komal    |  22 | MP        |  4500.00 |
|  7 | Muffy    |  24 | Indore    | 10000.00 |
+----+----------+-----+-----------+----------+
Table 2 − orders table is as follows:
+-----+---------------------+-------------+--------+
| oid | date                | customer_id | amount |
+-----+---------------------+-------------+--------+
| 102 | 2009-10-08 00:00:00 |           3 |   3000 |
| 100 | 2009-10-08 00:00:00 |           3 |   1500 |
| 101 | 2009-11-20 00:00:00 |           2 |   1560 |
| 103 | 2008-05-20 00:00:00 |           4 |   2060 |
+-----+---------------------+-------------+--------+
Now, let us join these two tables in our SELECT statement as follows:
SELECT id, name, amount, date
   FROM customer
   LEFT JOIN orders
   ON customers.id = orders.customer_id
UNION
   SELECT id, name, amount, date
   FROM customer
   RIGHT JOIN orders
   ON customers.id = orders.customer_id
This would produce the following result:
The UNION ALL Clause
The UNION ALL operator is used to combine the results of two SELECT statements including duplicate rows.
The same rules that apply to the UNION clause will apply to the UNION ALL operator.
Example – Consider the following two tables:
- Table 1 − customers table is as follows:
+----+----------+-----+-----------+----------+
| id | name     | age | address   | salary   |
+----+----------+-----+-----------+----------+
|  1 | Ramesh   |  32 | Ahmedabad |  2000.00 |
|  2 | Khilan   |  25 | Delhi     |  1500.00 |
|  3 | kaushik  |  23 | Kota      |  2000.00 |
|  4 | Chaitali |  25 | Mumbai    |  6500.00 |
|  5 | Hardik   |  27 | Bhopal    |  8500.00 |
|  6 | Komal    |  22 | MP        |  4500.00 |
|  7 | Muffy    |  24 | Indore    | 10000.00 |
+----+----------+-----+-----------+----------+
- Table 2 − orders table is as follows:
+-----+---------------------+-------------+--------+
| oid | date                | customer_id | amount |
+-----+---------------------+-------------+--------+
| 102 | 2009-10-08 00:00:00 |           3 |   3000 |
| 100 | 2009-10-08 00:00:00 |           3 |   1500 |
| 101 | 2009-11-20 00:00:00 |           2 |   1560 |
| 103 | 2008-05-20 00:00:00 |           4 |   2060 |
+-----+---------------------+-------------+--------+
Now, let us join these two tables in our SELECT statement as follows :
SELECT id, name, amount, date
   FROM customers
   LEFT JOIN orders
   ON customers.id = order.customer_id
UNION ALL
   SELECT id, name, amount, date
   FROM customers
   RIGHT JOIN orders
   ON customers.id = orders.customer_id;
This would produce the following result:
+------+----------+--------+---------------------+
| id   | name     | amount | date                |
+------+----------+--------+---------------------+
|    1 | Ramesh   |   NULL | NULL                |
|    2 | Khilan   |   1560 | 2009-11-20 00:00:00 |
|    3 | kaushik  |   3000 | 2009-10-08 00:00:00 |
|    3 | kaushik  |   1500 | 2009-10-08 00:00:00 |
|    4 | Chaitali |   2060 | 2008-05-20 00:00:00 |
|    5 | Hardik   |   NULL | NULL                |
|    6 | Komal    |   NULL | NULL                |
|    7 | Muffy    |   NULL | NULL                |
|    3 | kaushik  |   3000 | 2009-10-08 00:00:00 |
|    3 | kaushik  |   1500 | 2009-10-08 00:00:00 |
|    2 | Khilan   |   1560 | 2009-11-20 00:00:00 |
|    4 | Chaitali |   2060 | 2008-05-20 00:00:00 |
+------+----------+--------+---------------------+
Note : There are two other clauses (i.e., operators), which are like the UNION clause.
Relational Keys- Keys in a Relational Database
A database must be able to inhibit inconsistency occurring due to incorrect data. It must have certain identified attributes in relations to uniquely distinguish the tuples. No two tuples in a relation should have same value for all attributes since it will lead to duplicity of data. duplicity of data leads to inconsistency . Relational database systems have the concept of Relational Keys to distinguish between different records.
Types of Relational Keys
Super Keys
A relation’s tuples can be uniquely identified by various combinations of attributes. Super Keys is defined as a set of one attribute or combinations of two or more attributes that help in distinguishing between tuples in a relation.
For example, the Customer ID attribute of the relation Customer is unique for all customers. The Customer ID can be used to identify each customer tuple in the relation. Customer ID is a Super Key for relation Customer.
Customer Name attribute of Customer cannot be considered as Super Key because many customers for the organization can have same name. However when combined with Customer ID it becomes a Super Key {CustomerID, CustomerName}. It means that Super Key can have additional attributes. Consider any key K which is identified as a super key. Any superset of key K is also a super key. For example the possible Super Keys for Customer Relation are
- [ CustomerID, CustomerName, Customer Address ]
- [ CustomerID, CustomerName, Customer Contact Number ]
- [ CustomerID, Customer Contact Number ]
Candidate Keys
If we take a key from the set of super keys for which we don’t have any proper subset defined as a superkey, it is called a candidate key. In other words the minimal attribute super keys are termed as candidate keys.
If we can identify some distinct sets of attributes which identify the tuples uniquely they fall in the category of candidate keys. For example the possible Candidate Keys for Customer Relation are
- [ CustomerID ]
- [ CustomerName, Customer Address ]
- [ CustomerName, Customer Contact Number ]
- [ Customer Address, Customer Contact Number ]
Primary Key
Out of all possible candidate keys only one is chosen by the database designer as the key to identify the records in a relation in a database. This selected candidate key is called the Primary Key. It is the property of the relation and not of tuples. The primary key attribute(s) does not allow any duplicate values. It also inhibits leaving the primary key attribute without any value (NOT NULL).
A relation can have only one primary key.
In the Customer Database example {Customer ID} is the attribute taken as the primary key of customer relation. While picking up a candidate key as primary key the designer should ensure that it is an attribute or group of attributes that do not change or may change extremely rarely.
Alternate Keys
After selecting one key among candidate keys as primary key, the rest of candidate keys are called the alternate keys. In the customer Database these candidate keys are the alternate keys.
- [ CustomerName, Customer Address ]
- [ CustomerName, Customer Contact Number ]
- [ Customer Address, Customer Contact Number ]
Foreign Key
A foreign key is used to reference values from one relation into another relation. This is possible when the attribute or combination of attributes is primary key in the referenced relation. The relation in which the primary key of a relation is referenced is called the referencing table. The foreign key constraint implements the referential integrity in a database. The referencing relation attribute can have only those values which exist in the primary key attribute(s) of the referenced relation
A relation can have multiple foreign key
For example in the customer database the orders’ relation (referencing relation) has the structure (Order ID, Customer ID, Order Date, Order Status, Total Billing Amount). The attribute Customer ID is the foreign key referencing Customer ID from customer relation (referenced relation). It means that orders can be placed only for the customers whose customer details are already available in the customer relation.
Logical Operator Keywords
Here are the most important Logical Operators summarized in a table.
Logical Operators can be used for conditions as they show a result in form of a boolean (True/False) or Unknown. So, e.g. if an exact value is True for a value, a Logical Operator can proof that it’s True.
| Logical Operator | Explanation |
|---|---|
| ALL | If all comparisons are True: return True |
| ANY | If any comparison is True: return True |
| AND | If both expressions are True: return True |
| EXISTS | If a subquery contains rows: return True |
| IN | If compared value is equal to at least one value: return True |
| BETWEEN | If there are values in given range: return True |
| NOT | Reverses the value of any boolean |
| OR | If either expression is True: return True |
Having Clause Aggregate Functions
HAVING Clause
Unlike where clause which imposes conditions on columns Having clause enables you to specify conditions that filter which group results appear in the results.
Syntax
SELECT column_name(s)
FROM table_name
WHERE condition
GROUP BY column_name(s)
HAVING condition
ORDER BY column_name(s);
Description
- Used with
aggregate functions - Must follow
GROUP BYclause in the query
Aggregate Functions
- SQL aggregation is the task of collecting a set of values to return a single value.
- An aggregate function is a function where the values of multiple rows are grouped together as input on certain criteria to form a single value of more significant meaning.
Aggregate Functions Examples
Suppose this are the table given to us
| Students | table | |
|---|---|---|
| rollno | name | class |
| 1 | Sanskriti | TE |
| 1 | Shree | BE |
| 2 | Harry | TE |
| 3 | John | TE |
| 3 | Shivani | TE |
| purchase | table | |
|---|---|---|
| item | price | customer_name |
| Pen | 10 | Sanskriti |
| Bag | 1000 | Sanskriti |
| Vegetables | 500 | Sanskriti |
| Shoes | 5000 | Sanskriti |
| Water Bottle | 800 | XYZ |
| Mouse | 120 | ABC |
| Sun Glasses | 1350 | ABC |
AVG function
Calculates average of the given column of values
SELECT AVG(price) AS Avg_Purchase, customer_name
FROM purchase
GROUP BY customer_name;
| Avg_Purchase | customer_name |
|---|---|
| 1627.5000 | Sanskriti |
SUM function
Calculates sum of values of given column.
SELECT SUM(price) AS Total_Bill, customer_name
FROM purchase
GROUP BY customer_name;
| Total_Bill | customer_name |
|---|---|
| 6510 | Sanskriti |
COUNT function
Gives count of entries/ values in given column.
SELECT COUNT(item) AS Total_Items, customer_name
FROM purchase
GROUP BY customer_name;
| Total_Items | customer_name |
|---|---|
| 4 | Sanskriti |
MAX function
Return maximum value from the number of values in the column.
SELECT MAX(price) AS Highest_Purchase, customer_name
FROM purchase
GROUP BY customer_name;
| Highest_Purchase | customer_name |
|---|---|
| 5000 | Sanskriti |
MIN function
Return minimum value from the number of values in the column.
SELECT MIN(price) AS Lowest_Purchase, customer_name
FROM purchase
GROUP BY customer_name;
| Lowest_Purchase | customer_name |
|---|---|
| 10 | Sanskriti |
Having clause Examples
Example 1
SELECT COUNT(class) AS strength, class
FROM Students
GROUP BY class
HAVING COUNT(class) > 2;
Above query gives number of students in a class having number of students > 2
| strength | class |
|---|---|
| 4 | TE |
Example 2
SELECT customer_name, MIN(price) AS MIN_PURCHASE
FROM purchase
GROUP BY customer_name
HAVING MIN(price) > 10;
Above query finds minimum price which is > 10
| customer_name | MIN_PURCHASE |
|---|---|
| XYZ | 800 |
| ABC | 120 |
Example 3
SELECT customer_name, AVG(price) AS Average_Purchase
FROM purchase
GROUP BY customer_name
HAVING AVG(price) > 550
ORDER BY customer_name DESC;
Above query calculates average of price and prints customer name and average price which is greater than 550 with descending order of customer names.
| customer_name | Average_Purchase |
|---|---|
| XYZ | 800.0000 |
| Sanskriti | 1627.5000 |
| ABC | 735.0000 |
Example 4
SELECT customer_name, SUM(price) AS Total_Purchase
FROM purchase
WHERE customer_name
LIKE "S%"
GROUP BY customer_name
HAVING SUM(price) > 1000;
Calculates SUM of price and returns customer name and sum > 1000.
| customer_name | Total_Purchase |
|---|---|
| Sanskriti | 6510 |
Essential MySQL Functions
MySQL has many built-in functions. We will covering some important most used built-in functions; for a complete list refer to the online MySQL Reference Manual (http://dev.mysql.com/doc/).
NOTE: As of now we will be going through only function and their output, as they would be self explanatory.
Numeric Functions
SELECT ROUND(5.73)
6
SELECT ROUND(5.73, 1)
5.7
SELECT TRUNCATE(5.7582, 2)
5.75
SELECT CEILING(5.2)
6
SELECT FLOOR(5.7)
5
SELECT ABS(-5.2)
5.2
SELECT RAND() -- Generates a random floating point number b/w 0 & 1
STRING Functions
SELECT LENGTH('sky')
3
SELECT UPPER('sky')
SKY
SELECT LOWER('sky)
sky
SELECT LTRIM(' sky')
sky
SELECT RTRIM('sky ')
sky
SELECT TRIM(' sky ')
sky
SELECT LEFT('Kindergarten', 4)
Kind
SELECT RIGHT('Kindergarten', 6)
garten
SELECT SUBSTRING('Kindergarten', 3, 5)
nderg
SELECT LOCATE('n','Kindergarten') -- LOCATE returns the first occurrence of a character or character string, if found, otherwise it returns 0
3
SELECT REPLACE('Kindergarten', 'garten', 'garden')
Kindergarden
SELECT CONCAT('first', 'last')
firstlast
DATE Functions
SELECT NOW()
2021-10-21 19:59:47
SELECT CURDATE()
2021-10-21
SELECT CURTIME()
20:01:12
SELECT MONTH(NOW())
10
SELECT YEAR(NOW())
2021
SELECT HOUR(NOW())
13
SELECT DAYTIME(NOW())
Thursday
Formatting Dates and Times
In MySQL, the default date format is “YYYY-MM-DD”, ex: “2025-05-12”, MySQL allows developers to format it the way they want. We will discuss some of them.
SELECT DATE_FORMAT(NOW(), '%M %D %Y')
October 22nd 2021
SELECT DATE_FORMAT(NOW(), '%m %d %y')
10 22 21
SELECT DATE_FORMAT(NOW(), '%m %D %y')
10 22nd 21
SELECT TIME_FORMAT(NOW(), '%H %i %p')
14:11 PM
Calculating Dates and Times
SELECT DATE_ADD(NOW(), INTERVAL 1 DAY) --return tomorrows date and time
2021-10-23 14:26:17
SELECT DATE_ADD(NOW(), INTERVAL -1 YEAR)
or
SELECT DATE_SUB(NOW(), INTERVAL 1 YEAR)
Both the queries will return the same output
2020-10-22 14:29:47
SELECT DATEDIFF('2021-09-08 09:00', '2021-07-07 17:00') -- It will return the difference in number of days, time won't be considered
63
SELECT TIME_TO_SEC('09:00') - TIME_TO_SEC('09:02')
-120
Triggers In SQL
A trigger is a stored procedure in database which is automatically invoked whenever any special event occurs in the database. The event can be any event including INSERT, UPDATE and DELETE.
For eg: If you want to perfom a task after a record is inserted into the table then we can make use of triggers
Syntax for creating triggers
create triggecreate trigger [trigger_name]
[before | after]
{insert | update | delete}
on [table_name]
[for each row | for each column]
[trigger_body]
create trigger [trigger_name] : Creates or replaces an existing trigger with the trigger_name.
[before | after] : Now we can specify when our trigger will get fired. It can be before updating the database or after updating the database.
Generally , before triggers are used to validate the data before storing it into the database.
{insert | update | delete} : Now, we specify the DML operation for which our trigger should get fired .
on [table_name] : Here, we specify the name of the table which is associated with the trigger.
[for each row] : This specifies a row-level trigger, i.e., the trigger will be executed for each row being affected.
[for each column] : This specifies a column-level trigger, i.e., the trigger will be executed after the specified column is affected.
[trigger_body] : Here, we specify the operations to be performed once the trigger is fired.
Show Trigger
If you want to see all the triggers that are present in your database.
show triggers in database_name;
Drop Trigger
if you no longer want your trigger then you may delete it.
drop trigger trigger_name;
Example :
Let us consider we have our database named library. Consider a scenario where we want a trigger which is fired everytime any particular book is inserted into the books table . The trigger should add the logs of all the books that are inserted into the books table.
We have created two tables :
books: It will store all the books available in the library- bookrecord : It will generate a statement a log for the inserted book
Select * from library.books;
+----------+---------------+
| book_id  | book_name     |
+----------+---------------+
| 	   | 		   |
| 	   | 		   |
+----------+---------------+
Here, book_id is an auto-incremental field.
Select * from library.bookrecord;
+----------+---------------+-----------+
| SRNO     | bookid        | statement |
+----------+---------------+-----------+
|          |               |           |
|          | 		   |           |
+----------+---------------+-----------+
Here, SRNO is an auto-incremental field.
Now, we will create our trigger on the books table
create trigger library.addstatement
after insert
on library.books
for each row
insert into library.bookrecord(bookid,statement) values (NEW.book_id,concat('New book named ',NEW.book_name,"  added at ",curdate()));
In MySQL, NEW is used to access the currently inserted row. We are inserting the log for the currently inserted book in our database.
Now we will insert a book and wait for the output.
insert into library.books(book_name) values ("Harry Potter and the Goblet of fire");
Output for books:
+----------+-----------------------------------------------+
| book_id  | book_name  				   |
+----------+-----------------------------------------------+
|    1	   | 	Harry Potter and the Goblet of fire	   |
| 	   | 		  				   |
+----------+-----------------------------------------------+
Output for bookrecord:
+----------+---------------+----------------------------------------------------------------------------------+
| SRNO     | bookid        | statement									      |
+----------+---------------+----------------------------------------------------------------------------------+
|   1      |      1        |     New book named Harry Potter and the Goblet of fire  added at 2021-10-22      |
|          | 		   |          									      |
+----------+---------------+----------------------------------------------------------------------------------+
See. it worked!!
Conclusion:
Here, you learnt what are triggers and how you create them. You can create different types of triggers based on your needs and requirements.
TCL commands
Transaction Control Language
Transaction Control Languagecan be defined as the portion of a database language used formaintaining consistencyof the database andmanaging transactionsin the database.- A set of
SQL statementsthat areco-related logically and executed on the data stored in the tableis known as atransaction.
TCL Commands
COMMITCommandROLLBACKCommandSAVEPOINTCommand
COMMIT
The main use of COMMIT command is to make the transaction permanent. If there is a need for any transaction to be done in the database that transaction permanent through commit command.
Syntax
COMMIT;
ROLLBACK
Using this command, the database can be restored to the last committed state. Additionally, it is also used with savepoint command for jumping to a savepoint in a transaction.
Syntax
ROLLBACK TO savepoint-name;
SAVEPOINT
The main use of the Savepoint command is to save a transaction temporarily. This way users can rollback to the point whenever it is needed.
Syntax
SAVEPOINT savepoint-name;
Examples
This is purchase table that we are going to use through this tutorial
| item | price | customer_name |
|---|---|---|
| Pen | 10 | Sanskriti |
| Bag | 1000 | Sanskriti |
| Vegetables | 500 | Sanskriti |
| Shoes | 5000 | Sanskriti |
| Water Bottle | 800 | XYZ |
| Mouse | 120 | ABC |
| Sun Glasses | 1350 | ABC |
UPDATE purchase SET price = 20 WHERE item = "Pen";
O/P : Query OK, 1 row affected (3.02 sec) (Update the price of Pen set it from 10 to 20)
SELECT * FROM purchase;
O/P
| item | price | customer_name |
|---|---|---|
| Pen | 20 | Sanskriti |
| Bag | 1000 | Sanskriti |
| Vegetables | 500 | Sanskriti |
| Shoes | 5000 | Sanskriti |
| Water Bottle | 800 | XYZ |
| Mouse | 120 | ABC |
| Sun Glasses | 1350 | ABC |
START TRANSACTION;
Start transaction
COMMIT;
Saved/ Confirmed the transactions till this point
ROLLBACK;
Lets consider we tried to rollback above transaction
SELECT * FROM purchase;
O/P:
| item | price | customer_name |
|---|---|---|
| Pen | 20 | Sanskriti |
| Bag | 1000 | Sanskriti |
| Vegetables | 500 | Sanskriti |
| Shoes | 5000 | Sanskriti |
| Water Bottle | 800 | XYZ |
| Mouse | 120 | ABC |
| Sun Glasses | 1350 | ABC |
As we have committed the transactions the rollback will not affect anything
SAVEPOINT sv_update;
Create the savepoint the transactions above this will not be rollbacked
UPDATE purchase SET price = 30 WHERE item = "Pen";
O/P : Query OK, 1 row affected (0.57 sec)
Rows matched: 1 Changed: 1 Warnings: 0
SELECT * FROM purchase;
| item | price | customer_name |
|---|---|---|
| Pen | 30 | Sanskriti |
| Bag | 1000 | Sanskriti |
| Vegetables | 500 | Sanskriti |
| Shoes | 5000 | Sanskriti |
| Water Bottle | 800 | XYZ |
| Mouse | 120 | ABC |
| Sun Glasses | 1350 | ABC |
price of pen is changed to 30 using the update command
ROLLBACK to sv_update;
Now if we rollback to the savepoint price should be 20 after rollback lets see
SELECT * FROM purchase;
| item | price | customer_name |
|---|---|---|
| Pen | 20 | Sanskriti |
| Bag | 1000 | Sanskriti |
| Vegetables | 500 | Sanskriti |
| Shoes | 5000 | Sanskriti |
| Water Bottle | 800 | XYZ |
| Mouse | 120 | ABC |
| Sun Glasses | 1350 | ABC |
| Torch | 850 | ABC |
As expected we can see update query is rollbacked to sv_update.
Conclusion
With this short tutorial we have learnt TCL commands.
The MySQL dump command
There are many ways and tools on how to export or backup your MySQL databases. In my opinion, mysqldump is a great tool to accomplish this task.
The mysqldump tool can be used to dump a database or a collection of databases for backup or transfer to another database server (not necessarily MariaDB or MySQL). The dump typically contains SQL statements to create the table, populate it, or both.
One of the main benefits of mysqldump is that it is available out of the box on almost all shared hosting servers. So if you are hosting your database on a cPanel server that you don’t have root access to, you could still use it to export more extensive databases.
Exporting a Database
To export/backup a database, all you need to do is run the following command:
mysqldump -u your_username -p your_database_name > your_database_name-$(date +%F).sql
Note that you need to change the your_database_name with the actual name of your database and the your_username part with your existing MySQL username.
Rundown of the arguments:
-u: needs to be followed by your MySQL username-p: indicates that you would be prompted for your MySQL password>: indicates that the output of the command should be stored in the .sql file that you specify after that sign
You would create an export of your database by running the above command, which you could later use as a backup or even transfer it to another server.
Exporting all databases
If you have root access to the server, you could use the --all-databases flag to export all of the databases hosted on the particular MySQL server. The downside of this approach is that this would create one single .sql` export, which would contain all of the databases.
Let’s say that you would like to export each database into a separate .sql file. You could do that with the following script:
#!/bin/bash

##
# Get a list of all databases except the system databases that are not needed
##
DATABASES=$(echo "show databases;" | mysql | grep -Ev "(Database|information_schema|mysql|performance_schema)")

DATE=$(date +%d%m%Y)
TIME=$(date +%s)
BACKUP_DIR=/home/your_user/backup

##
# Create Backup Directory
##

if [ ! -d ${BACKUP_DIR} ]; then
  mkdir -p ${BACKUP_DIR}
fi

##
# Backup all databases
##

for DB in $DATABASES;
do
    mysqldump --single-transaction --skip-lock-tables $DB | gzip > ${BACKUP_DIR}/$DATE-$DB.sql.gz
done
The script would backup each database and store the .sql dumps in the /home/your_user/backup folder. Make sure to adjust the path to your backup folder.
For more information on Bash scripting, check out this opensource eBook here.
Automated backups
You can even set a cronjob to automate the backups above; that way, you would have regular backups of your databases.
To do that, you need to make sure that you have the following content in your .my.cnf file. The file should be stored at:
/home/your_user/.my.cnf
You should make sure that it has secure permissions:
chmod 600 /home/your_user/.my.cnf
And you should add the following content:
[client]
user=your_mysql_user
password=your_mysql_password
Once you have your .my.cnf file configured, you set up a cronjob to trigger the mysqldump export of your database:
0 10,22 * * * /usr/bin/mysqldump -u your_username -p your_database_name > your_database_name-$(date +%F).sql
The above would run at 10 AM and 10 PM every day, so you will have two daily database backups.
You can even expand the logic and add a compression step so that the .sql dumps do not consume too much webspace.
Conclusion
The mysqldump is a great tool to easily and quickly backup your MySQL databases.
For more information, you could take a look at the official documentation here:
This was initially posted here.
