
Summary: in this tutorial, you will learn how to create new tables in the PostgreSQL database using Python.
This tutorial assumes that you know how to write the CREATE TABLE statement. If this is not the case, you should check out the CREATE TABLE tutorial.
Steps for creating PostgreSQL tables in Python
To create a new table in a PostgreSQL database, you use the following steps:
- First, construct CREATE TABLE statements.
- Next, connect to the PostgreSQL database by calling the connect() function. The connect() function returns a connection object.
- Then, create a cursor object by calling the cursor() method of the connection object.
- After that, execute the CREATE TABLE by calling the execute() method of the cursor object.
- Finally, close the communication with the PostgreSQL database server by calling the close() methods of the cursor and connection objects.
Creating tables in Python example
1) Create a Python program
First, create a new file called create_table.py.
Second, inside the create_table.py file, define a new function called create_tables().
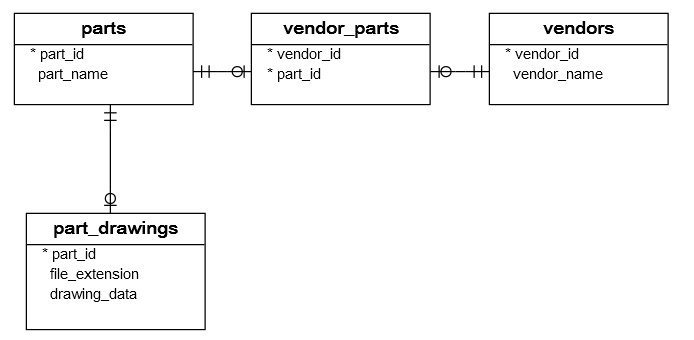
The create_tables() function creates four tables in the suppliers database: vendors, parts, vendor_parts, and part_drawings.

#!/usr/bin/python

import psycopg2
from config import config


def create_tables():
    """ create tables in the PostgreSQL database"""
    commands = (
        """
        CREATE TABLE vendors (
            vendor_id SERIAL PRIMARY KEY,
            vendor_name VARCHAR(255) NOT NULL
        )
        """,
        """ CREATE TABLE parts (
                part_id SERIAL PRIMARY KEY,
                part_name VARCHAR(255) NOT NULL
                )
        """,
        """
        CREATE TABLE part_drawings (
                part_id INTEGER PRIMARY KEY,
                file_extension VARCHAR(5) NOT NULL,
                drawing_data BYTEA NOT NULL,
                FOREIGN KEY (part_id)
                REFERENCES parts (part_id)
                ON UPDATE CASCADE ON DELETE CASCADE
        )
        """,
        """
        CREATE TABLE vendor_parts (
                vendor_id INTEGER NOT NULL,
                part_id INTEGER NOT NULL,
                PRIMARY KEY (vendor_id , part_id),
                FOREIGN KEY (vendor_id)
                    REFERENCES vendors (vendor_id)
                    ON UPDATE CASCADE ON DELETE CASCADE,
                FOREIGN KEY (part_id)
                    REFERENCES parts (part_id)
                    ON UPDATE CASCADE ON DELETE CASCADE
        )
        """)
    conn = None
    try:
        # read the connection parameters
        params = config()
        # connect to the PostgreSQL server
        conn = psycopg2.connect(**params)
        cur = conn.cursor()
        # create table one by one
        for command in commands:
            cur.execute(command)
        # close communication with the PostgreSQL database server
        cur.close()
        # commit the changes
        conn.commit()
    except (Exception, psycopg2.DatabaseError) as error:
        print(error)
    finally:
        if conn is not None:
            conn.close()


if __name__ == '__main__':
    create_tables()
2) Execute the Python program
To execute the Python program, you use the following command:
python create_table.py
3) Verify the table creation
First, log in to the PostgreSQL database server using the psql program.
Second, use the \dt command to display the table list from the suppliers database.
suppliers=# \dt
             List of relations
 Schema |     Name      | Type  |  Owner
--------+---------------+-------+----------
 public | part_drawings | table | postgres
 public | parts         | table | postgres
 public | vendor_parts  | table | postgres
 public | vendors       | table | postgres
(4 rows)
As you see can see clearly from the output, we have four tables created successfully in the suppliers database.
If you use other client tool like pgAdmin, you can view the tables via the table list under the public schema.
In this tutorial, you have learned step by step how to create new PostgreSQL tables in Python using psycopg database adapter.


Leave a Reply