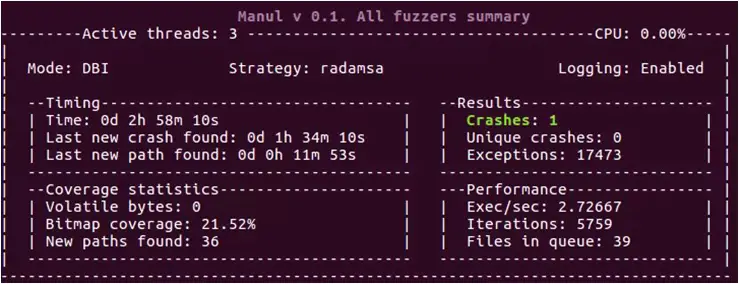

Manul-status_screen
Manul – fuzzer for open-source and blackbox binaries on Windows, Linux and MacOS
Manul is a coverage-guided parallel fuzzer for open-source and black-box binaries on Windows, Linux and macOS (beta) written in pure Python.
Manul Quick Start
pip3 install psutil
git clone https://github.com/mxmssh/manul
cd manul
mkdir in
mkdir out
echo "AAAAAA" > in/test
python3 manul.py -i in -o out -n 4 "linux/test_afl @@"
Installing Radamsa
sudo apt-get install gcc make git wget
git clone https://gitlab.com/akihe/radamsa.git && cd radamsa && make && sudo make install
There is no need to install radamsa on Windows, Manul is distributed with radamsa native library on this platform.
List of Public CVEs
| CVE IDs | Product | Finder |
|---|---|---|
| CVE-2019-9631 CVE-2019-7310 CVE-2019-9959 | Poppler | Maksim Shudrak |
| CVE-2018-17019 CVE-2018-16807 CVE-2019-12175 | Bro/Zeek | Maksim Shudrak |
If you managed to find a new bug using Manul please contact me and I will add you in the list.
Dependencies in Manul
- Python3 (Python2 is deprecated since Jan 1. 2020 but Manul should still work fine under Python2)
- psutil
- pywin32 (
pip install pywin32) on Windows platform (required for DBI persistence mode only).
Coverage-guided fuzzing
Currently, Manul supports two types of instrumentation: AFL-based (afl-gcc, afl-clang and afl-clang-fast) and DBI.
Coverage-guided fuzzing (AFL instrumentation mode)
Instrument your target with afl-gcc or afl-clang-fast and Address Sanitizer (recommended for better results). For example:
CC=afl-gcc CXX=afl-g++ CFLAGS=-fsanitize=address CXXFLAGS=-fsanitize=address cmake <path_to_your_target>
make -j 8
USE_ASAN=1 CC=afl-clang-fast CXX=afl-clang-fast++ cmake <path_to_your_target>
make -j 8See these instructions for more details.
Coverage-guided fuzzing in DBI mode
You don’t need to instrument your target in this mode but you need to download the latest version of DynamoRIO framework for Windows or Linux.
Manul is distributed with x86/x64 precompiled clients for Linux and Windows. You can find them in the following folders:
linux/dbi_32|dbi_64/libbinafl.so (DynamoRIO client)
win/dbi_32|dbi_64/binafl.dll
Unfortunately, DynamoRIO is not officially supported on MacOS.
Using DynamoRIO to fuzz black-box binaries
You can find the latest DynamoRIO release packages at DynamoRIO download page.
You have to uncomment the following lines in the manul.config file and provide correct path to DynamoRIO launcher and client.
# Choose DBI framework to provide coverage back to Manul ("dynamorio" or "pin"). Example dbi = dynamorio
dbi = dynamorio
# If dbi parameter is not None the path to dbi engine launcher and dbi client should be specified.
dbi_root = /home/max/DynamoRIO/bin64/drrun
dbi_client_root = /home/max/manul/linux/dbi_64/libbinafl.so
dbi_client_libs = None
Additionally, you can increase performance of your black-box fuzzing campaign by using persistent in-memory fuzzing. In this mode, you should instruct Manul to instrument particular function (yes, you need to find it by disassembling your binary) and it will run it in a loop by uncommenting the following lines:
dbi_persistence_mode = 1
dbi_target_module = afl_test
dbi_target_method = open_file
#dbi_target_offset = 0x3198 # optionally you can provide offset of this function instead of name
dbi_fuzz_iterations = 1000
winAFL authors provide a very good explanation on how it actually works here. Manul uses a large portion of winAFL instrumetation library’s code to communicate and instrument a target.
IMPORTANT NOTE: You should use 32-bit launcher and 32-bit client to fuzz 32-bit binaries and 64-bit launcher and 64-bit client for 64-bit binaries!
Compiling DynamoRIO client library
To compile instrumentation library, you need to use the latest version of DynamoRIO. The source code of instrumentation library can be found in dbi_clients_src located in the Manul main folder.
64-bit Linux

cd dbi_clients_src
wget <DynamoRIO-x86_64-Linux-X.XX.XXXX-X.tar.gz> - download the latest DynamoRIO
tar xvf DynamoRIO-x86_64-X.XX.XXXX-X.tar.gz
mkdir client_64
cd client_64
cmake ../dr_cov/ -DDynamoRIO_DIR=/home/max/manul/dbi_clients_src/DynamoRIO-x86_64-Linux-X.XX.XXXX-X.tar.gz/cmake
make
32-bit Linux
cd dbi_clients_src
wget <DynamoRIO-i386-Linux-X.XX.XXXX-X.tar.gz> - download the latest DynamoRIO
tar xvf DynamoRIO-x86_64-X.XX.XXXX-X.tar.gz
mkdir client_64
cd client_64
CFLAGS=-m32 CXXFLAGS=-m32 cmake ../dr_cov/ -DDynamoRIO_DIR=/home/max/manul/dbi_clients_src/DynamoRIO-i386-Linux-X.XX.XXXX-X.tar.gz/cmake
makeOn Windows, the easiest way to compile the library would be to install Visual Studio (tested on 2017 & 2013 versions), launch VS20XX Cross Tools Command Prompt and run the following commands:
64-bit Windows
cd dbi_clients_src
<Download and extract the latest version of DynamoRIO>
mkdir client_64
cd client_64
cmake -G"Visual Studio 15 Win64" ..\dr_cov\ -DDynamoRIO_DIR=C:\Users\max\manul\dbi_clients_src\DynamoRIO-Windows-XXXX.XX.X.X\cmake
cmake --build . --config RelWithDebInfo (or just Debug if needed)
32-bit Windows
cd dbi_clients_src
<Download and extract the latest version of DynamoRIO>
mkdir client_32
cd client_32
cmake -G"Visual Studio 15" ..\dr_cov\ -DDynamoRIO_DIR=C:\Users\max\manul\dbi_clients_src\DynamoRIO-Windows-XXXX.XX.X.X\cmake
cmake --build . --config RelWithDebInfo (or just Debug if needed)Using Intel PIN to fuzz black-box binaries on Linux
Manul initially supported Intel PIN coverage-guided fuzzing but due to low performance and high maintainance overhead, this is not supported anymore.
Command-Line Arguments
The most frequently used options can be provided via the command line. The more options are supported using configuration file (manul.config).
Example: python3 manul.py -i corpus -o out_dir -n 40 "target @@"

positional arguments:
  target_binary  The target binary and options to be executed (don't forget to include quotes e.g. "target e @@").

optional arguments:
  -h, --help     show this help message and exit
  -n NFUZZERS    Number of parallel fuzzers
  -s             Run dumb fuzzing (no code instrumentation)
  -c CONFIG      Path to config file with additional options (see Configuration File Options section below)
  -r             Restore previous session

Required parameters:
  -i INPUT       Path to directory with initial corpus
  -o OUTPUT      Path to output directory
Configuration File Options
Manul is distributed with default manul.config file where user can find all supported options and usage examples. Options should be specified in the following format Format: <option_name> = <value>. Symbol # can be used to ignore a line.
Dictionary
dict = /home/max/dictionaries/test.dict. AFL mutation strategy allows user to specify a list of custom tokens that can be inserted at random places in the fuzzed file. Manul supports this functionality via this option (absolute paths preferred).
Mutator weights
mutator_weights=afl:7,radamsa:2,my_mutator:1. Mutator weights allow user to tell Manul how many mutations per 10 executions should be performed by certain fuzzer. In this example, AFL mutator will be executed in 7/10 mutations, Radamsa 2/10 and some custom my_mutator will get 1/10. If you want to disable certain mutator, the weight should be assigned to 0 (e.g. mutator_weights=afl:0,radamsa:1,my_mutator:9).
Deterministic Seed (Radamsa Option)
deterministic_seed = False|True. By providing True, Radamsa mutations will become deterministic thereby each run of Manul will lead to same outputs.
Print Summary per Thread
print_per_thread = False|True. By enabling this option, Manul will print summary for each thread being executed instead of total summary.
Disable Volatile Paths
disable_volatile_bytes = False|True By enabling this option, Manul will not blacklist volatile paths.
AFL’s forkserver (only UNIX)
forkserver_on = False|True Enable or disable AFL’s forkserver.
DBI Options
dbi = dynamorio|pin. This option tells Manul which DBI framework will be used to instrument the target.
dbi_root = <path>. This options tells Manul where to find DBI framework main launcher.
dbi_client_root = <path>. This options tells Manul where to find DBI client to perform instrumentation.
dbi_client_libs = name_#1,name_#2|None. This option can be used to specify list of libraries that need to be instrumented along with the main target (e.g. you have executable that loads the target library + several others where you want to search for bugs).
dbi_persistence_mode = 0|1|2. This option is used to choose between DBI persistent modes. 0 – no persistence, 1 – standard persistence (function wrapping), 2 – not yet supported.
If dbi-persistence_mode = 1|2 the following options should be specified:
dbi_target_module = <module name>. Manul will try to search for target function in the module specified here.
dbi_target_method = <function name>. Function name to be wrapped for persistence.
dbi_target_offset = <offset of function e.g. 0x3198>. Function offset to be wrapped for persistence. This option can be used instead of dbi_target_method if debug symbols are not available.
dbi_fuzz_iterations = 500. The number of fuzz iterations to run in-memory before the whole program restarts. You can play with this argument to find the value that works the best with your target.
dbi_thread_coverage = False. Instrument coverage only from a thread that executed the target function (not yet supported).
Timeout
timeout = 10. Time to wait before kill the target and send the next test case.
init_wait
init_wait = 1. This option can be used to setup a timeout required for target to initialize.
Netslave and Netmaster Options
The options net_config_master and net_config_slave are used to distribute Manul instances over network. You have to perform the following 3 steps to run distributed fuzzing.
- Create a file with a list of hosts in the following format:
IP:portwhere your slaves will be executed. - Start all Manul slave instances on remote machines (with all required options and path to target binary) and enable the following option:
net_config_slave = 0.0.0.0:1337. Manul will launch the instance and will wait for incoming connection from master instance on port 1337. - Start the master instance and provide the file with a list of slave instances created on Step 1 using
net_config_master = file_name.
Debug Mode
debug = False|True – print debug info.
logging_enable = False|True – save debug info in the log.
Logo
manul_logo = False|True – print Manul logo at the beginning.
Disable Stats
no_stats = False|True – save statistics.
Bitmap Synchronization Frequency (5000 recommended for DBI mode)
sync_freq = 10000. Allows user to change coverage bitmap synchronization frequency. This options tells Manul how often it should synchronize coverage between parallel fuzzing instances. Lower value decreases performance but increases coordination between instances.
Custom Path to Save Output
#custom_path = test_path – this option allows to save the test case in the custom folder (if target wants to load it from some predefined place).
Command Line Fuzzing (experimental)
cmd_fuzzing = True|False. If this option is enabled, Manul will provide the input in the target via command line instead of saving in the file.
Ignore Signals
user_signals = 6,2,1|None. User can tell Manul which signals from the target should be ignored (not considered as crash).
Network Fuzzing (experimental)
target_ip_port = 127.0.0.1:7715|None – used to specify target IP and PORT. target_protocol = tcp|tcp – used to specify the protocol to send input in the target over network. net_sleep_between_cases = 0.0. This option can be used to define a delay between test cases being send in the target.
Currently, network fuzzing is an experimental feature (see issues for more details).
Adding Custom Mutator
Custom mutator can be added in the following three steps: Step 1. Create a python (.py) file and give it some name (e.g. example_mutator.py)
Step 2. Create two functions def init(fuzzer_id) and def mutate(data). See example_mutator for more details. Manul will call init function during fuzzing initialization and mutate for each file being provided into the target.
Step 3. Enable mutator by specifying its name using mutator_weights in manul.config. E.g. mutator_weights=afl:2,radamsa:0,example_mutator:8.
NOTE: AFL and Radamsa mutators should always be specified. If you want to disable AFL and/or Radamsa just assign 0 weights to them.
Technical Details
TBD


Leave a Reply