

FeroxBuster is a fast, simple, recursive content discovery tool written in Rust.
Demo:
Installation
Download a Release
Releases for multiple architectures can be found in the Releases section. The latest release for each of the following systems can be downloaded and executed as shown below.
Linux (32 and 64-bit) & MacOS
curl -sL https://raw.githubusercontent.com/epi052/feroxbuster/master/install-nix.sh | bashWindows x86
https://github.com/epi052/feroxbuster/releases/latest/download/x86-windows-feroxbuster.exe.zip
Expand-Archive .\feroxbuster.zip
.\feroxbuster\feroxbuster.exe -V
Windows x86_64
Invoke-WebRequest https://github.com/epi052/feroxbuster/releases/latest/download/x86_64-windows-feroxbuster.exe.zip -OutFile feroxbuster.zip
Expand-Archive .\feroxbuster.zip
.\feroxbuster\feroxbuster.exe -V
Snap Install
Install using snap
sudo snap install feroxbusterThe only gotcha here is that the snap package can only read wordlists from a few specific locations. There are a few possible solutions, of which two are shown below.
If the wordlist is on the same partition as your home directory, it can be hard-linked into ~/snap/feroxbuster/common
ln /path/to/the/wordlist ~/snap/feroxbuster/common
./feroxbuster -u http://localhost -w ~/snap/feroxbuster/common/wordlist
If the wordlist is on a separate partition, hard-linking won’t work. You’ll need to copy it into the snap directory.
cp /path/to/the/wordlist ~/snap/feroxbuster/common
./feroxbuster -u http://localhost -w ~/snap/feroxbuster/common/wordlist
Homebrew on MacOS and Linux
Install using Homebrew via tap
brew tap tgotwig/feroxbuster
brew install feroxbuster
brew tap tgotwig/linux-feroxbuster
brew install feroxbuster
Cargo Install
feroxbuster is published on crates.io, making it easy to install if you already have rust installed on your system.
cargo install feroxbusterapt Install
Download feroxbuster_amd64.deb from the Releases section. After that, use your favorite package manager to install the .deb.
wget -sLO https://github.com/epi052/feroxbuster/releases/latest/download/feroxbuster_amd64.deb.zip
unzip feroxbuster_amd64.deb.zip
sudo apt install ./feroxbuster_amd64.deb
AUR Install
Install feroxbuster-git on Arch Linux with your AUR helper of choice:
yay -S feroxbuster-gitDocker Install
The following steps assume you have docker installed / setup
First, clone the repository.
git clone https://github.com/epi052/feroxbuster.git
cd feroxbuster
Next, build the image.
sudo docker build -t feroxbuster .After that, you should be able to use docker run to perform scans with feroxbuster.
Basic usage
sudo docker run --init -it feroxbuster -u http://example.com -x js,htmlPiping from stdin and proxying all requests through socks5 proxy
cat targets.txt | sudo docker run --net=host --init -i feroxbuster --stdin -x js,html --proxy socks5://127.0.0.1:9050Mount a volume to pass in ferox-config.toml
You’ve got some options available if you want to pass in a config file. ferox-buster.toml can live in multiple locations and still be valid, so it’s up to you how you’d like to pass it in. Below are a few valid examples:
sudo docker run --init -v $(pwd)/ferox-config.toml:/etc/feroxbuster/ferox-config.toml -it feroxbuster -u http://example.comsudo docker run --init -v ~/.config/feroxbuster:/root/.config/feroxbuster -it feroxbuster -u http://example.comNote: If you are on a SELinux enforced system, you will need to pass the :Z attribute also.
docker run --init -v (pwd)/ferox-config.toml:/etc/feroxbuster/ferox-config.toml:Z -it feroxbuster -u http://example.comDefine an alias for simplicity
alias feroxbuster="sudo docker run --init -v ~/.config/feroxbuster:/root/.config/feroxbuster -i feroxbuster" Configuration
Default Values
Configuration begins with with the following built-in default values baked into the binary:
- timeout:
7seconds - follow redirects:
false - wordlist:
/usr/share/seclists/Discovery/Web-Content/raft-medium-directories.txt - threads:
50 - verbosity:
0(no logging enabled) - scan_limit:
0(no limit imposed on concurrent scans) - status_codes:
200 204 301 302 307 308 401 403 405 - user_agent:
feroxbuster/VERSION - recursion depth:
4 - auto-filter wildcards –
true - output:
stdout - save_state:
true(create a state file in cwd whenCtrl+Cis received)
Threads and Connection Limits At A High-Level
This section explains how the -t and -L options work together to determine the overall aggressiveness of a scan. The combination of the two values set by these options determines how hard your target will get hit and to some extent also determines how many resources will be consumed on your local machine.
A Note on Green Threads
feroxbuster uses so-called green threads as opposed to traditional kernel/OS threads. This means (at a high-level) that the threads are implemented entirely in userspace, within a single running process. As a result, a scan with 30 green threads will appear to the OS to be a single process with no additional light-weight processes associated with it as far as the kernel is concerned. As such, there will not be any impact to process (nproc) limits when specifying larger values for -t. However, these threads will still consume file descriptors, so you will need to ensure that you have a suitable nlimit set when scaling up the amount of threads. More detailed documentation on setting appropriate nlimit values can be found in the No File Descriptors Available section of the FAQ
Threads and Connection Limits: The Implementation
- Threads: The
-toption specifies the maximum amount of active threads per-directory during a scan - Connection Limits: The
-Loption specifies the maximum amount of active connections per thread
Threads and Connection Limits: Examples
To truly have only 30 active requests to a site at any given time, -t 30 -L 1 is necessary. Using -t 30 -L 2 will result in a maximum of 60 total requests being processed at any given time for that site. And so on. For a conversation on this, please see Issue #126 which may provide more (or less) clarity ![]()
ferox-config.toml
After setting built-in default values, any values defined in a ferox-config.toml config file will override the built-in defaults.
feroxbuster searches for ferox-config.toml in the following locations (in the order shown):
/etc/feroxbuster/(global)CONFIG_DIR/ferxobuster/(per-user)- The same directory as the
feroxbusterexecutable (per-user) - The user’s current working directory (per-target)
CONFIG_DIR is defined as the following:
- Linux:
$XDG_CONFIG_HOMEor$HOME/.configi.e./home/bob/.config - MacOs:
$HOME/Library/Application Supporti.e./Users/bob/Library/Application Support - Windows:
{FOLDERID_RoamingAppData}i.e.C:\Users\Bob\AppData\Roaming
If more than one valid configuration file is found, each one overwrites the values found previously.
If no configuration file is found, nothing happens at this stage.
As an example, let’s say that we prefer to use a different wordlist as our default when scanning; we can set the wordlist value in the config file to override the baked-in default.
Notes of interest:
- it’s ok to only specify values you want to change without specifying anything else
- variable names in
ferox-config.tomlmust match their command-line counterpart
# ferox-config.toml

wordlist = "/wordlists/jhaddix/all.txt"
A pre-made configuration file with examples of all available settings can be found in ferox-config.toml.example.
# ferox-config.toml
# Example configuration for feroxbuster
#
# If you wish to provide persistent settings to feroxbuster, rename this file to ferox-config.toml and make sure
# it resides in the same directory as the feroxbuster binary.
#
# After that, uncomment any line to override the default value provided by the binary itself.
#
# Any setting used here can be overridden by the corresponding command line option/argument
#
# wordlist = "/wordlists/jhaddix/all.txt"
# status_codes = [200, 500]
# filter_status = [301]
# threads = 1
# timeout = 5
# proxy = "http://127.0.0.1:8080"
# replay_proxy = "http://127.0.0.1:8081"
# replay_codes = [200, 302]
# verbosity = 1
# scan_limit = 6
# quiet = true
# json = true
# output = "/targets/ellingson_mineral_company/gibson.txt"
# debug_log = "/var/log/find-the-derp.log"
# user_agent = "Mozilla/5.0 (Windows NT 6.1; Win64; x64; rv:47.0) Gecko/20100101 Firefox/47.0"
# redirects = true
# insecure = true
# extensions = ["php", "html"]
# no_recursion = true
# add_slash = true
# stdin = true
# dont_filter = true
# extract_links = true
# depth = 1
# filter_size = [5174]
# filter_regex = ["^ignore me$"]
# filter_similar = ["https://somesite.com/soft404"]
# filter_word_count = [993]
# filter_line_count = [35, 36]
# queries = [["name","value"], ["rick", "astley"]]
# save_state = false
# time_limit = 10m

# headers can be specified on multiple lines or as an inline table
#
# inline example
# headers = {"stuff" = "things"}
#
# multi-line example
#   note: if multi-line is used, all key/value pairs under it belong to the headers table until the next table
#         is found or the end of the file is reached
#
# [headers]
# stuff = "things"
# more = "headers"
Command Line Parsing
Finally, after parsing the available config file, any options/arguments given on the commandline will override any values that were set as a built-in or config-file value.
USAGE:
    feroxbuster [FLAGS] [OPTIONS] --url <URL>...

FLAGS:
    -f, --add-slash        Append / to each request
    -D, --dont-filter      Don't auto-filter wildcard responses
    -e, --extract-links    Extract links from response body (html, javascript, etc...); make new requests based on
                           findings (default: false)
    -h, --help             Prints help information
    -k, --insecure         Disables TLS certificate validation
        --json             Emit JSON logs to --output and --debug-log instead of normal text
    -n, --no-recursion     Do not scan recursively
    -q, --quiet            Only print URLs; Don't print status codes, response size, running config, etc...
    -r, --redirects        Follow redirects
        --stdin            Read url(s) from STDIN
    -V, --version          Prints version information
    -v, --verbosity        Increase verbosity level (use -vv or more for greater effect. [CAUTION] 4 -v's is probably
                           too much)

OPTIONS:
        --debug-log <FILE>                  Output file to write log entries (use w/ --json for JSON entries)
    -d, --depth <RECURSION_DEPTH>           Maximum recursion depth, a depth of 0 is infinite recursion (default: 4)
    -x, --extensions <FILE_EXTENSION>...    File extension(s) to search for (ex: -x php -x pdf js)
    -N, --filter-lines <LINES>...           Filter out messages of a particular line count (ex: -N 20 -N 31,30)
    -X, --filter-regex <REGEX>...           Filter out messages via regular expression matching on the response's body
                                            (ex: -X '^ignore me$')
    -S, --filter-size <SIZE>...             Filter out messages of a particular size (ex: -S 5120 -S 4927,1970)
    -C, --filter-status <STATUS_CODE>...    Filter out status codes (deny list) (ex: -C 200 -C 401)
    -W, --filter-words <WORDS>...           Filter out messages of a particular word count (ex: -W 312 -W 91,82)
    -H, --headers <HEADER>...               Specify HTTP headers (ex: -H Header:val 'stuff: things')
    -o, --output <FILE>                     Output file to write results to (use w/ --json for JSON entries)
    -p, --proxy <PROXY>                     Proxy to use for requests (ex: http(s)://host:port, socks5(h)://host:port)
    -Q, --query <QUERY>...                  Specify URL query parameters (ex: -Q token=stuff -Q secret=key)
    -R, --replay-codes <REPLAY_CODE>...     Status Codes to send through a Replay Proxy when found (default: --status-
                                            codes value)
    -P, --replay-proxy <REPLAY_PROXY>       Send only unfiltered requests through a Replay Proxy, instead of all
                                            requests
        --resume-from <STATE_FILE>          State file from which to resume a partially complete scan (ex. --resume-from
                                            ferox-1606586780.state)
    -L, --scan-limit <SCAN_LIMIT>           Limit total number of concurrent scans (default: 0, i.e. no limit)
    -s, --status-codes <STATUS_CODE>...     Status Codes to include (allow list) (default: 200 204 301 302 307 308 401
                                            403 405)
    -t, --threads <THREADS>                 Number of concurrent threads (default: 50)
        --time-limit <TIME_SPEC>            Limit total run time of all scans (ex: --time-limit 10m)
    -T, --timeout <SECONDS>                 Number of seconds before a request times out (default: 7)
    -u, --url <URL>...                      The target URL(s) (required, unless --stdin used)
    -a, --user-agent <USER_AGENT>           Sets the User-Agent (default: feroxbuster/VERSION)
    -w, --wordlist <FILE>                   Path to the wordlist
 Scan’s Display Explained
feroxbuster attempts to be intuitive and easy to understand, however, if you are wondering about any of the scan’s output and what it means, this is the section for you!
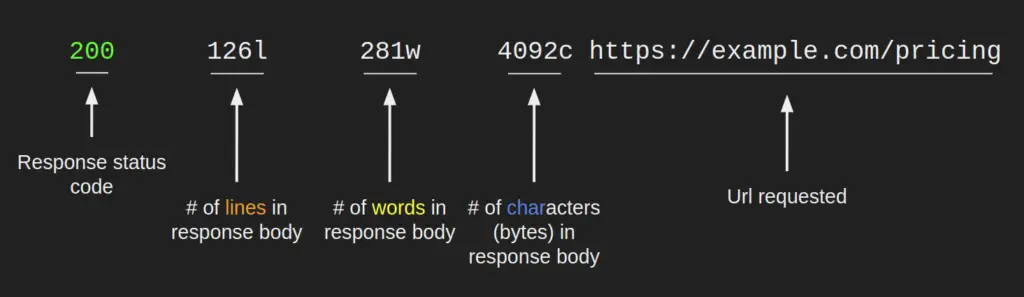
Discovered Resource
When feroxbuster finds a response that you haven’t filtered out, it’s reported above the progress bars and looks similar to what’s pictured below.
The number of lines, words, and bytes shown here can be used to filter those responses
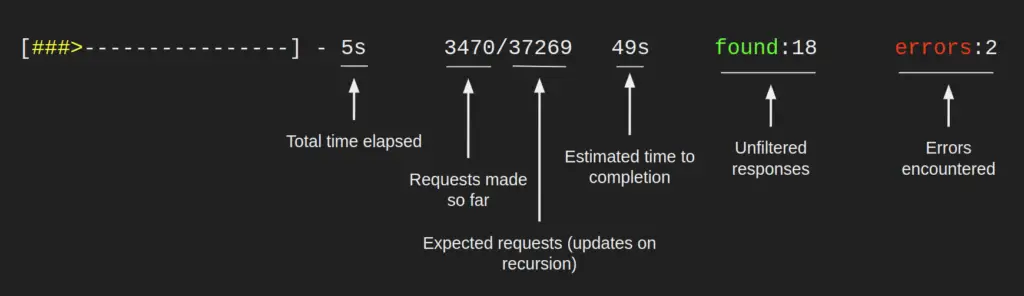
Overall Scan Progress Bar
The top progress bar, colored yellow, tracks the overall scan status. Its fields are described in the image below.
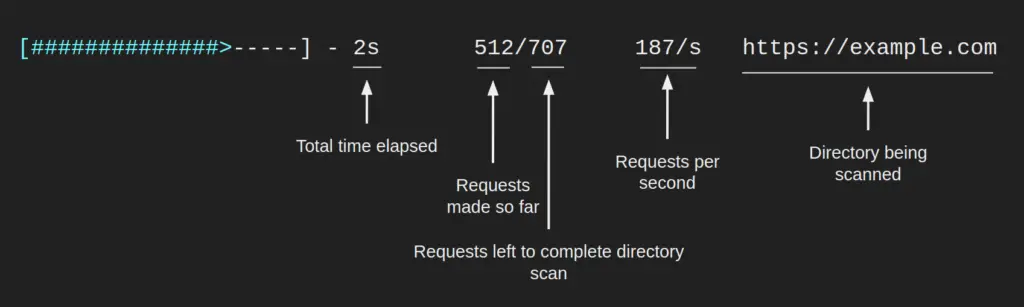
Directory Scan Progress Bar
All other progress bars, colored cyan, represent a scan of one particular directory and will look similar to what’s below.
Example Usage
Multiple Values
Options that take multiple values are very flexible. Consider the following ways of specifying extensions:
./feroxbuster -u http://127.1 -x pdf -x js,html -x php txt json,docxThe command above adds .pdf, .js, .html, .php, .txt, .json, and .docx to each url
All of the methods above (multiple flags, space separated, comma separated, etc…) are valid and interchangeable. The same goes for urls, headers, status codes, queries, and size filters.
Include Headers
./feroxbuster -u http://127.1 -H Accept:application/json "Authorization: Bearer {token}"IPv6, non-recursive scan with INFO-level logging enabled
./feroxbuster -u http://[::1] --no-recursion -vvRead urls from STDIN; pipe only resulting urls out to another tool
cat targets | ./feroxbuster --stdin --quiet -s 200 301 302 --redirects -x js | fff -s 200 -o js-filesProxy traffic through Burp
./feroxbuster -u http://127.1 --insecure --proxy http://127.0.0.1:8080Proxy traffic through a SOCKS proxy (including DNS lookups)
./feroxbuster -u http://127.1 --proxy socks5h://127.0.0.1:9050Pass auth token via query parameter
./feroxbuster -u http://127.1 --query token=0123456789ABCDEFExtract Links from Response Body (New in v1.1.0)
Search through the body of valid responses (html, javascript, etc…) for additional endpoints to scan. This turns feroxbuster into a hybrid that looks for both linked and unlinked content.
Example request/response with --extract-links enabled:
- Make request to
http://example.com/index.html - Receive, and read in, the
bodyof the response - Search the
bodyfor absolute and relative links (i.e.homepage/assets/img/icons/handshake.svg) - Add the following directories for recursive scanning:
http://example .com/homepagehttp://example .com/homepage/assetshttp://example .com/homepage/assets/imghttp://example .com/homepage/assets/img/icons
- Make a single request to
http://example .com/homepage/assets/img/icons/handshake.svg
./feroxbuster -u http://127.1 --extract-linksHere’s a comparison of a wordlist-only scan vs --extract-links using Feline from Hack the Box:
Wordlist only
With --extract-links
Limit Total Number of Concurrent Scans (new in v1.2.0)
Limit the number of scans permitted to run at any given time. Recursion will still identify new directories, but newly discovered directories can only begin scanning when the total number of active scans drops below the value passed to --scan-limit.
./feroxbuster -u http://127.1 --scan-limit 2
Filter Response by Status Code (new in v1.3.0)
Version 1.3.0 included an overhaul to the filtering system which will allow for a wide array of filters to be added with minimal effort. The first such filter is a Status Code Filter. As responses come back from the scanned server, each one is checked against a list of known filters and either displayed or not according to which filters are set.
./feroxbuster -u http://127.1 --filter-status 301Pause an Active Scan (new in v1.4.0)
NOTE: v1.12.0 added an interactive menu to the pause/resume functionality. Active scans can still be paused, however, now you’re presented with the option to cancel a scan instead of simply seeing a spinner.
Scans can be paused and resumed by pressing the ENTER key (shown below, please see v1.12.0‘s entry for the latest visual representation)
Replay Responses to a Proxy based on Status Code (new in v1.5.0)
The --replay-proxy and --replay-codes options were added as a way to only send a select few responses to a proxy. This is in stark contrast to --proxy which proxies EVERY request.
Imagine you only care about proxying responses that have either the status code 200 or 302 (or you just don’t want to clutter up your Burp history). These two options will allow you to fine-tune what gets proxied and what doesn’t.
./feroxbuster -u http://127.1 --replay-proxy http://localhost:8080 --replay-codes 200 302 --insecureOf note: this means that for every response that matches your replay criteria, you’ll end up sending the request that generated that response a second time. Depending on the target and your engagement terms (if any), it may not make sense from a traffic generated perspective.
Filter Response by Word Count & Line Count (new in v1.6.0)
In addition to filtering on the size of a response, version 1.6.0 added the ability to filter out responses based on the number of lines and/or words contained within the response body. This change drove a change to the information displayed to the user as well. This section will detail the new information and how to make use of it with the new filters provided.
Example output:
200 10l 212w 38437c https://example-site.com/index.htmlThere are five columns of output above:
- column 1: status code – can be filtered with
-C|--filter-status - column 2: number of lines – can be filtered with
-N|--filter-lines - column 3: number of words – can be filtered with
-W|--filter-words - column 4: number of bytes (overall size) – can be filtered with
-S|--filter-size - column 5: url to discovered resource
Filter Response Using a Regular Expression (new in v1.8.0)
Version 1.3.0 included an overhaul to the filtering system which will allow for a wide array of filters to be added with minimal effort. The latest addition is a Regular Expression Filter. As responses come back from the scanned server, the body of the response is checked against the filter’s regular expression. If the expression is found in the body, then that response is filtered out.
NOTE: Using regular expressions to filter large responses or many regular expressions may negatively impact performance.
./feroxbuster -u http://127.1 --filter-regex '[aA]ccess [dD]enied.?' --output results.txt --jsonStop and Resume Scans (--resume-from FILE) (new in v1.9.0)
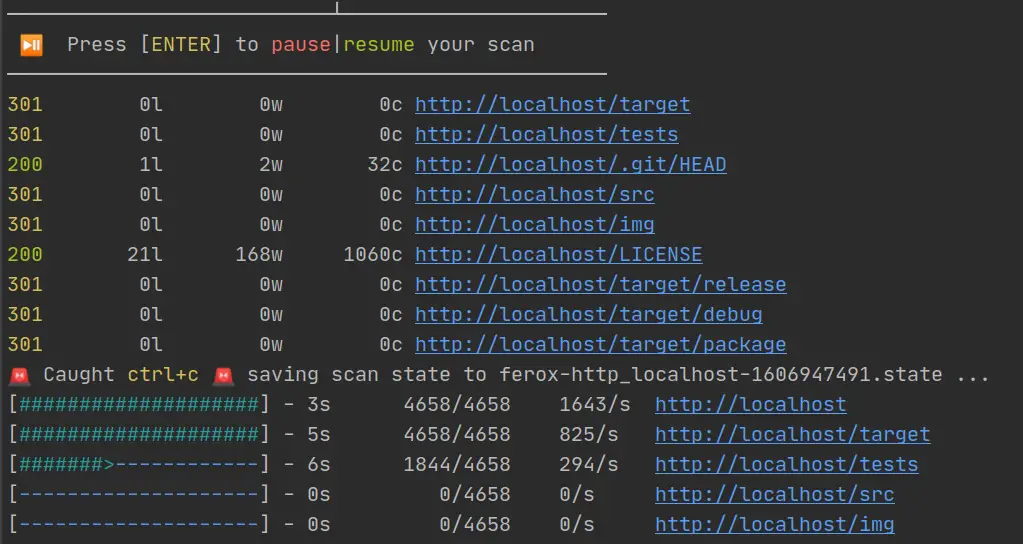
Version 1.9.0 adds a few features that allow for completely stopping a scan, and resuming that same scan from a file on disk.
A simple Ctrl+C during a scan will create a file that contains information about the scan that was cancelled.
// example snippet of state file

{
  "scans": [
    {
      "id": "057016a14769414aac9a7a62707598cb",
      "url": "https://localhost.com",
      "scan_type": "Directory",
      "complete": true
    },
    {
      "id": "400b2323a16f43468a04ffcbbeba34c6",
      "url": "https://localhost.com/css",
      "scan_type": "Directory",
      "complete": false
    }
  ],
  "config": {
    "wordlist": "/wordlists/seclists/Discovery/Web-Content/common.txt",
    "...": "..."
  },
  "responses": [
    {
      "type": "response",
      "url": "https://localhost.com/Login",
      "path": "/Login",
      "wildcard": false,
      "status": 302,
      "content_length": 0,
      "line_count": 0,
      "word_count": 0,
      "headers": {
        "content-length": "0",
        "server": "nginx/1.16.1"
      }
    }
  ]
},
Based on the example image above, the same scan can be resumed by using feroxbuster --resume-from ferox-http_localhost-1606947491.state. Directories that were already complete are not rescanned, however partially complete scans are started from the beginning.
In order to prevent state file creation when Ctrl+C is pressed, you can simply add the entry below to your ferox-config.toml.
# ferox-config.toml

save_state = false
Enforce a Time Limit on Your Scan (new in v1.10.0)
Version 1.10.0 adds the ability to set a maximum runtime, or time limit, on your scan. The usage is pretty simple: a number followed directly by a single character representing seconds, minutes, hours, or days. feroxbuster refers to this combination as a time_spec.
Examples of possible time_specs:
30s– 30 seconds20m– 20 minutes1h– 1 hour1d– 1 day (why??)
A valid time_spec can be passed to --time-limit in order to force a shutdown after the given time has elapsed.
Extract Links from robots.txt (New in v1.10.2)
In addition to extracting links from the response body, using --extract-links makes a request to /robots.txt and examines all Allow and Disallow entries. Directory entries are added to the scan queue, while file entries are requested and then reported if appropriate.
Filter Response by Similarity to A Given Page (fuzzy filter) (new in v1.11.0)
Version 1.11.0 adds the ability to specify an example page for filtering pages that are similar to the given example.
For example, consider a site that attempts to redirect new users to a /register endpoint. The /register page has a CSRF token that alters the page’s response slightly with each new request (sometimes affecting overall length). This means that a simple line/word/char filter won’t be able to filter all responses. In order to filter those redirects out, one could use a command like this:
./feroxbuster -u https://somesite.xyz --filter-similar-to https://somesite.xyz/register
--filter-similar-to requests the page passed to it via CLI (https://somesite.xyz/register), after which it hashes the response body using the SSDeep algorithm. All subsequent pages are hashed and compared to the original request’s hash. If the comparison of the two hashes meets a certain percentage of similarity (currently 95%), then that request will be filtered out.
SSDeep was selected as it does a good job of identifying near-duplicate pages once content-length reaches a certain size, while remaining performant. Other algorithms were tested but resulted in huge performance hits (orders of magnitude slower on requests/second).
NOTE
- SSDeep/
--filter-similar-todoes not do well at detecting similarity of very small responses- The lack of accuracy with very small responses is considered a fair trade-off for not negatively impacting performance
- Using a bunch of
--filter-similar-tovalues may negatively impact performance
Cancel a Recursive Scan Interactively (new in v1.12.0)
Version 1.12.0 expanded the pause/resume functionality introduced in v1.4.0 by adding an interactive menu from which currently running recursive scans can be cancelled, without affecting the overall scan. Scans can still be paused indefinitely by pressing ENTER, however, the
Scans that are started via -u or passed in through --stdin cannot be cancelled, only scans found via --extract-links or recursion are eligible.
Below is an example of the Scan Cancel Menu™.
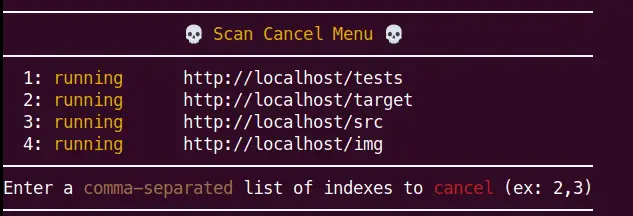
Using the menu is pretty simple:
- Press
ENTERto view the menu - Choose a scan to cancel by entering its scan index (
1)- more than one scan can be selected by using a comma-separated list (
1,2,3… etc)
- more than one scan can be selected by using a comma-separated list (
- Confirm selections, after which all non-cancelled scans will resume
Here is a short demonstration of cancelling two in-progress scans found via recursion.

Comparison w/ Similar Tools
There are quite a few similar tools for forced browsing/content discovery. Burp Suite Pro, Dirb, Dirbuster, etc… However, in my opinion, there are two that set the standard: gobuster and ffuf. Both are mature, feature-rich, and all-around incredible tools to use.
So, why would you ever want to use feroxbuster over ffuf/gobuster? In most cases, you probably won’t. ffuf in particular can do the vast majority of things that feroxbuster can, while still offering boatloads more functionality. Here are a few of the use-cases in which feroxbuster may be a better fit:
- You want a simple tool usage experience
- You want to be able to run your content discovery as part of some crazy 12 command unix pipeline extravaganza
- You want to scan through a SOCKS proxy
- You want auto-filtering of Wildcard responses by default
- You want an integrated link extractor/robots.txt parser to increase discovered endpoints
- You want recursion along with some other thing mentioned above (ffuf also does recursion)
- You want a configuration file option for overriding built-in default values for your scans
| feroxbuster | gobuster | ffuf | |
|---|---|---|---|
| fast | |||
| easy to use | |||
| allows recursion | |||
| can specify query parameters | |||
| SOCKS proxy support | |||
| multiple target scan (via stdin or multiple -u) | |||
| configuration file for default value override | |||
| can accept urls via STDIN as part of a pipeline | |||
| can accept wordlists via STDIN | |||
| filter based on response size, wordcount, and linecount | |||
| auto-filter wildcard responses | |||
| performs other scans (vhost, dns, etc) | |||
| time delay / rate limiting | |||
extracts links from response body to increase scan coverage (v1.1.0) | |||
limit number of concurrent recursive scans (v1.2.0) | |||
filter out responses by status code (v1.3.0) | |||
interactive pause and resume of active scan (v1.4.0) | |||
replay only matched requests to a proxy (v1.5.0) | |||
filter out responses by line & word count (v1.6.0) | |||
json output (ffuf supports other formats as well) (v1.7.0) | |||
filter out responses by regular expression (v1.8.0) | |||
save scan’s state to disk (can pick up where it left off) (v1.9.0) | |||
maximum run time limit (v1.10.0) | |||
use robots.txt to increase scan coverage (v1.10.2) | |||
use example page’s response to fuzzily filter similar pages (v1.11.0) | |||
cancel a recursive scan interactively (v1.12.0) | |||
| huge number of other options |
Of note, there’s another written-in-rust content discovery tool, rustbuster. I came across rustbuster when I was naming my tool (![]() ). I don’t have any experience using it, but it appears to be able to do POST requests with an HTTP body, has SOCKS support, and has an 8.3 shortname scanner (in addition to vhost dns, directory, etc…). In short, it definitely looks interesting and may be what you’re looking for as it has some capability I haven’t seen in similar tools.
). I don’t have any experience using it, but it appears to be able to do POST requests with an HTTP body, has SOCKS support, and has an 8.3 shortname scanner (in addition to vhost dns, directory, etc…). In short, it definitely looks interesting and may be what you’re looking for as it has some capability I haven’t seen in similar tools.
 Common Problems/Issues (FAQ)
No file descriptors available
Why do I get a bunch of No file descriptors available (os error 24) errors?
There are a few potential causes of this error. The simplest is that your operating system sets an open file limit that is aggressively low. Through personal testing, I’ve found that 4096 is a reasonable open file limit (this will vary based on your exact setup).
There are quite a few options to solve this particular problem, of which a handful are shown below.
Increase the Number of Open Files
We’ll start by increasing the number of open files the OS allows. On my Kali install, the default was 1024, and I know some MacOS installs use 256 ![]() .
.
Edit /etc/security/limits.conf
One option to up the limit is to edit /etc/security/limits.conf so that it includes the two lines below.
*represents all usershardandsoftindicate the hard and soft limits for the OSnofileis the number of open files option.
/etc/security/limits.conf
-------------------------
...
*        soft nofile 4096
*        hard nofile 8192
...
Use ulimit directly
A faster option, that is not persistent, is to simply use the ulimit command to change the setting.
ulimit -n 4096Additional Tweaks (may not be needed)
If you still find yourself hitting the file limit with the above changes, there are a few additional tweaks that may help.
This section was shamelessly stolen from this stackoverflow answer. More information is included in that post and is recommended reading if you end up needing to use this section.
![]() Special thanks to HTB user @sparkla for their help with identifying these additional tweaks
Special thanks to HTB user @sparkla for their help with identifying these additional tweaks ![]()
Increase the ephemeral port range, and decrease the tcp_fin_timeout.
The ephermal port range defines the maximum number of outbound sockets a host can create from a particular I.P. address. The fin_timeout defines the minimum time these sockets will stay in TIME_WAIT state (unusable after being used once). Usual system defaults are
net.ipv4.ip_local_port_range = 32768 61000net.ipv4.tcp_fin_timeout = 60
This basically means your system cannot consistently guarantee more than (61000 - 32768) / 60 = 470 sockets per second.
sudo sysctl net.ipv4.ip_local_port_range="15000 61000"
sudo sysctl net.ipv4.tcp_fin_timeout=30
Allow socket reuse while in a TIME_WAIT status
This allows fast cycling of sockets in time_wait state and re-using them. Make sure to read post Coping with the TCP TIME-WAIT from Vincent Bernat to understand the implications.
sudo sysctl net.ipv4.tcp_tw_reuse=1 Progress bars print one line at a time
feroxbuster needs a terminal width of at least the size of what’s being printed in order to do progress bar printing correctly. If your width is too small, you may see output like what’s shown below.
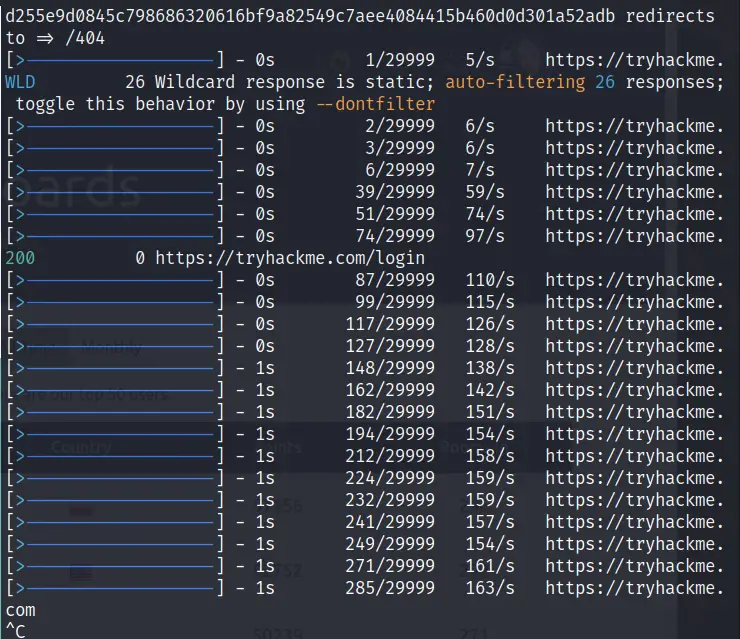
If you can, simply make the terminal wider and rerun. If you’re unable to make your terminal wider consider using -q to suppress the progress bars.
What do each of the numbers beside the URL mean?
Please refer to this section where each number’s meaning and how to use it to filter responses is discussed.
Connection closed before message completed
The error in question can be boiled down to ‘networking stuff’. feroxbuster uses reqwest which uses hyper to make requests to the server. This issue report to the hyper project explains what is happening (quoted below to save you a click). This isn’t a bug so much as it’s a target-specific tuning issue. When lowering the -t value, the error doesn’t occur (or happens much less frequently).
This isn’t a bug. Simply slow down the scan. A -t value of 50 was chosen as a sane default that’s still quite fast out of the box. However, network related errors may occur when the client and/or server become over-saturated. The Threads and Connection Limits At A High-Level section details how to accomplish per-target tuning.
This is just due to the racy nature of networking.
hyper has a connection pool of idle connections, and it selected one to send your request. Most of the time, hyper will receive the server’s FIN and drop the dead connection from its pool. But occasionally, a connection will be selected from the pool and written to at the same time the server is deciding to close the connection. Since hyper already wrote some of the request, it can’t really retry it automatically on a new connection, since the server may have acted already.
SSL Error routines:tls_process_server_certificate:certificate verify failed
In the event you see an error similar to
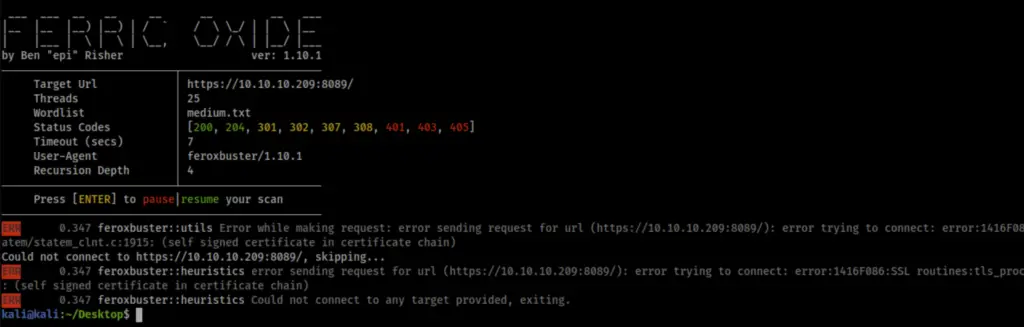
error trying to connect: error:1416F086:SSL routines:tls_process_server_certificate:certificate verify failed:ssl/statem/statem_clnt.c:1913: (self signed certificate)You just need to add the -k|--insecure flag to your command.
feroxbuster rejects self-signed certs and other “insecure” certificates/site configurations by default. You can choose to scan these services anyway by telling feroxbuster to ignore insecure server certs.